How to livestream: An Essential Handbook for Mastering Live Streaming
"Livestream: Where do I even begin?" Without a basic understanding of how livestreaming works, getting started can be intimidating. Whether you want to start streaming using more than just your webcam or smartphone, understand the fundamental components of online video streaming, or quickly learn the basics of livestreaming, you've landed on the right page.
What you'll need to start livestream
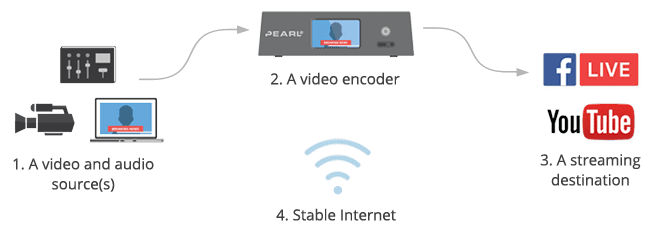
1. Video and audio source(s)
Video data coming from a camera during a live stream is referred to as a video source. Similarly, audio data is known as an audio source. A basic setup may include a single video and audio source, while a more intricate one might involve multiple audio and video sources. Different combinations of video and audio sources are known as "scenes" or "layouts," such as full-screen, picture-in-picture, or side-by-side layouts. The video source(s) for a live stream could be from the following:
- DSLR camera
- Camcorder
- Computer screen
- Webcam
- PTZ camera
- Phone or tablet camera
2. Video encoder
An encoder translates the video signal for the Internet. It is a piece of software that compresses and converts the incoming audio-video signal into a digital, web-friendly format. You need an encoder because most video sources are not ready for livestreaming. Video cameras are designed for recording large and bulky video files, not for streaming in real-time.
Today, you have the choice of going live from three types of encoding devices: a mobile phone or tablet, a computer with streaming software installed, or a dedicated hardware encoder. While a mobile phone may serve as an all-in-one video source and encoding device, its live production capabilities are extremely limited. Let's focus on the encoding tools that can handle more professional live streams, with the ability to add multiple cameras and layouts.
The Most important encoder settings
Both software and hardware encoders have similar variable settings that affect your live stream. Here are the most important ones:
- Frame rate: This refers to how many frames per second are displayed. The common inputs are 10 fps (outrageously low, infuriating to the human eye frame rate), 24 fps, 30 fps (standard for digital video), and 60 fps (beautiful and lifelike).
- Output resolution: Size of video frame, width x height, in pixels. The most common resolution sizes used today are 720p and 1080p. Here are some common resolution names and their aliases:
Resolution shorthand | Dimensions, in pixels | Also referred to as |
480p | 858×480 | SD or Standard Definition |
720p | 1280 x 720 | HD or "HD Ready" |
1080p | 1920 x 1080 | FHD or "Full HD" |
1440p | 2560 x 1440 | QHD or Quad HD resolution |
4K or 2160p | 3840 x 2160 | UHD or Ultra HD resolution |
- Bitrate: How much video data you are uploading, per second. Generally expressed in kilobits per second (Kbps), although megabits per second (Mbps) are also sometimes used. That's Kbps divided by roughly 1000.
The general value range for bitrate is 1000-8000 Kbps. Common values are 1000 Kbps (absolute minimum for livestream), 2500 Kbps, 3000 Kbps, and 5000 Kbps. The bitrate depends on frame rate and resolution: the higher the frame rate and resolution, the higher the bitrate needs to be for a smooth, high-quality livestream.
- Codec: Refers to the method of compressing (encoding) audio and video data for faster transmission. H.264 is the most common one.
In order to achieve a good stream, it's important to maintain a balance between bitrate, frame rate, and output resolution. The maximum settings you can use depends largely on the type of encoder you use and your Internet bandwidth. For example, with sufficient bandwidth, a hardware encoder like Pearl-2 can stream 1080p resolution at 60 fps without skipping a beat, whereas an older computer with streaming software may struggle, dropping frames and causing buffering even with sufficient bandwidth.
3. Streaming destination
A streaming destination refers to an online site, platform, or app where your live video is accessible to others. These destinations are commonly known as content delivery networks (CDNs). Popular free CDNs include platforms such as YouTube, Facebook Live, Twitch, and others. There are also paid streaming platforms that offer more control over how your live stream is presented, who can view it, and whether or how it can be monetized. CDNs like Vimeo, Vimeo Livestream, Dacast, and StreamShark offer various monthly plans. The costs depend on the amount of data in gigabytes that you upload. Whether free or paid, you will need to sign up and log into the CDN of your choice. Some platforms, such as YouTube, may require you to go through additional steps and wait for 24 hours before you can start livestream.
4. Stable Internet connection
To ensure a stable livestream, using a hardwired, dedicated Ethernet line provides the most reliable connection. While Wi-Fi or cellular (4G/LTE) Internet can also be used, they are prone to signal fluctuations. Performing a speed test before going live is crucial. We recommend having at least 1.5 times your stream's bitrate available to accommodate potential network fluctuations. For instance, if your stream has a bitrate of 5 Mbps, make sure you have a minimum upload bandwidth of 7.5 Mbps for a dependable livestream.
What does livestream work on a technical level?
Here are the main steps that occur in the livestream:
1. Compression
The next step in processing the video data is compressing and encoding it. This involves removing redundant visual information to reduce the file size. For example, if the first frame of a video shows a person speaking against a gray background, subsequent frames with the same background do not need to include the gray background again.
Video compression can be compared to adding new furniture to a living room. Every time a new chair or coffee table is added, there's no need to buy a whole new set of furniture. Instead, the room layout can largely stay the same, with only one piece changed at a time, and occasionally a larger rearrangement if necessary. Similarly, not every frame of a video stream needs to be completely re-rendered, only the parts that change between frames, such as the movement of a person's mouth.
2. Encoding
"Encoding" refers to the process of converting data into a new format. livestream video data is encoded into interpretable digital formats that various devices can recognize. Common video encoding standards include: H.264/H.265/VP9/AV1 .
3. Segmentation
Video files contain a large amount of digital data, so it takes longer to download them compared to shorter files like PDFs or images. To make it possible to send video data over the Internet without major delays, streaming video is divided into small segments, each lasting a few seconds.
4. Content Delivery Network (CDN) Distribution
Once the live stream is segmented, compressed, and encoded (all processes take just a few seconds), it needs to be delivered to the thousands or millions of viewers who want to watch. In order to maintain high quality with minimal latency and deliver the stream to multiple viewers in different locations, it needs to be distributed by a CDN.
A CDN is a distributed network of servers that cache and deliver content on behalf of the origin server. Using a CDN results in faster performance because user requests no longer need to travel to the origin server, but can be handled by a nearby CDN server. Handling requests and delivering content in this way also reduces the load on the origin server. Finally, because CDN servers are located all over the world, rather than concentrated in a single geographic area, a CDN can efficiently deliver content to users worldwide.
5. Decoding & Video Playback
The Content Delivery Network (CDN) distributes the live stream to all users who are watching. Each user's device gets the segmented video data, decodes and decompresses it. Then, the media player on the user's device, which could be a dedicated app or a video player within a browser, interprets the data as visual information and plays the video.
How to livestream on YouTube
Going livestream on YouTube is simple. You just need a free channel and get it verified, which usually takes less than 24 hours.
1. Create a YouTube channel
To start livestream on YouTube, you need to have a YouTube channel. If you don't have one, you'll need to create a YouTube (or Google) account first.
- First, sign in to your YouTube account.
- Once you're signed in to YouTube, click on your avatar in the upper-right corner and select the "My channel" option to create a new channel.
- If you have multiple YouTube channels, you can switch between them here. You can also create an account for your brand or pick a Brand Account if you've been added to one as a manager.
2. Enable live streaming on YouTube
Now that you have a channel, you can start uploading videos. But it takes a few more steps to enable live streaming on your channel.

- Sign in to your YouTube account and click the "Create icon" at the top.
- Click "Go Live".
- Verify your channel and wait for up to 24 hours for live streaming to be enabled.
3. Choose how you want to livestream on YouTube
You can broadcast live videos on YouTube in three ways:
- Mobile: You can use your mobile device for streams while on the go for vlogs and updates. Keep in mind that you need at least 1,000 subscribers to your channel to go live from YouTube's mobile app.
- Encoder: By using an encoder (or streaming software), you can have more control over your live stream. The setup is a bit more complicated than mobile or webcam streaming, but once you get the hang of it, you can produce higher-quality streams. You should choose this option if you want to share your screen or use multiple cameras.
- Webcam: YouTube has a live streaming studio that you can launch from your web browser, which connects to your computer's webcam. This is a quick and easy way to start streaming, although you have less control over the quality of your stream than if you use an encoder.
4. Examine All
Before you start livestream, it's important to check the following things:
- Upload speed: Make sure you know your streaming upload speed in advance and test for any potential speed issues, such as peer-to-peer connections or too many devices on the network.
- Gear connectivity: Test your stream in private mode and troubleshoot any problems with how your camera, microphone, or other equipment is connected to your setup.
- The script (or any other guidelines for the stream): Ensure that all parties involved agree on the script for the live stream, especially if you are streaming with another brand.
How to livestream on Facebook
Remember that Facebook Live videos are public, so anyone with access to Facebook can watch them on any device, even without an account. Users have the option to livestream on Facebook from a profile, a page, a group, or an event. The process for starting a livestream from the app differs from using a web browser, so make sure to refer to the specific instructions for each method.
1. How to livestream on Facebook From the Facebook App
- Go to the profile, page, group, or event where you want to go live.
- Tap "What's on your mind?" or Create post.
- Click "Live video" in the post options.
- Tap "Where it says" to add a description about the video. You can also tag friends or other pages, a location, or a feeling/activity.
- Use the buttons on the bottom to configure the settings and any features or tools you want to use during the stream.
- Tap "Start Live Video" when you are ready, and Finish to end it.
2. How to livestream on Facebook From a Web Browser
To go livestream on Facebook from a web browser, you can use Live Producer. With Live Producer, you have the option to stream live with your computer's built-in camera or use an external camera and streaming software (also known as an encoder).
Here are the steps to going livestream on Facebook from a web browser.
- On your Facebook homepage, look for the "Live" or "Live Video" option. If you are on a profile, you'll find it under "What's on your mind?" The icon is a red camera.
- Choose to simply "Go live" or to "Create live video event".
- Then, choose details for your video. These include a start time, a title and description, who to invite as a co-host, and various audio and video controls.
- Click "Go Live" in the bottom left corner when you are ready.
How to livestream on TikTok
Here's how to go livestream on TikTok if you have access to the platform's live streaming capabilities.
- Tap the "Create icon" on the home screen (that's the plus sign on the bottom of the screen).
- Swipe left all the way to "LIVE" in the bottom navigation, pick an image, and write a title for your stream. Remember: The title and cover image need to entice folks to click on your video, so make sure they grab your viewer's attention!
- Once you're ready, press "GO LIVE" to start your stream. It will count you down from 3 and then boom! You're live!
- Once you're live, you can tap the "three dots" to access settings and features. Here, you can flip your camera, add effects, filter comments, and add up to 20 moderators.
- When you're ready to wrap up, tap the "X" in the top-left corner to end your TikTok live stream.
Tencent MPS Stream
Tencent MPS Stream is a powerful service that significantly enhances live stream experiences. It provides a comprehensive solution for users to broadcast high-quality live streams across various platforms such as Youtube, Facebook, TikTok, and more.
By leveraging Tencent MPS Stream, users can effortlessly manage and control their live streams. The service offers real-time video processing, which ensures the delivery of smooth, high-definition content. This is particularly beneficial for users who want to maintain professional standards in their live streams.
Moreover, Tencent MPS Stream supports transcoding, which means it can convert the live stream to different formats suitable for various platforms. This feature is crucial for users who wish to broadcast their content on multiple platforms simultaneously.
Additionally, Tencent MPS Stream provides a robust CDN (Content Delivery Network) that ensures fast and reliable delivery of live streams to viewers around the world. This helps in reducing buffering and latency issues, thereby providing a seamless viewing experience.
In summary, Tencent MPS Stream is a comprehensive solution that helps users to broadcast high-quality live streams on various platforms. It not only ensures the delivery of smooth, high-definition content but also provides a reliable and fast delivery network, making livestream an enjoyable experience for both broadcasters and viewers. If you need more information, please feel free to contact us.