

Audio/Video Transcoding Integration
Last updated: 2026-06-01 10:35:18Download PDF
I. Audio/Video Transcoding Feature Overview
Overview
Audio/video transcoding is the process of converting the original audio/video bitrate stream into another audio/video bitrate stream, and it is an offline task. Through transcoding, parameters such as the encoding format, resolution, and bitrate of the original bitrate stream can be changed to adapt to playback on different terminals and in different network environments. For an explanation of various types of transcoding, see the table below.
Applicable Input Source | Transcoding Type | Description |
Video | Standard video transcoding | It can reduce the video bitrate and change the parameters of the original bitrate stream such as the encoding standard, resolution, and frame rate, thereby adapting to playback on different terminals and in different network environments. |
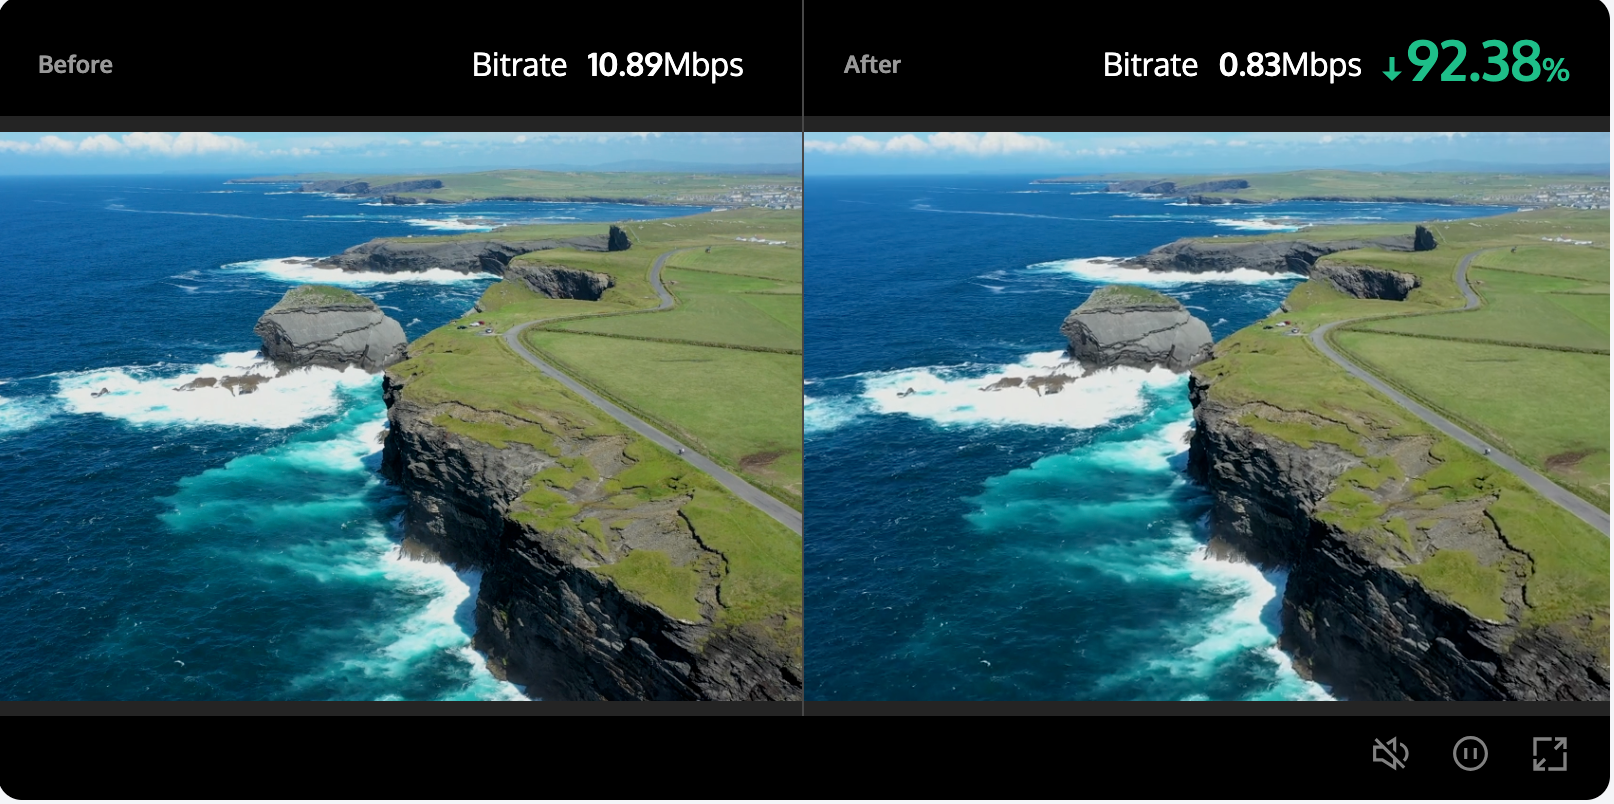
| TSC transcoding | Top speed codec (TSC) transcoding is an "upgraded" feature of standard video transcoding. It can perform adaptive optimization processing on different types of videos, delivering higher-definition viewing experiences to users with lower bandwidth consumption. While maintaining or even enhancing the image quality, it reduces bandwidth costs by more than 50%. |
| Adaptive bitrate stream for videos | Convert the input source video file into multiple bitrate streams suitable for playback in different scenarios, allowing users to select a video with a suitable bitrate for playback based on their network conditions, thereby enhancing the user experience. |
| Remux | It can change the encapsulation format of the source video file. |
Audio | Standard audio transcoding | It can reduce the audio bitrate and change parameters such as the encoding standard, sampling rate, and sound channel, thereby adapting to playback on different terminals and in different network environments. |
| TSC transcoding for audio | TSC transcoding for audio is an "upgraded" feature of standard audio transcoding. It can perform adaptive optimization processing on different types of audio, delivering higher-definition listening experiences to users with lower bandwidth consumption. |
| Adaptive bitrate stream for audio | It can convert the input source audio file into multiple bitrate streams suitable for playback in different scenarios, thereby adapting to different network conditions and enhancing the user experience. |
Technical Strengths
Within the industry, Tencent Cloud MPS supports the most comprehensive audio/video encoding standard compression. It provides multiple transcoding methods such as TSC transcoding, adaptive bitrate stream transcoding, Remux, and audio transcoding. With distributed transcoding supporting up to 30+ times speed, it helps reduce playback bandwidth consumption and costs.
Comprehensive Encoding Method, Reducing the Bitrate by More Than 50%
Provide comprehensive encoding methods (such as VP8, H.264, VP9, H.265, AV1, AVS3, and H.266), which can significantly reduce the bitrate without quality loss, saving playback bandwidth and storage costs.
Superior Image Quality and Crystal-Clear View
By using intelligent dynamic encoding technology, TSC delivers a superior viewing effect while reducing the bitrate. Compared to open-source encoders, the VMAF score increases by 3 to 5 points. It supports real-time encoding for high-resolution videos up to 8K, integrating advanced technologies such as super-resolution, HDR, and expanded color gamut. Moreover, it was one of the first in China to support Dolby Vision/Dolby Atmos, providing an exceptionally clear viewing experience.
Note:
How to Use the Audio/Video Transcoding Feature
(1) Precautions Before Use
Before using the audio/video transcoding feature, you need to complete the following preliminary operations: registration/login for a Tencent Cloud account; activation and authorization of the COS service. For a specific operation guide, see Getting Started. For account authorization issues, see Account Authorization.
(2) Creating Audio/Video Transcoding Tasks
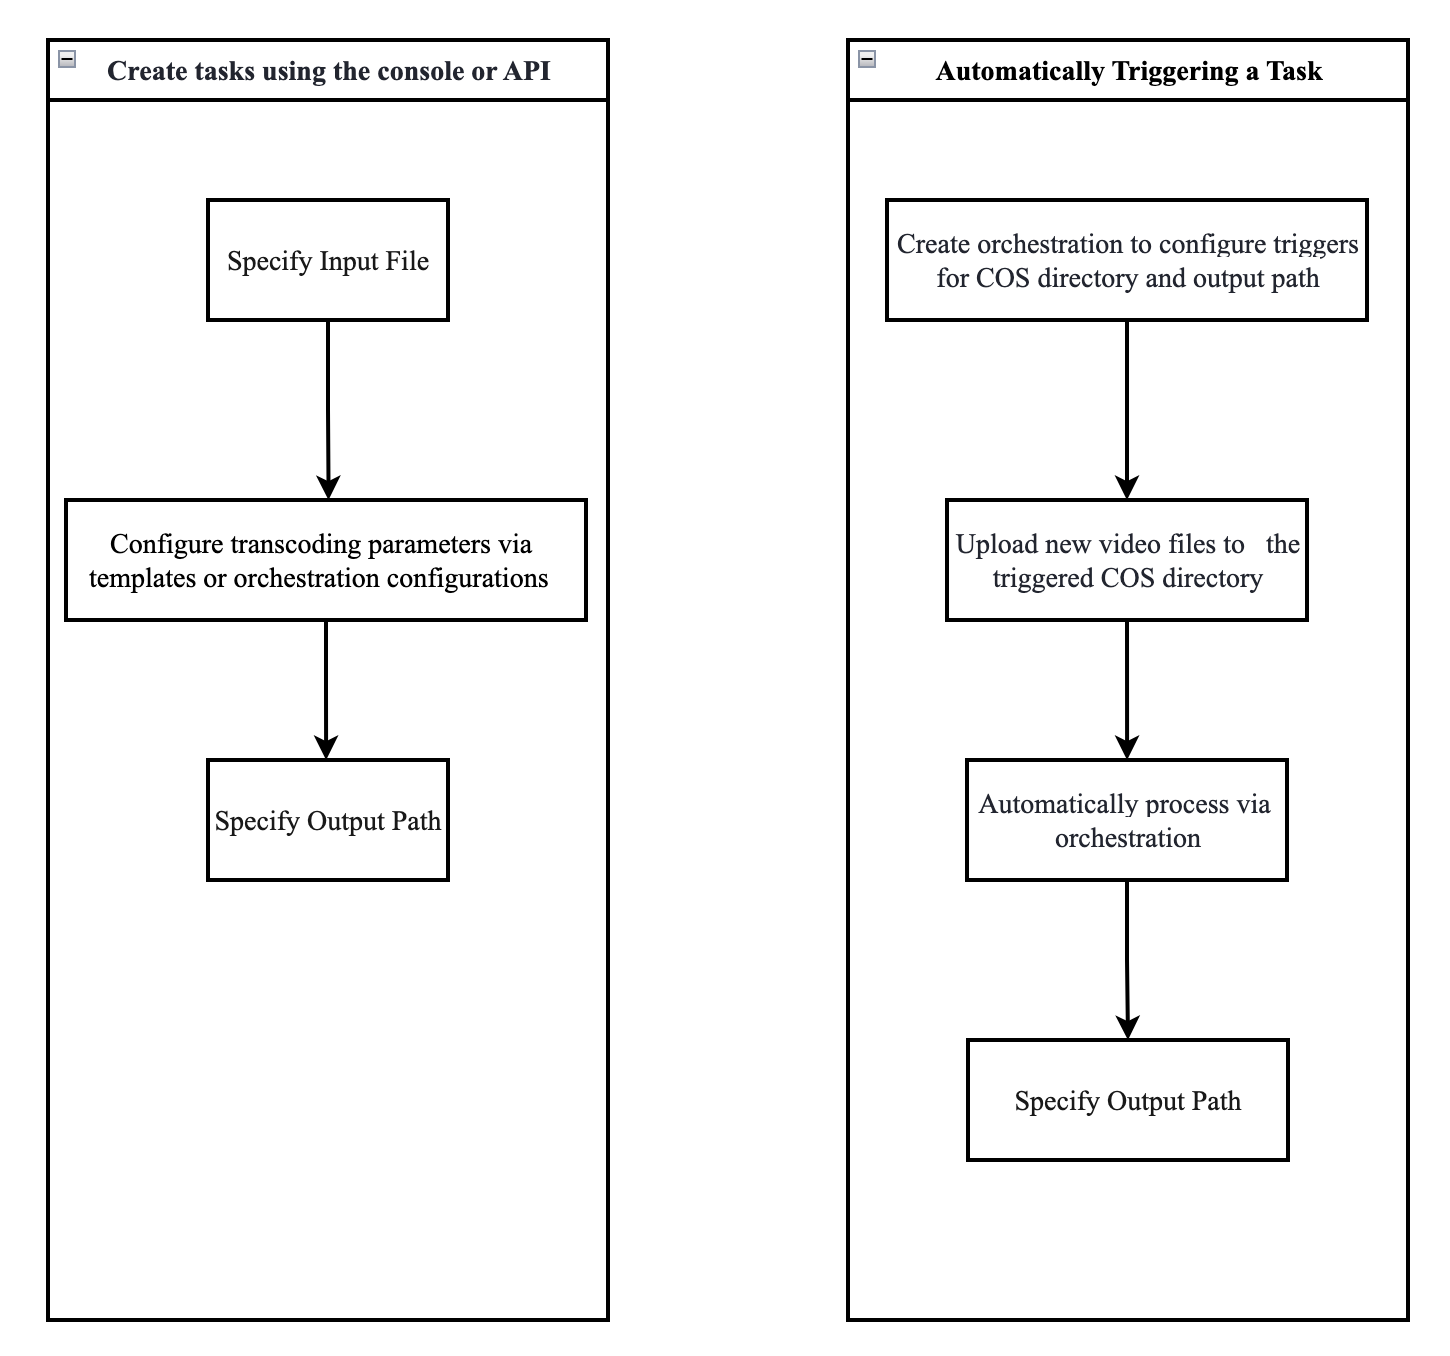
Tencent Cloud MPS provides three task initiation methods: quickly creating tasks through the console, initiating tasks through the API, and automatically triggering tasks. The following flowchart shows the general operation process for each task initiation method. To learn about the specific configuration methods for audio/video transcoding tasks, see the detailed instructions in the Creating Audio/Video Transcoding Tasks section below.
II. Creating Audio/Video Transcoding Tasks
Method 1. Initiating a Zero-Code Task from the Console
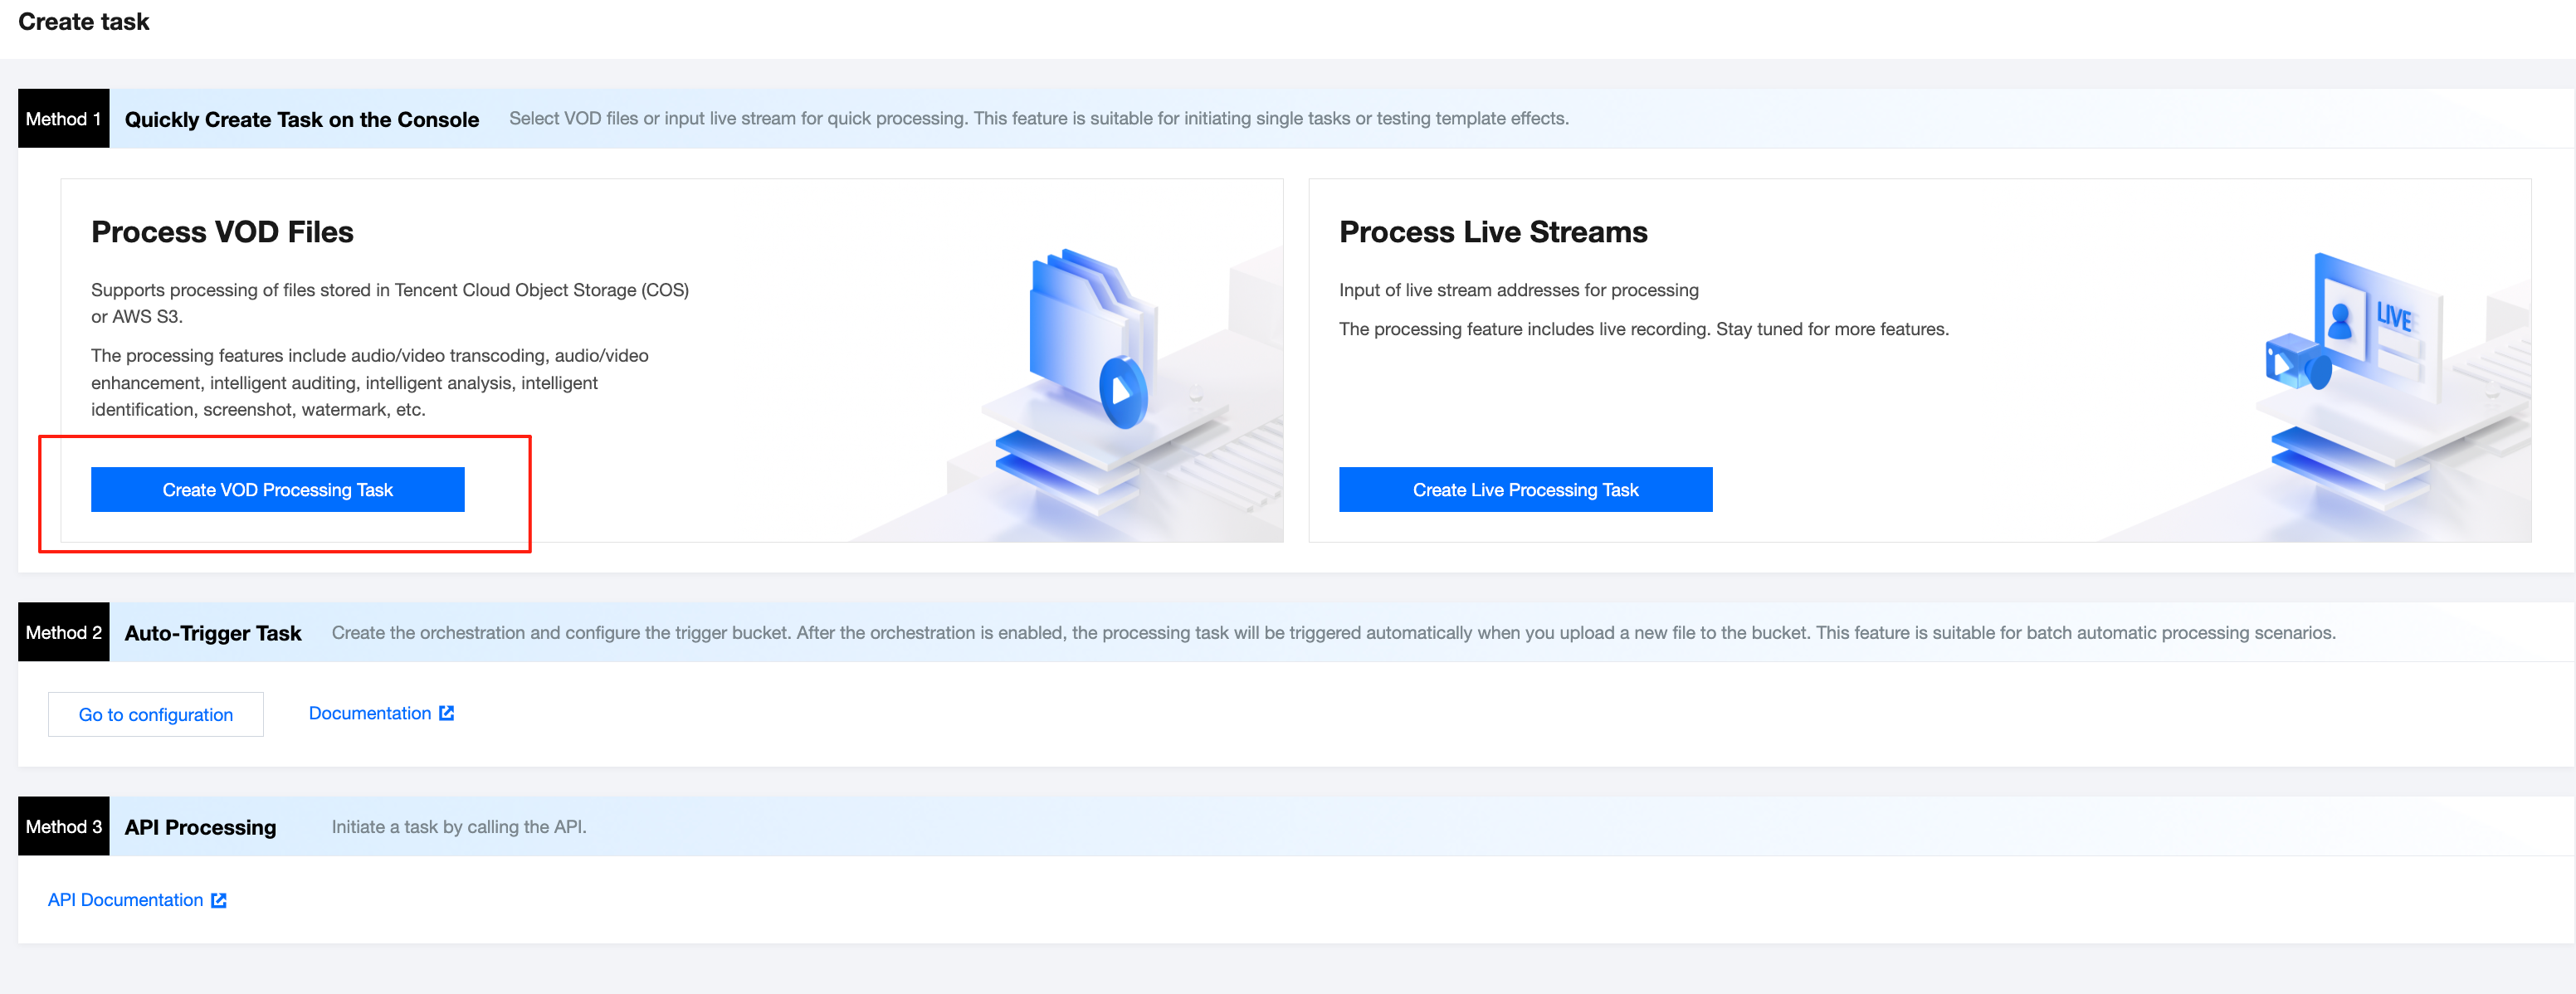
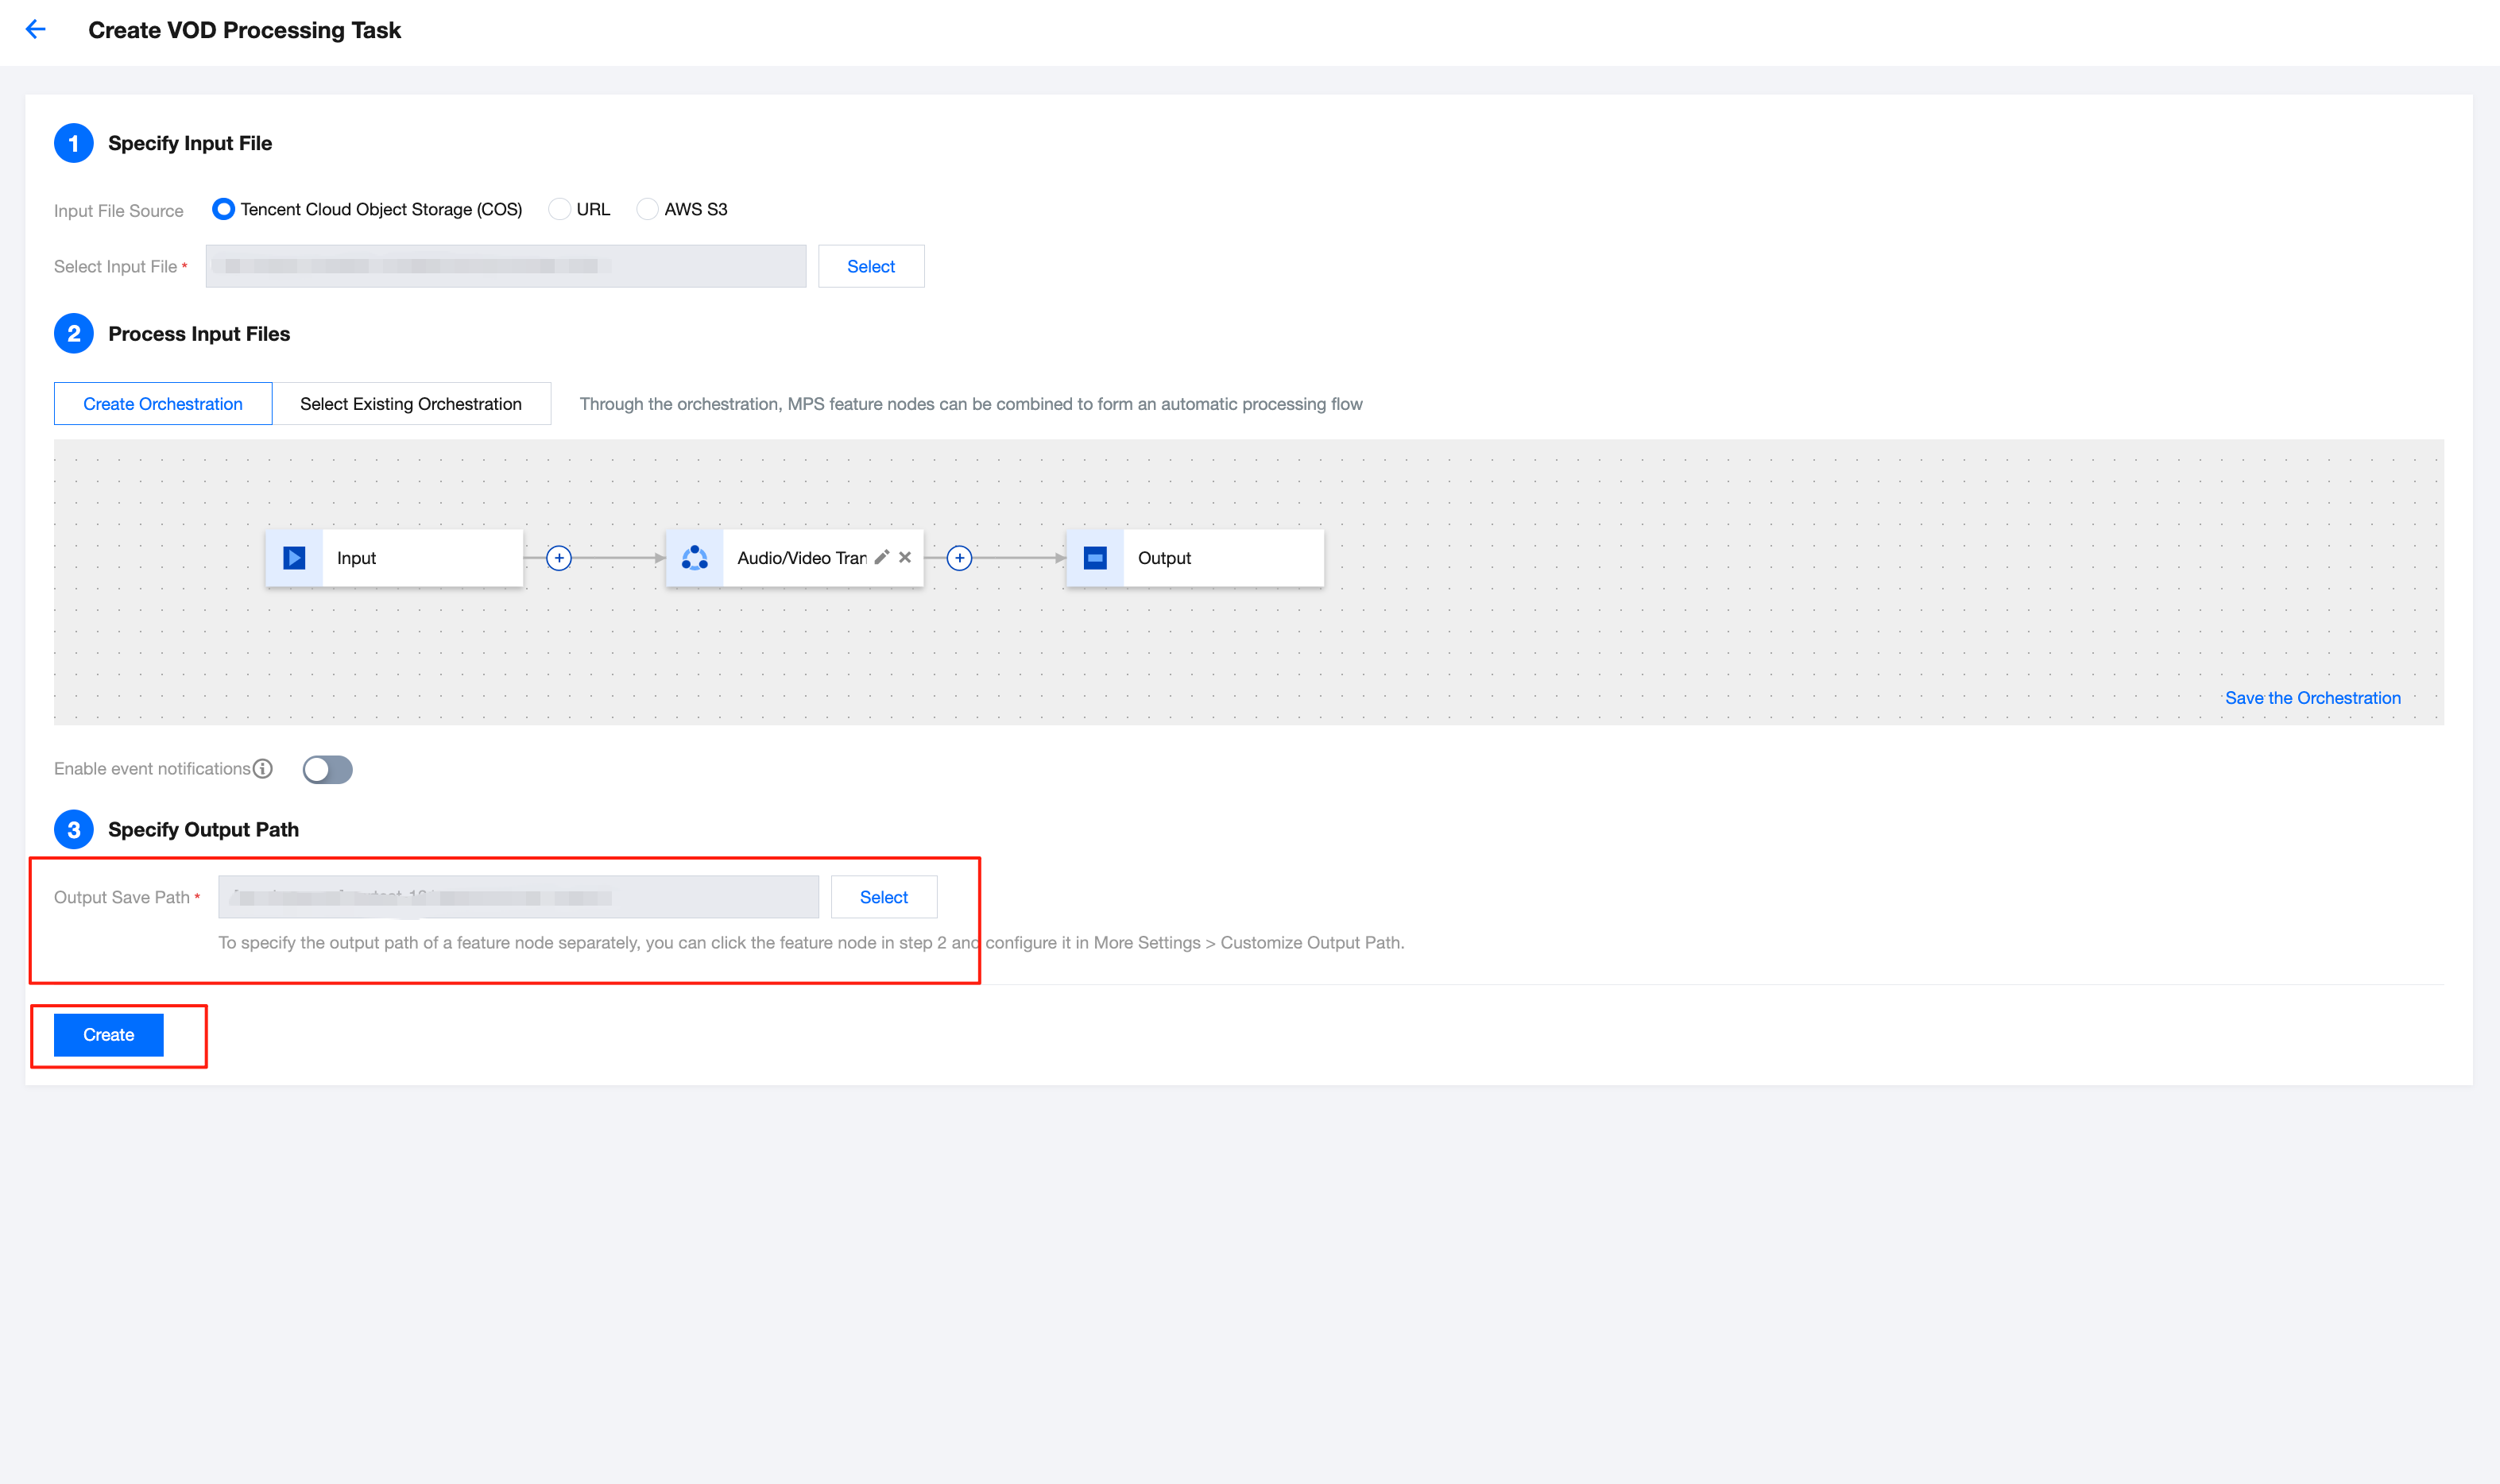
1. Go to the Media Processing Service console, and then click Create Task > Create VOD Processing Task.
2. First, specify the input video file. You can select audio/video files from a COS or AWS S3 bucket, or provide a file download URL.
3. Then, in the step "Select Input File", add a Audio/Video Transcoding node.
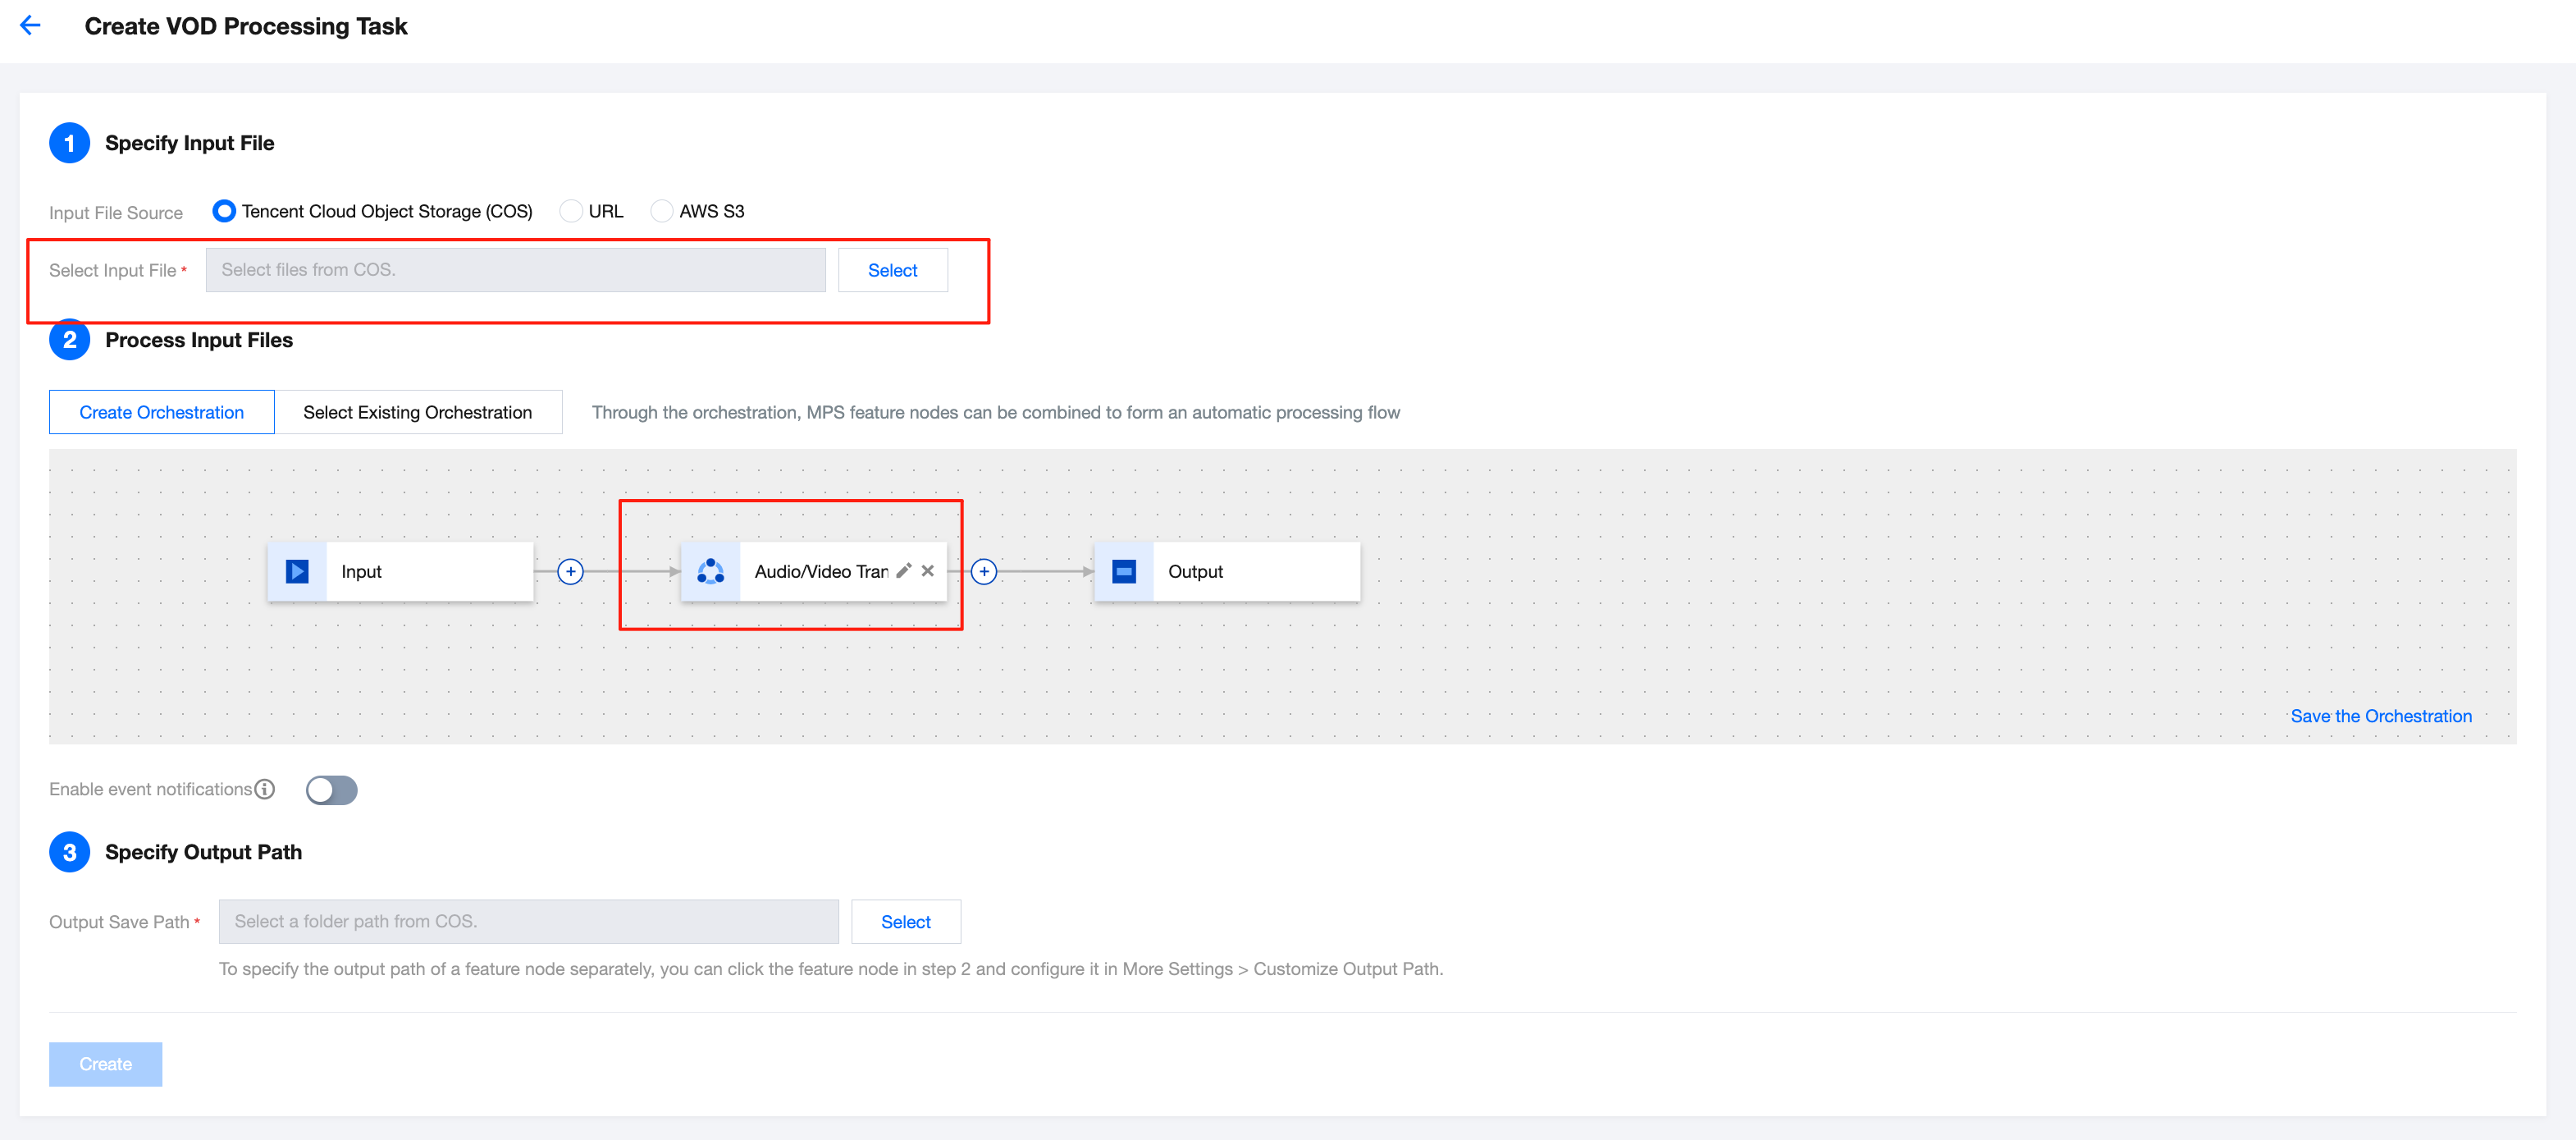
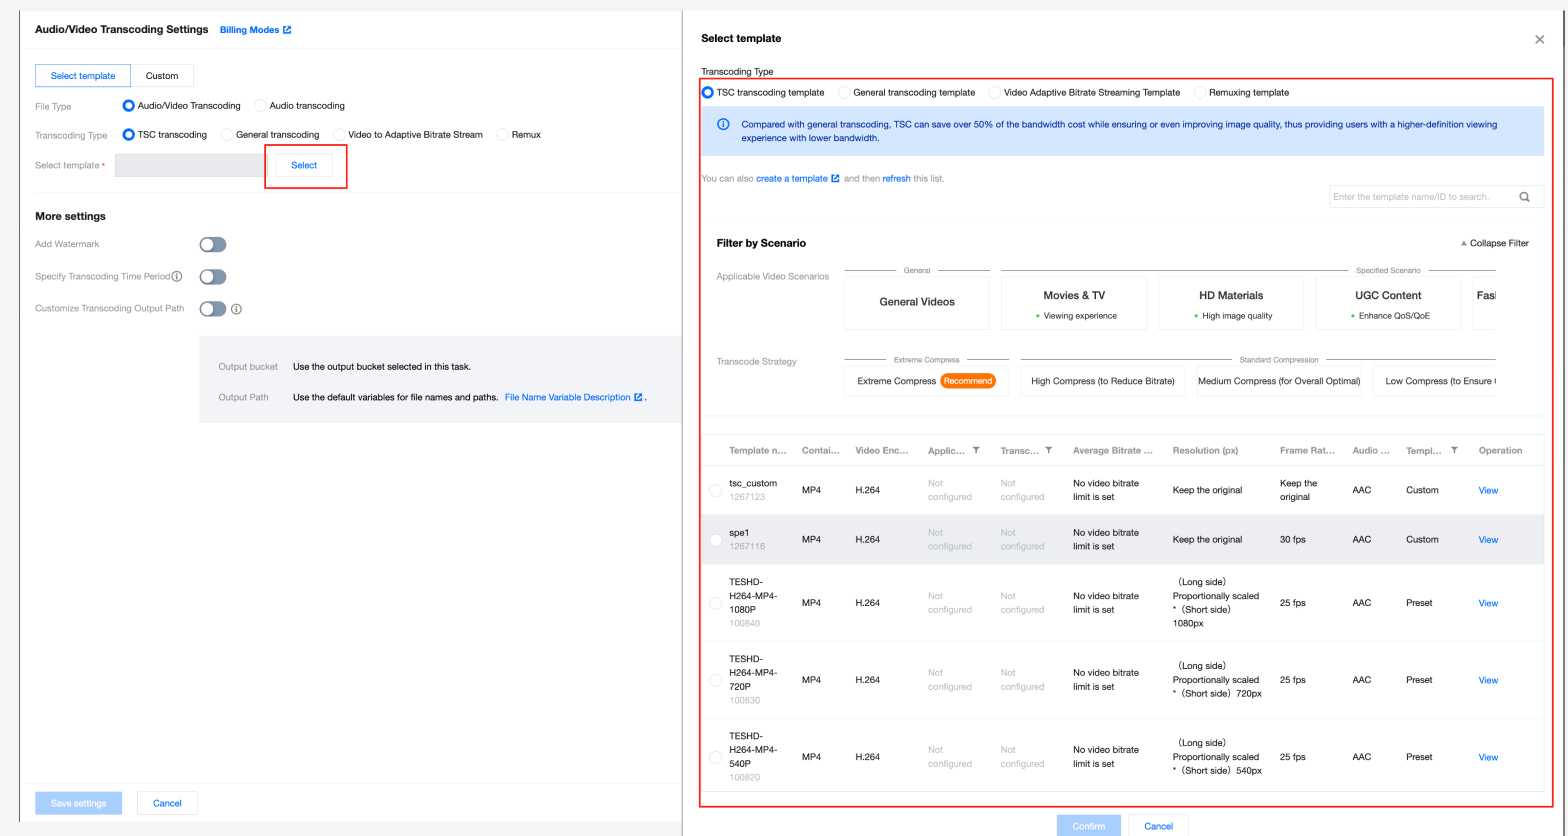
4. In the Audio/Video Enhancement Settings pop-up window, select the required audio/video transcoding template or custom transcoding parameters. For detailed template parameter configuration instructions, see Audio/Video Transcoding Template.
5. Finally, after specifying the output video storage path, click Create to initiate the task.
Method 2. Initiating a Task via the API
Method (1): Call the ProcessMedia API to initiate a task by specifying the Template ID. Example:
{"InputInfo": {"Type": "URL","UrlInputInfo": {"Url": "https://test-1234567.cos.ap-guangzhou.myqcloud.com/video/test.mp4"// Replace it with the video URL to be processed.}},"OutputStorage": {"Type": "cos","CosOutputStorage": {"Bucket": "test-1234567","Region": "ap-guangzhou"}},"MediaProcessTask": {"TranscodeTaskSet": [{"Definition": 100800//100800 is the preset template ID for video transcoding. It can be replaced with your custom audio/video transcoding template ID.}]}}
Method (2): Call the ProcessMedia API to initiate a task by specifying the Orchestration ID (for orchestration creation instructions, see the Automatic Trigger section below or see the VOD Orchestration documentation). Example:
{"InputInfo": {"Type": "COS","CosInputInfo": {"Bucket": "test-1234567","Region": "ap-guangzhou","Object": "/video/123.mp4"}},"OutputStorage": {"Type": "cos","CosOutputStorage": {"Bucket": "test-1234567","Region": "ap-guangzhou"}},"ScheduleId": 12345 //Replace it with a custom orchestration ID. 12345 is a sample code and has no practical significance.}
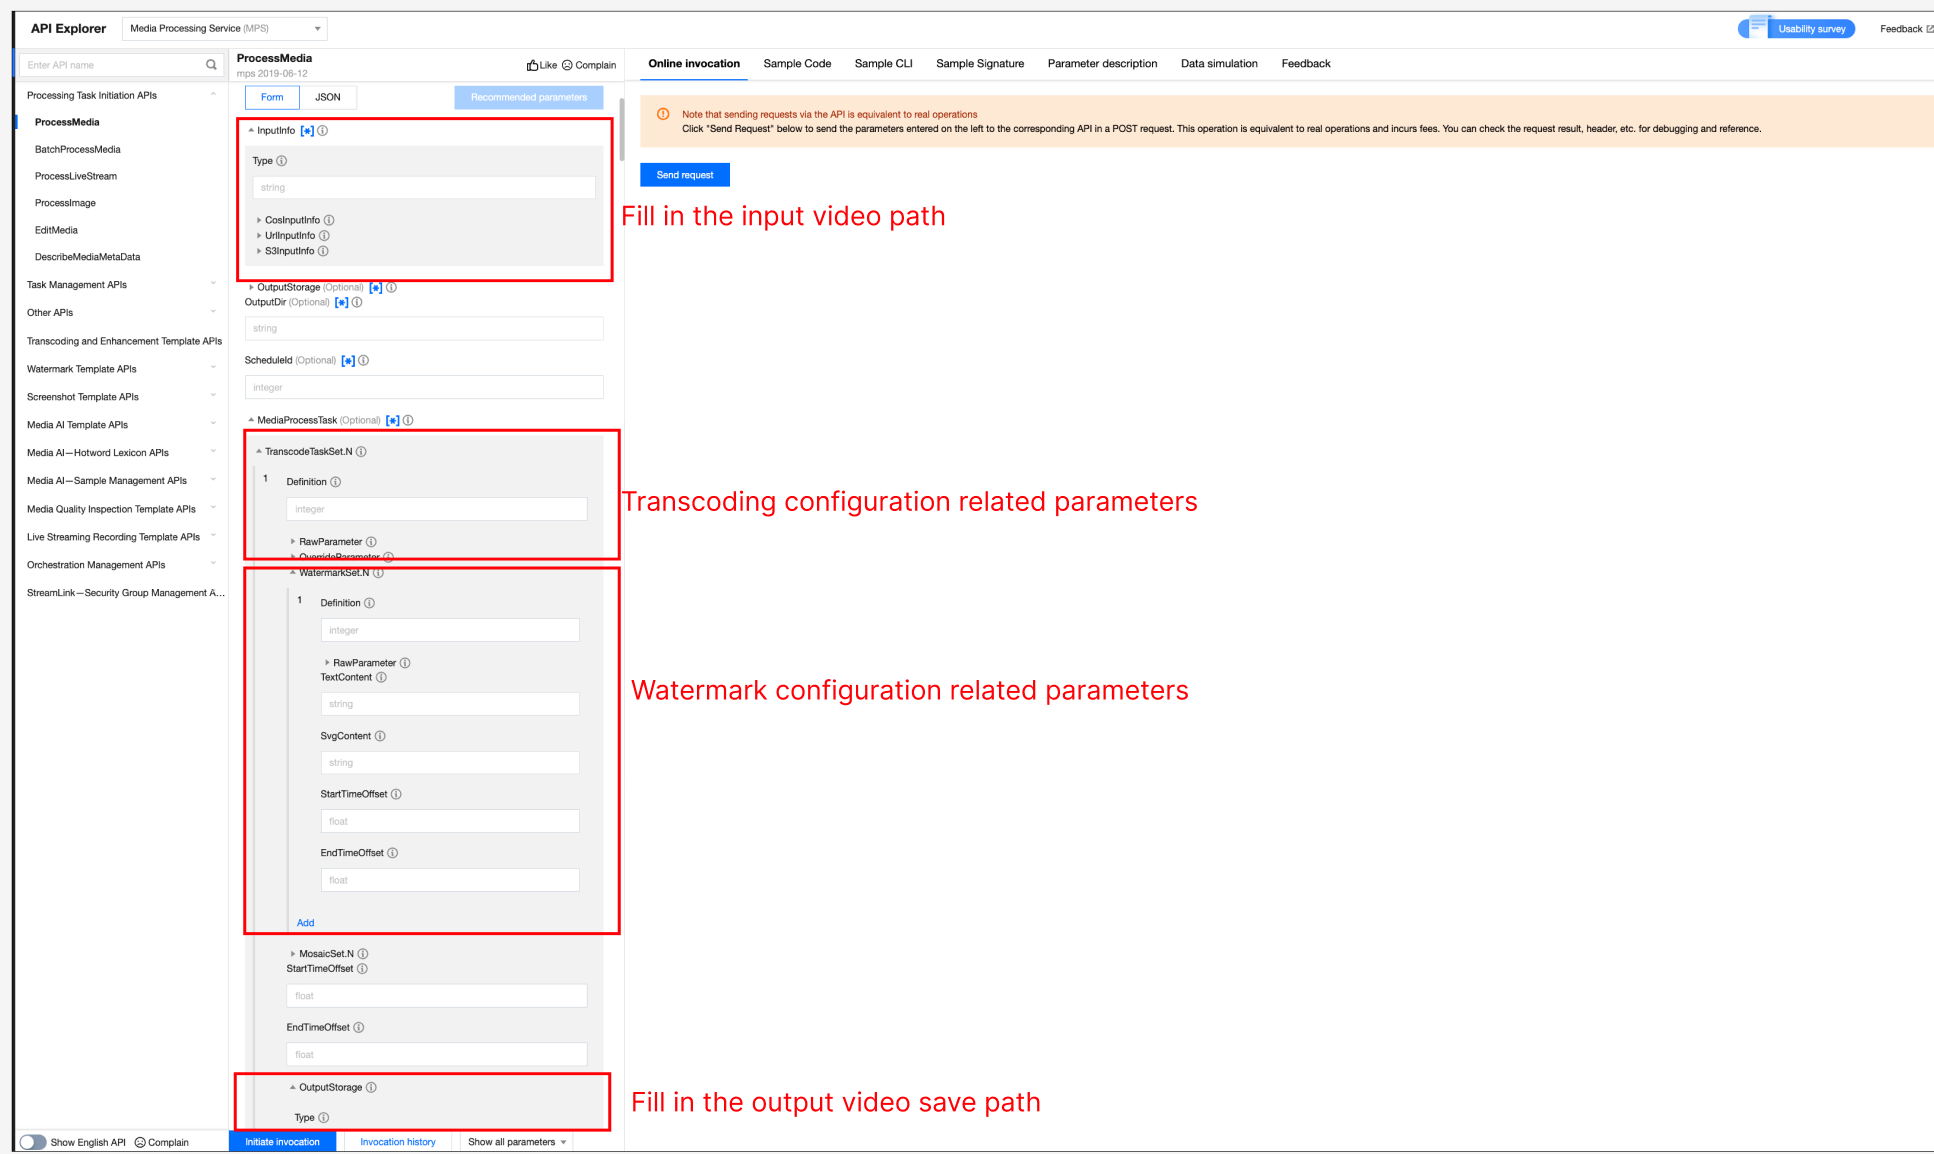
It is recommended to use API Explorer for quick debugging and verification:
Enter the online debugging page of the MPS API Explorer, and select the ProcessMedia API from the API list on the left. See the figure below to fill in parameters such as the input path, output path, template ID, and orchestration ID, and then you can initiate the online API call.
Appendix: Additional Parameters for Transcoding-Related APIs
Some advanced features are not available for configuration on the Create a Transcoding Template Through the Console page. You can use the API to CreateTranscodeTemplate and pass in additional parameters through
StdExtInfo.Supplementing Audio Streams with Silence Packets
Parameter Name | Requirement | Type | Remarks |
enable_mute_audio | Optional. | Int | It is enabled, silence packets will be supplemented. The default value is 0. 0: Do not enable. 1: Fill with silence packets when audio frames are discontinuous. 2: On the basis of 1, supplement silence packets for cases where there is no audio at the end. |
Example JSON:
"StdExtInfo" : "{\"audio_info\":{\"enable_mute_audio\":1}}"
Transcoding Output File Storage Method
The console supports configuring COS and AWS S3 as output paths. You can also use additional parameters to upload transcoding output files to other third-party cloud storage.
Parameter Name | Requirement | Type | Remarks |
appid | Optional. | String | Cloud account ID. |
bucket | Required | String | Bucket name. |
region | Required | String | Bucket region name. |
headers | Optional. | JSON structure | It is of type JSON structure, indicating the headers carried when you upload files. Example: "headers": { "agent" : "tencent", "used" : "for-test" } |
token | Optional. | String | Upload and download using the temporary token method. |
id | Optional. | String | User SecretID. |
key | Optional. | String | User SecretKey. |
host | Optional. | String | host |
access_point | Optional. | string | aws_vpc type is required. |
storage_type | Optional. | String | "aws_s3": AWS S3. "aws_vpc": AWS private cloud. "oss": Alibaba Cloud OSS. |
The example JSON is as follows:
"StdExtInfo" : "{\"cos_info\":{\"storage_type\":\"oss\",\"bucket\":\"test-test\",\"region\":\"cn-shenzhen\",\"id\":\"abcdefghijk\",\"key\":\"lmnopqrstuvwxyz\"}}"
Method 3. Automatically Triggering an MPS Task After a File Is Uploaded to COS
If you want to upload a video file to the COS bucket and achieve automatic audio/video transcoding according to preset parameters, you can:
1. Click Save the Orchestration when creating a task, and configure parameters such as the triggered bucket and triggered directory in the pop-up window.
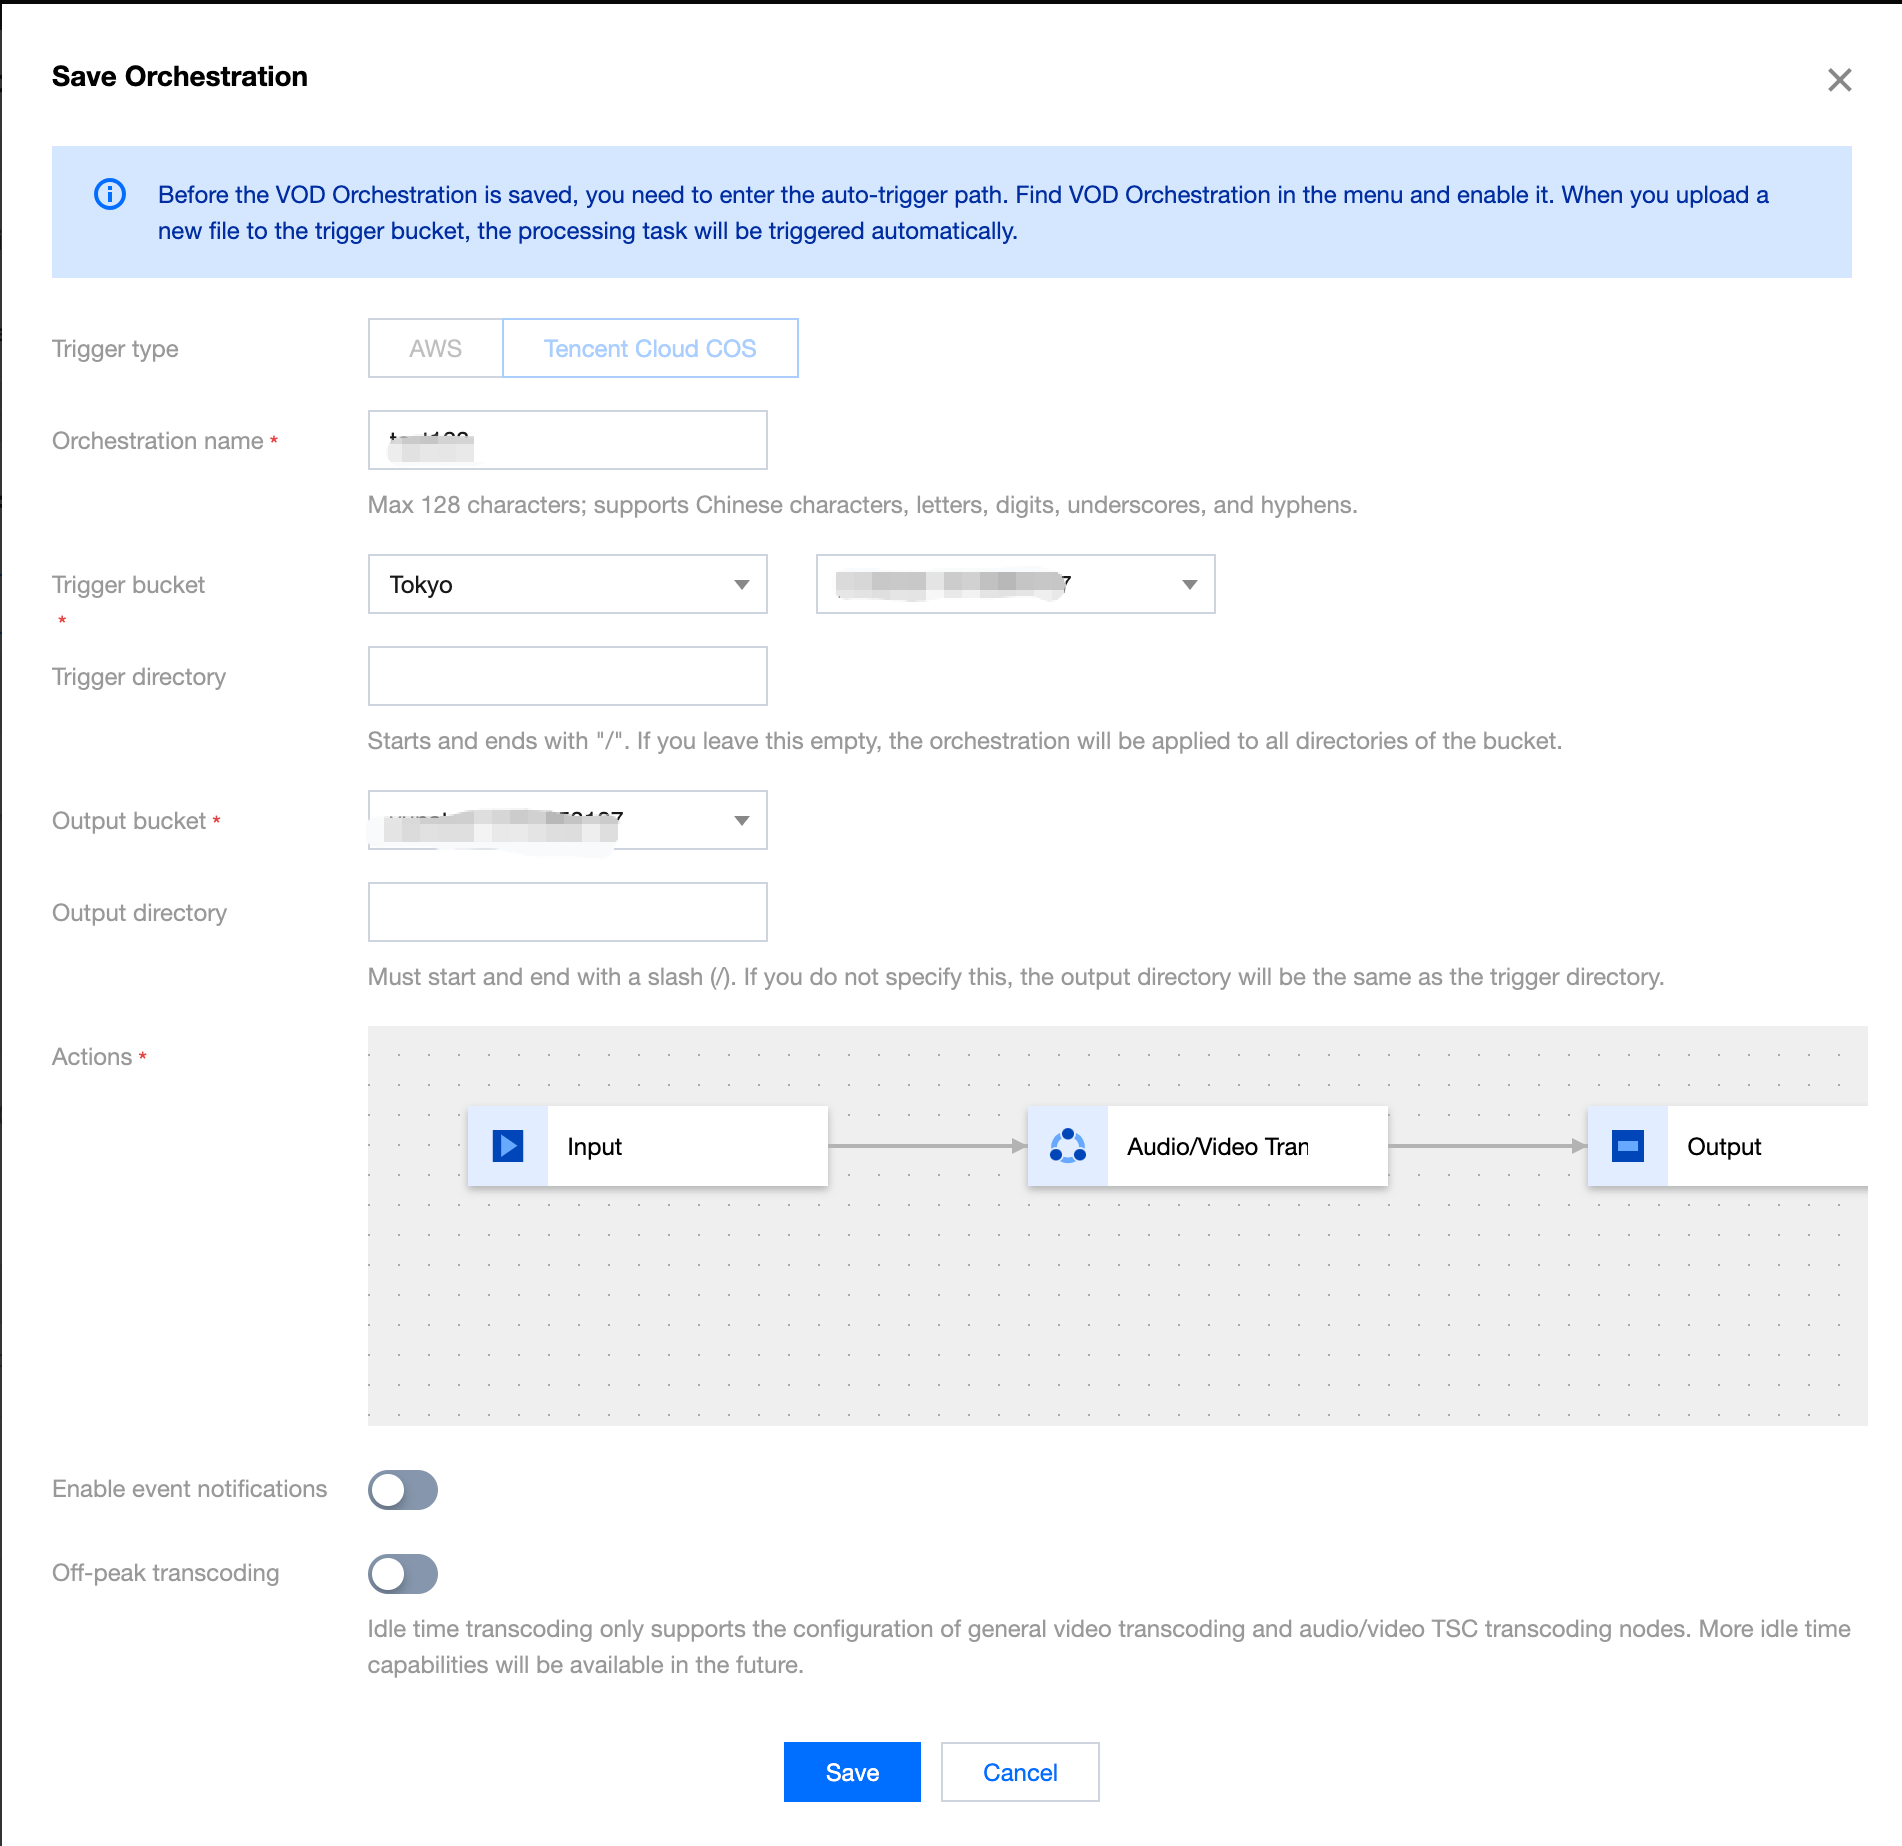
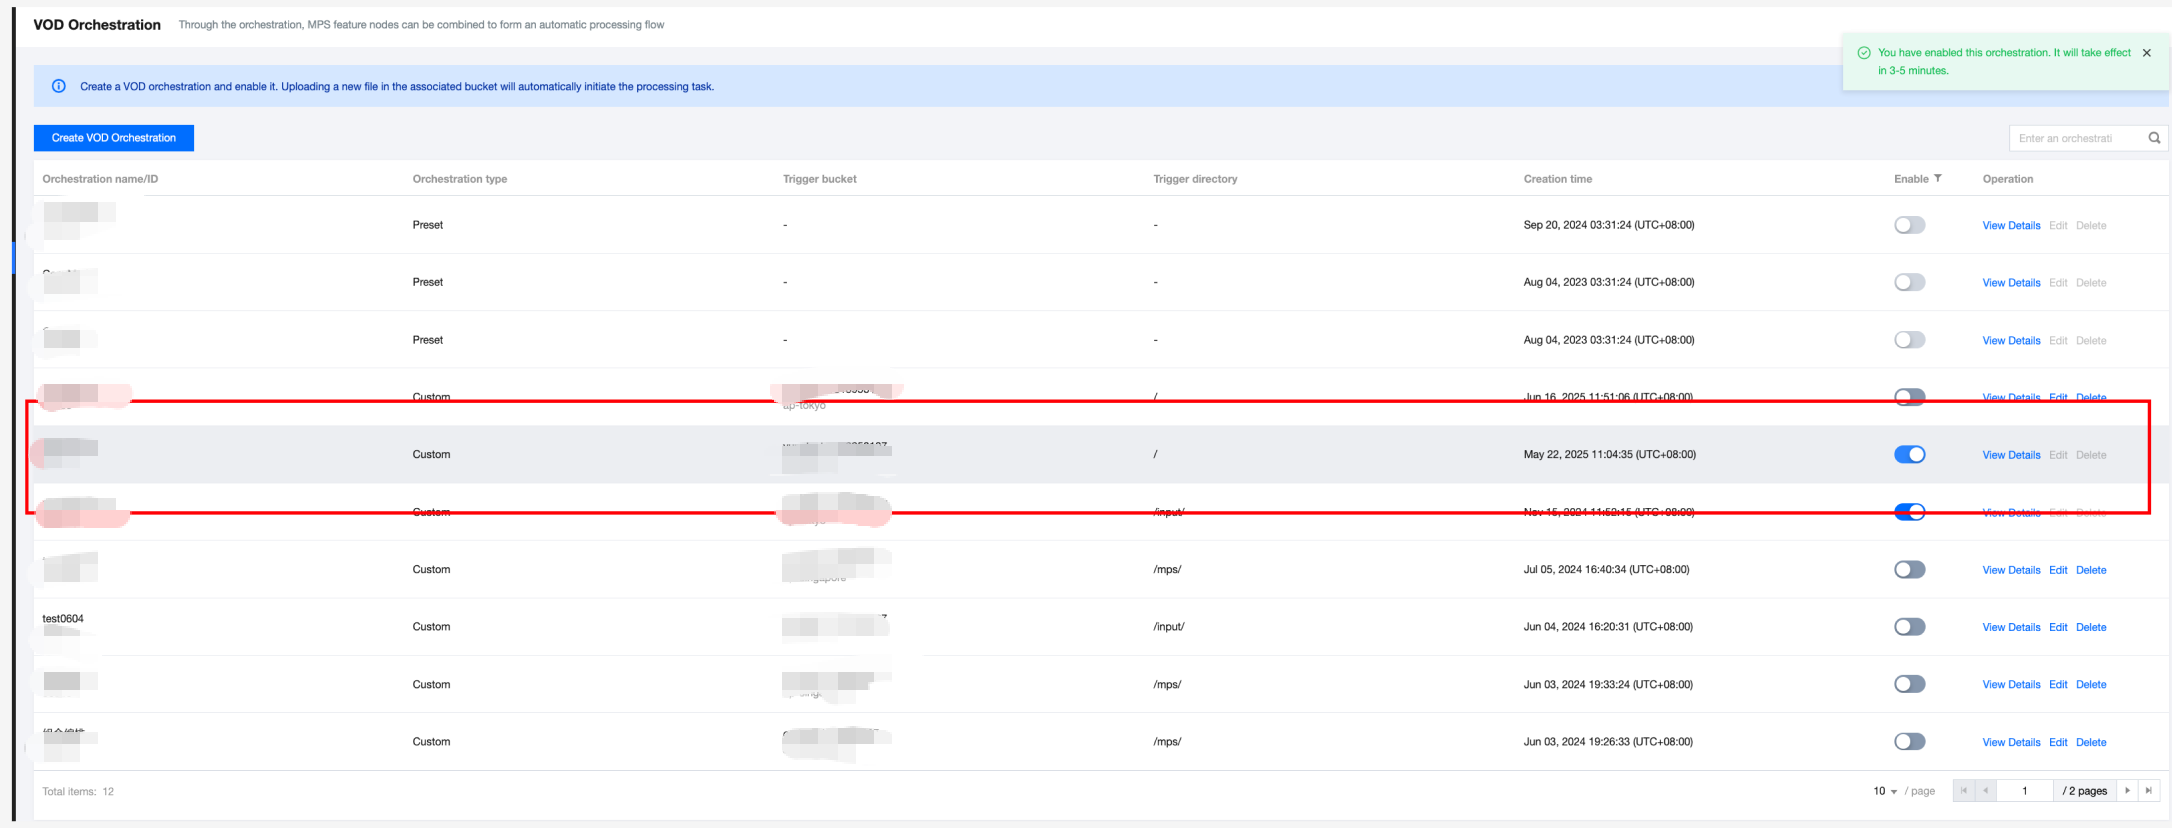
2. Then, go to the VOD Orchestration list, find the new orchestration, and enable the switch at Enable. Subsequently, any video files added to the triggered directory will automatically initiate tasks according to the preset process and parameters of the orchestration, and the processed video files will be saved to the output path configured in the orchestration.
Note:
It takes 3-5 minutes for the orchestration to take effect after being enabled.
III. Querying Task Results
1. Task Callback
When initiating an MPS task using ProcessMedia, you can set callback information through the
TaskNotifyConfig parameter. After the task processing is completed, the task result will be callback through the configured callback information. You can parse the event notification result through ParseNotification.2. Querying Task Results
Method 1: Querying Task Results by Calling the DescribeTaskDetail API:
Enter the TaskId returned by
ProcessMedia (for example, 24000022-WorkflowTask-b20a8exxxxxxx1tt110253) to query task results.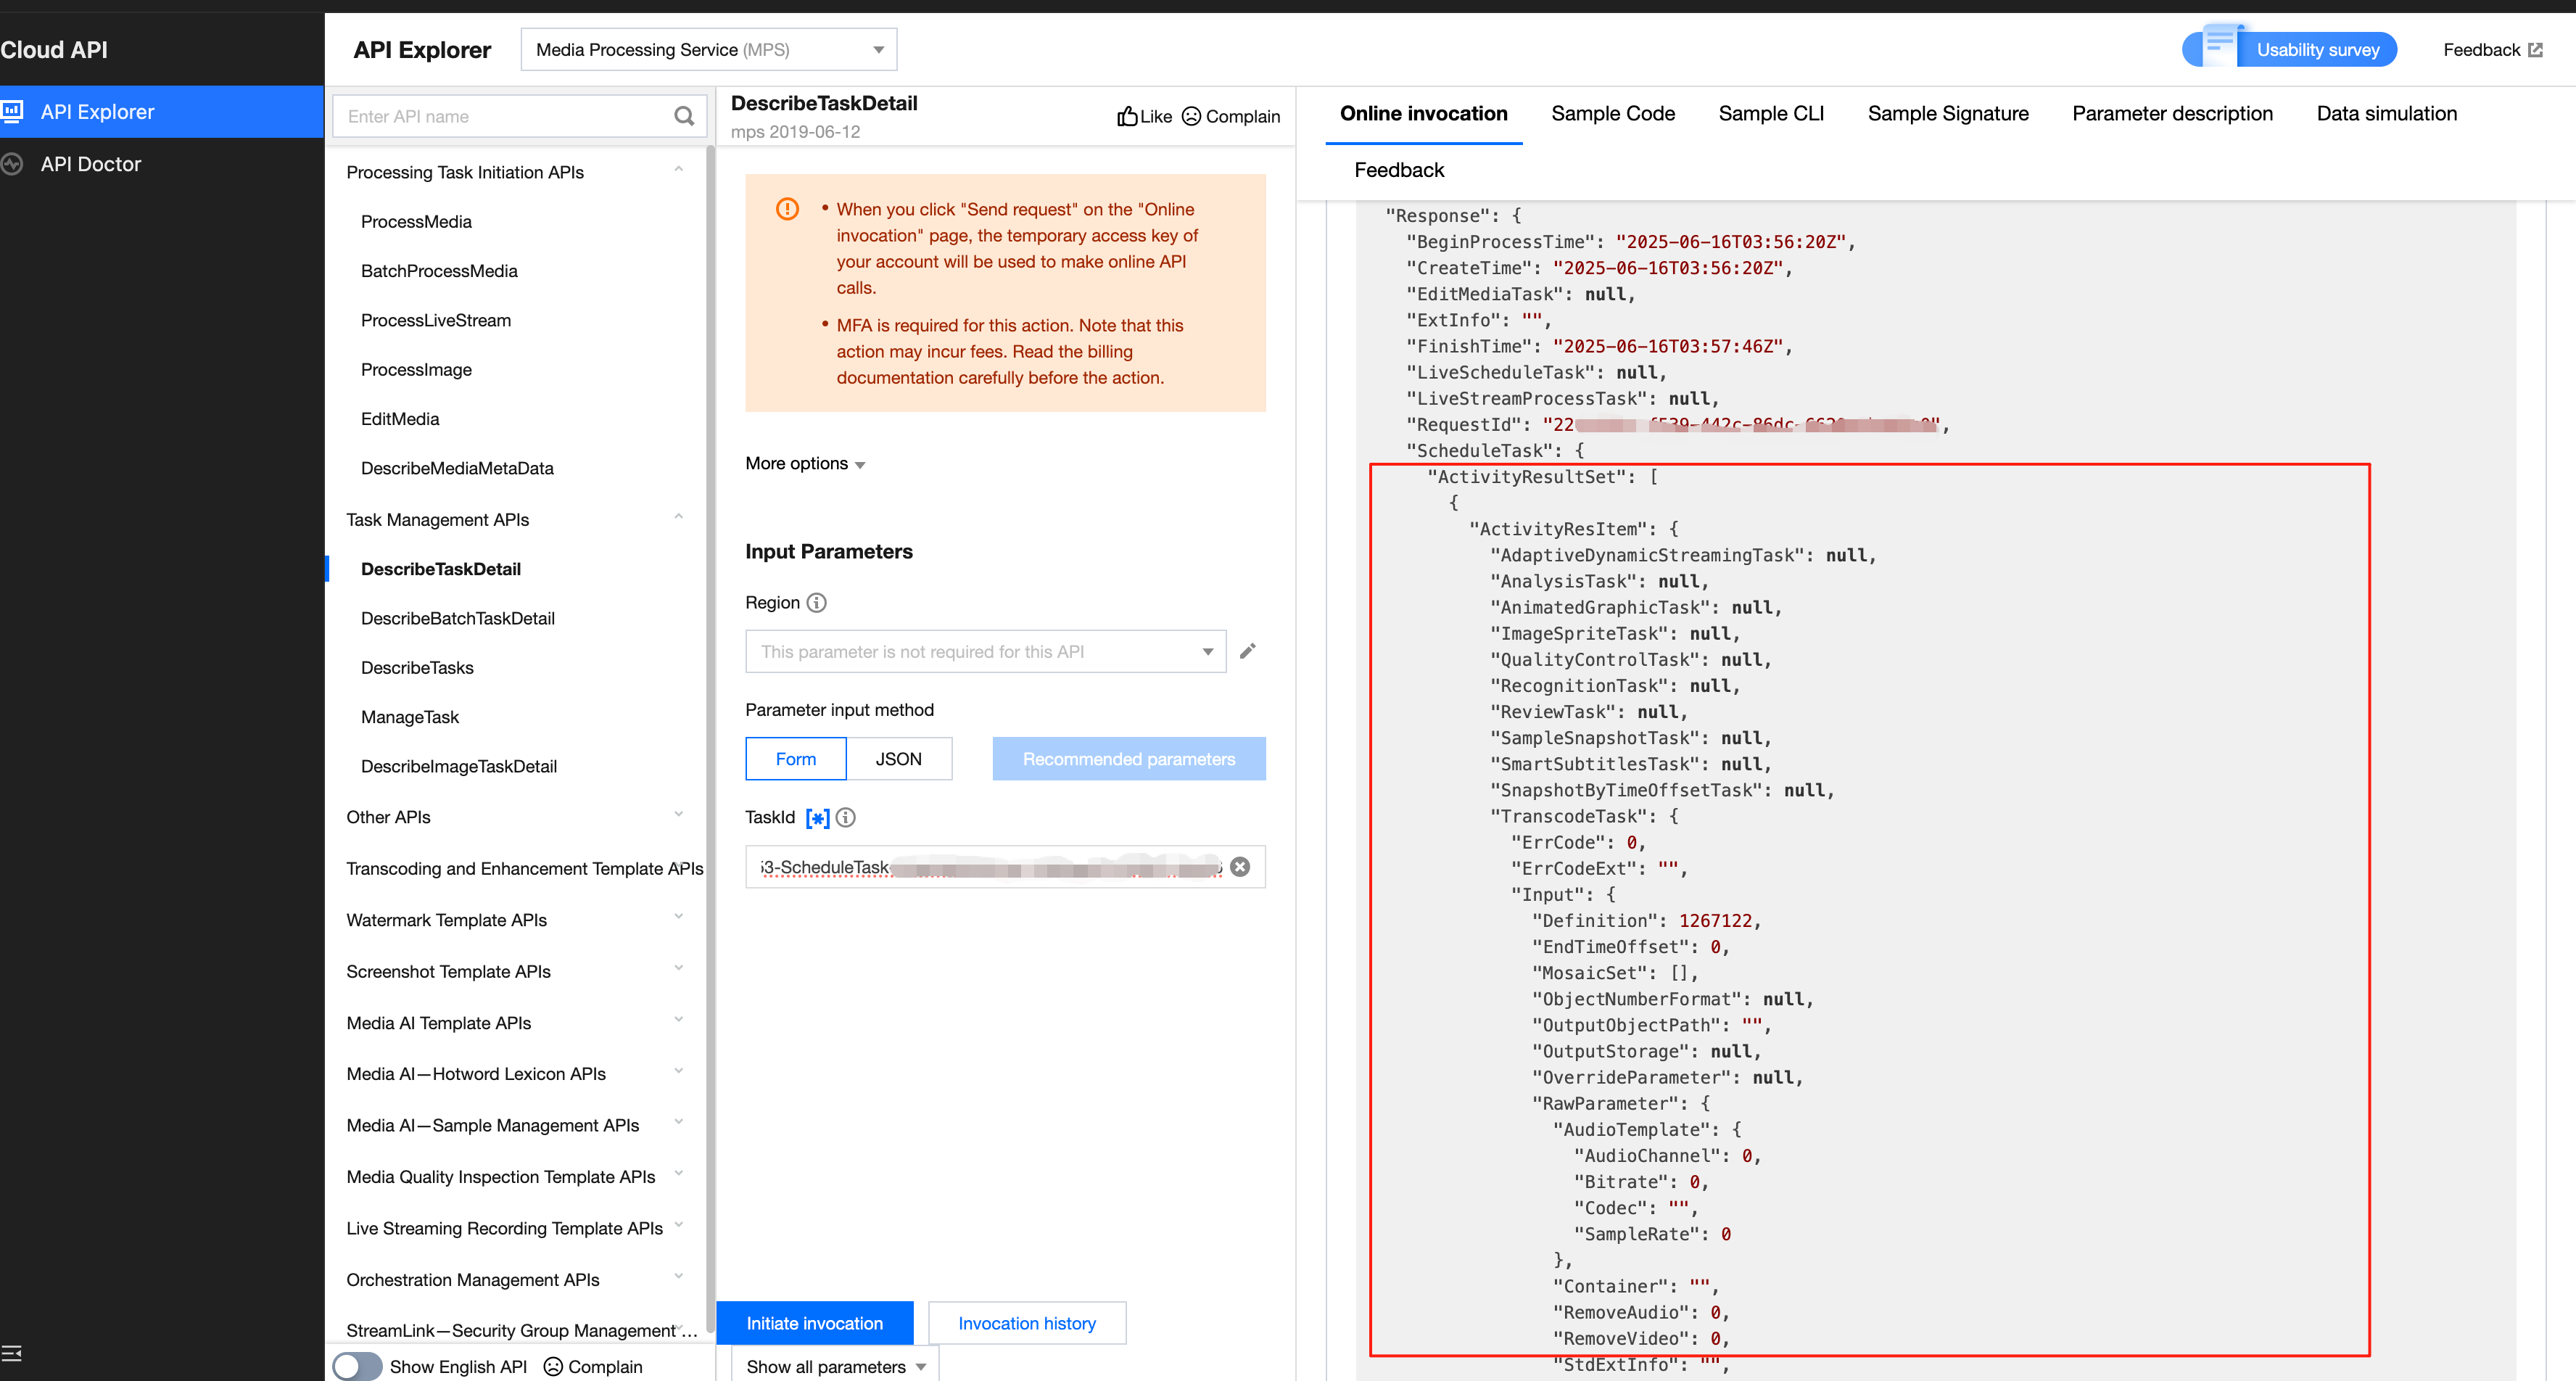
Method 2: Querying Task Results in the Console:
1. Go to the VOD Processing Tasks console, and the task you just initiated will be listed in the task list.
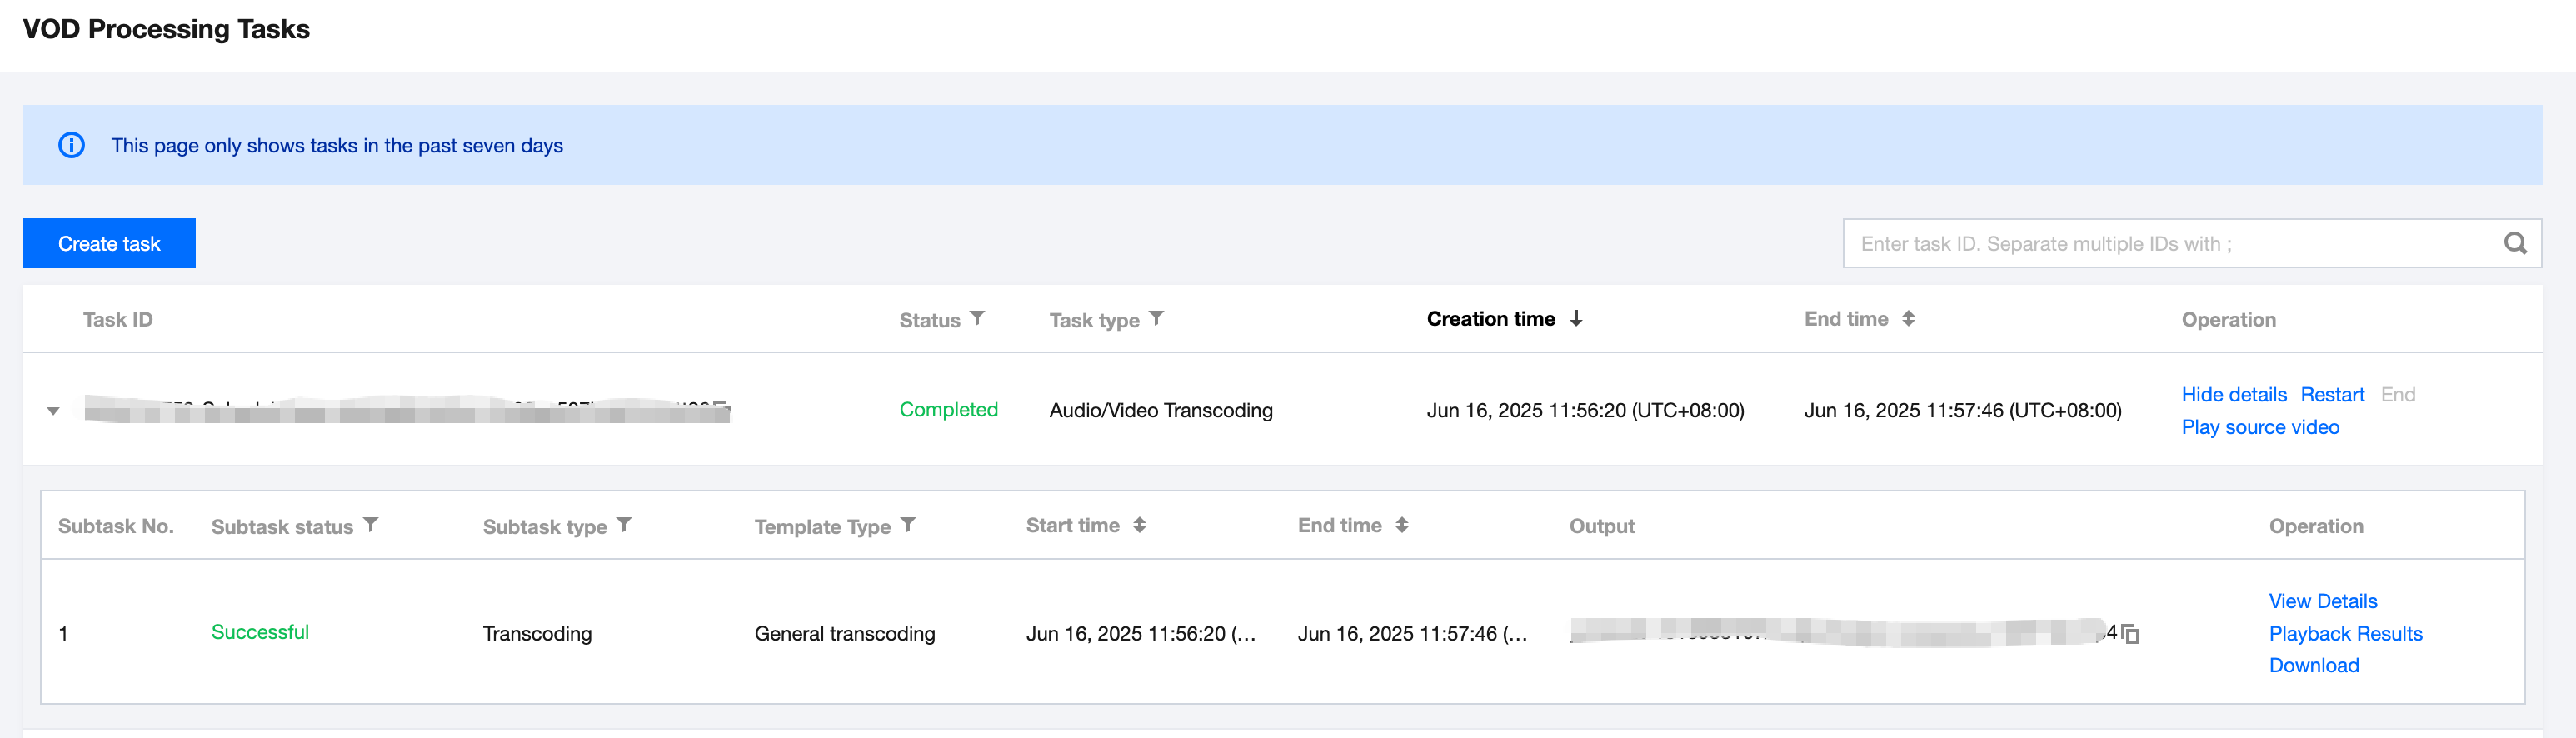
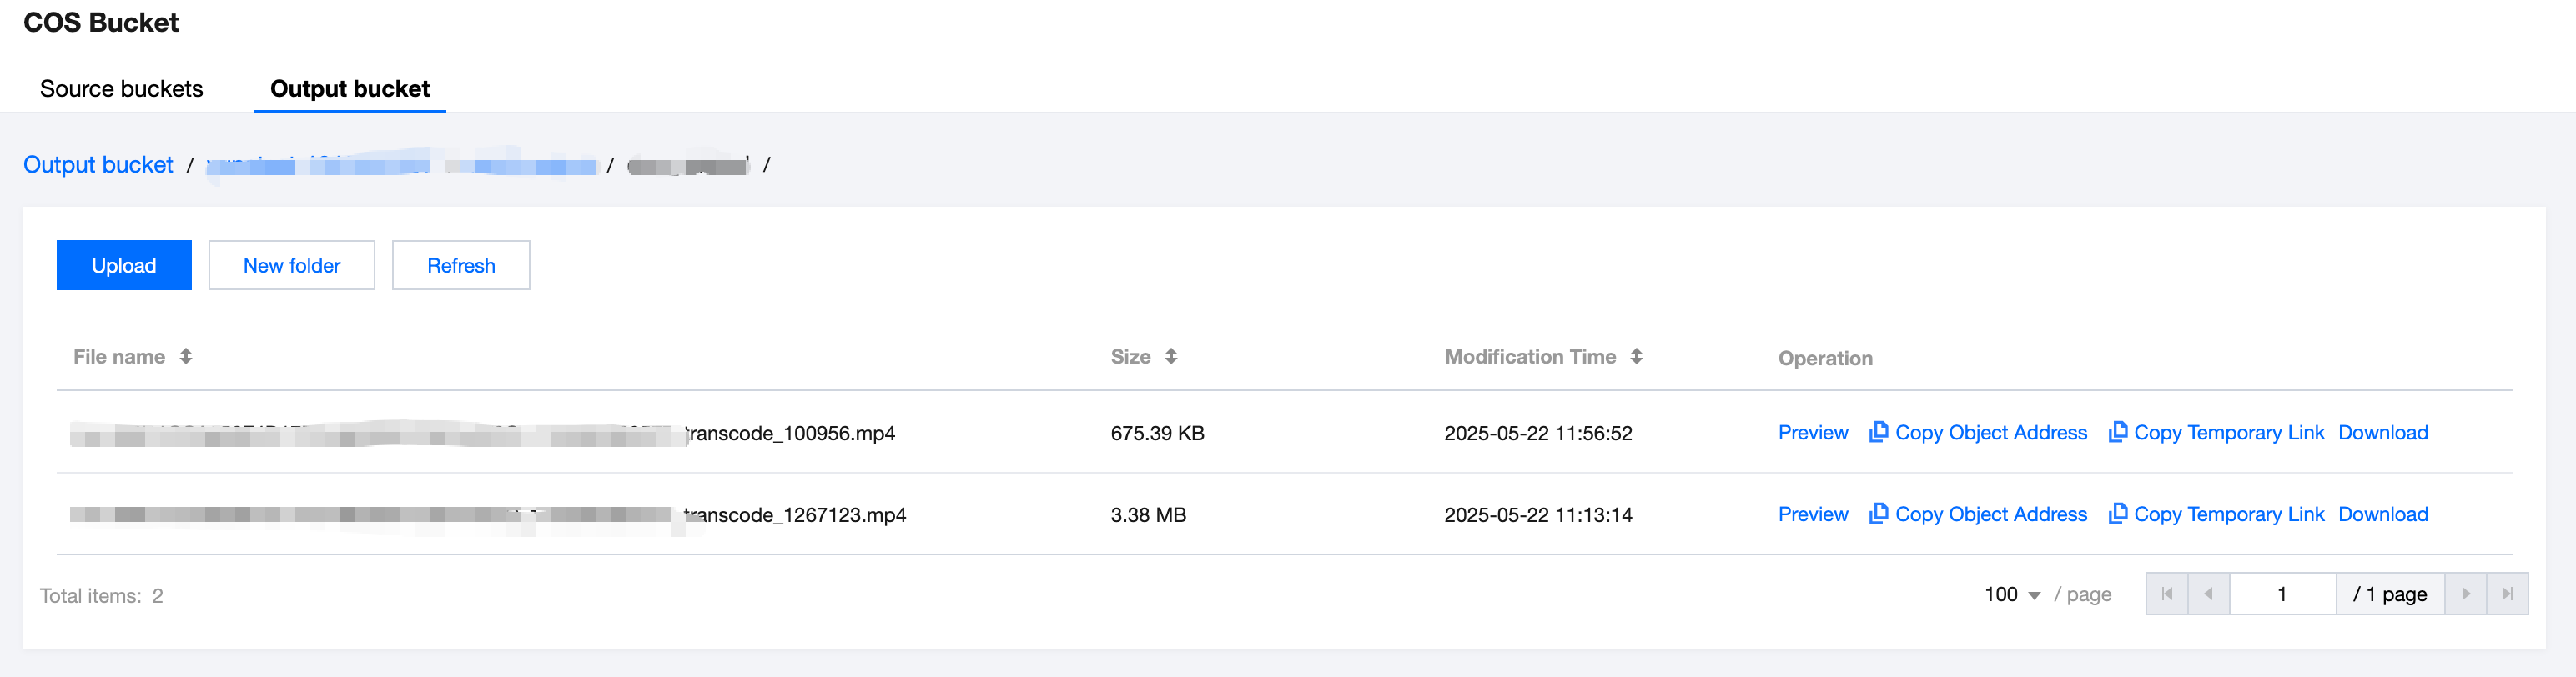
2. When the subtask is in the "Successful" status, you can navigate to COS Bucket > Output Bucket, find your output location, and then preview or download the audio/video transcoding output files.
IV. Instructions for More Transcoding-Related Features
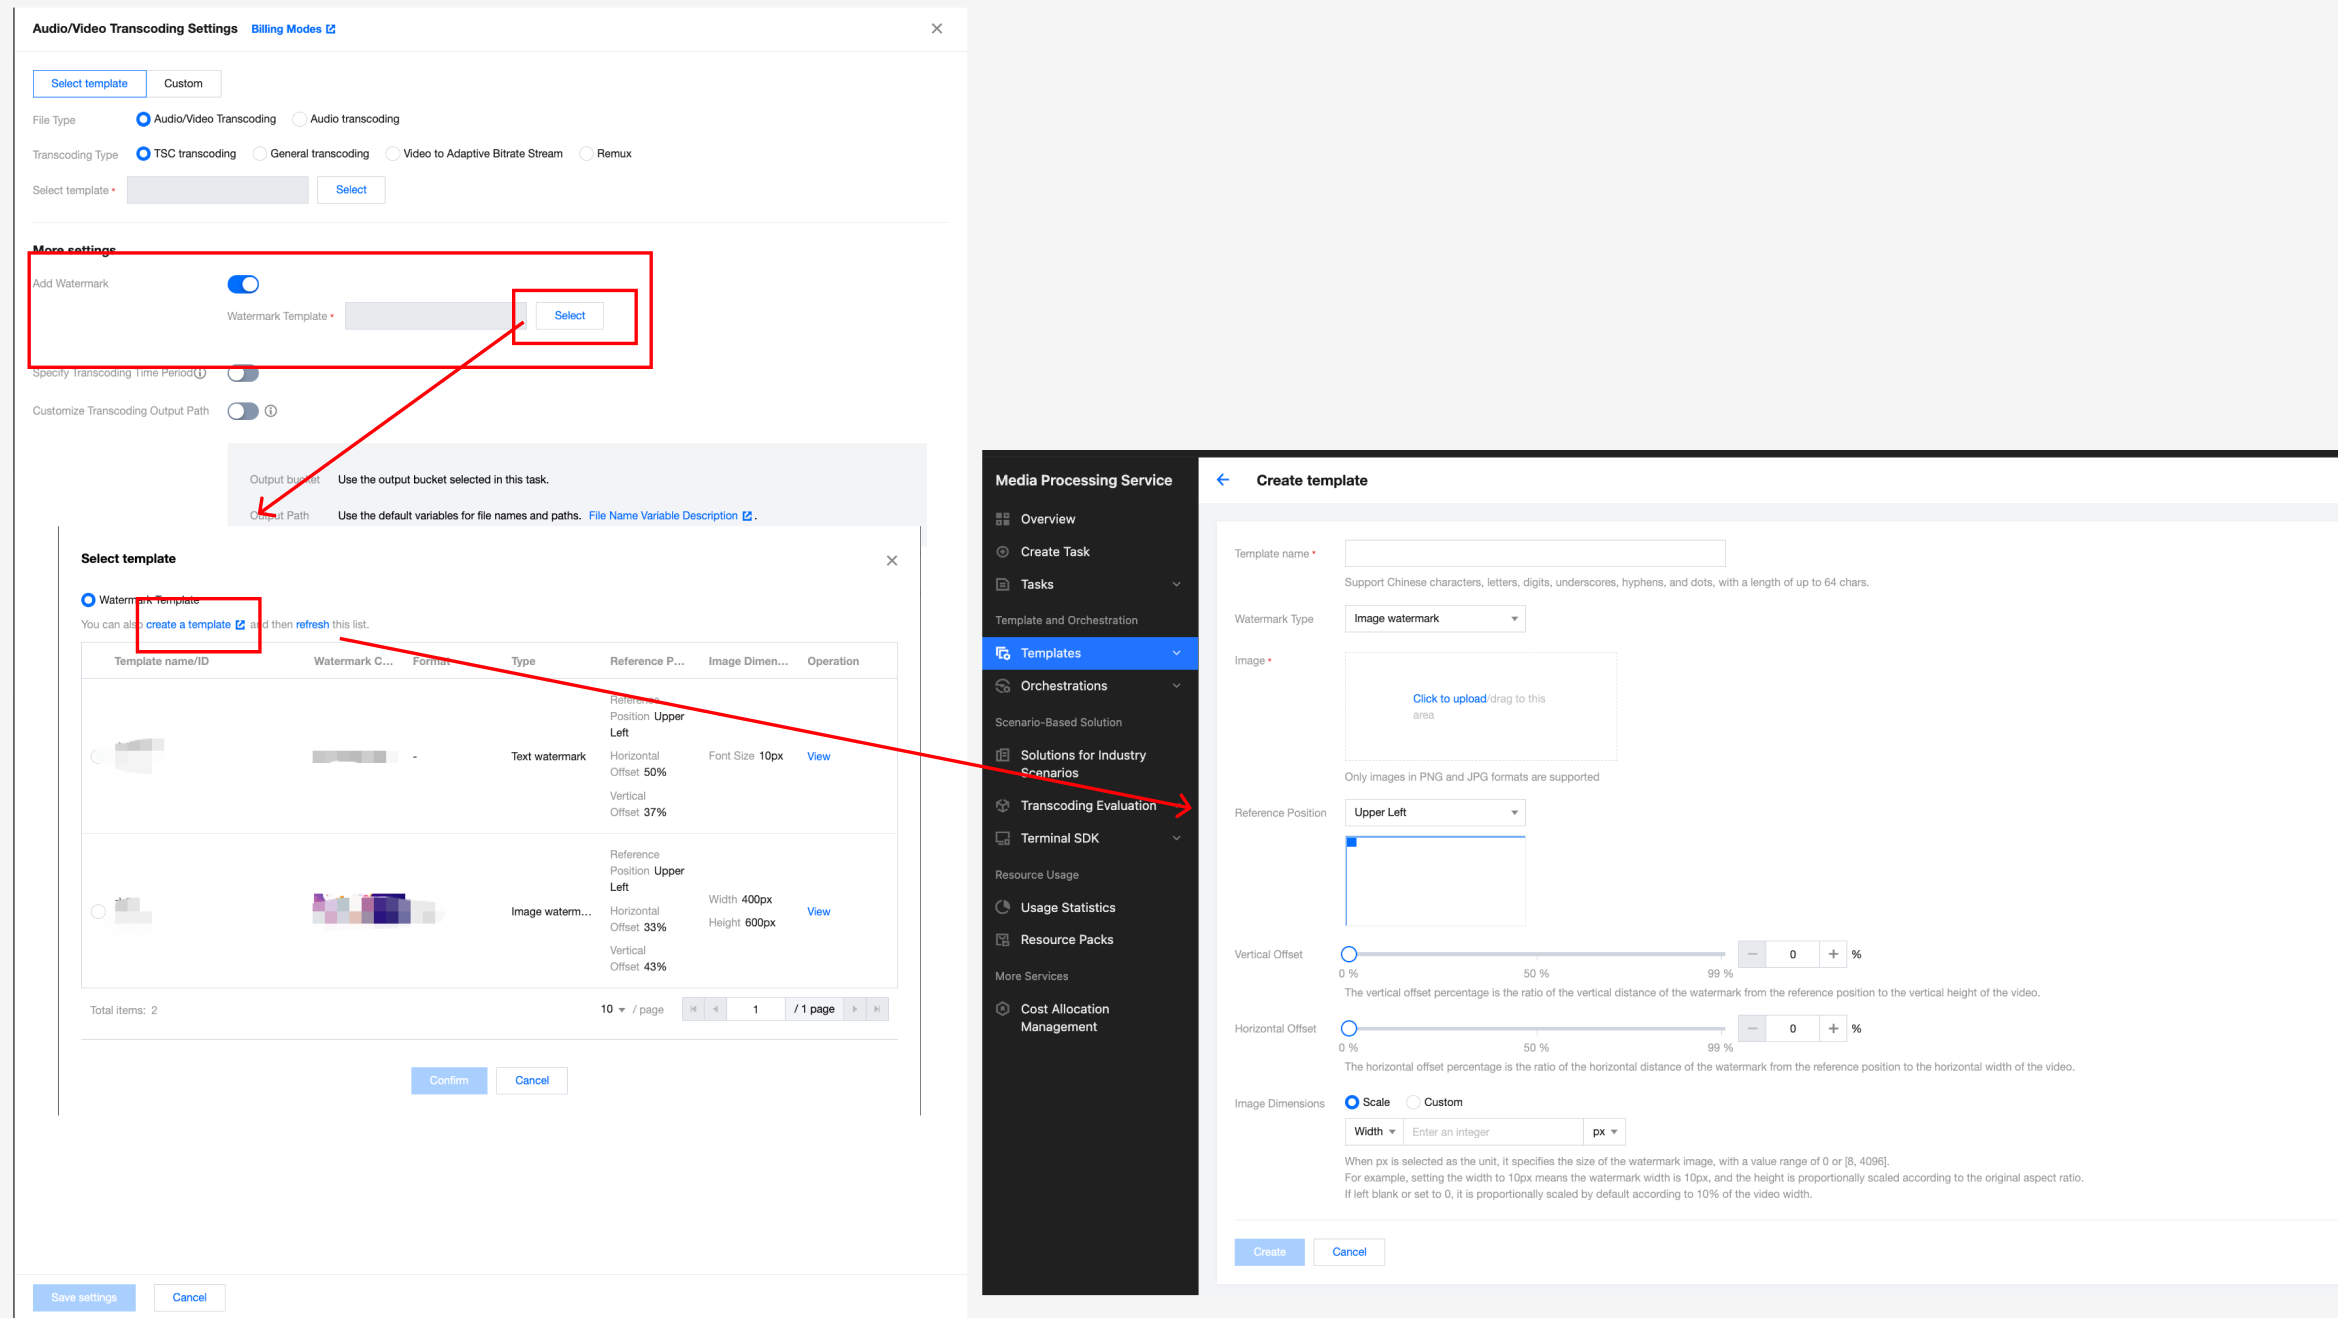
Watermarking
When creating a transcoding task, you can watermark it.
When initiating a transcoding task in the console, you can follow the following steps to watermark it:
When initiating a task using the API, you can see the following example:
{"InputInfo": {"Type": "URL","UrlInputInfo": {"Url": "https://test-1234567.cos.ap-guangzhou.myqcloud.com/video/test.mp4" // Replace it with the video URL to be processed.}},"OutputStorage": {"Type": "cos","CosOutputStorage": {"Bucket": "test-1234567","Region": "ap-guangzhou"}},"MediaProcessTask": {"TranscodeTaskSet": [{"Definition": 100800,//100800 is the preset template ID for video transcoding. It can be replaced with your custom audio/video transcoding template ID."WatermarkSet": [{"Definition": 12345//Replace it with a watermark template ID. 12345 is a sample code and has no practical significance.}]}]}}
Embedding Subtitles (Hard Subtitles) During Transcoding
Note:
Using the embedding subtitle feature will incur transcoding fees. For a complete billing explanation, see Audio/Video Transcoding Billing.
Method 1: Initiating Subtitle Embedment Tasks in the Console
When creating a transcoding task, you can embed subtitles into the video image as hard subtitles. You can select the subtitle source in the following two ways:
Subtitle file: Support selecting a subtitle file stored in COS or entering the URL address of a subtitle file. Supported formats: SRT, WebVTT, ASS, SSA, PGS, and SUP.
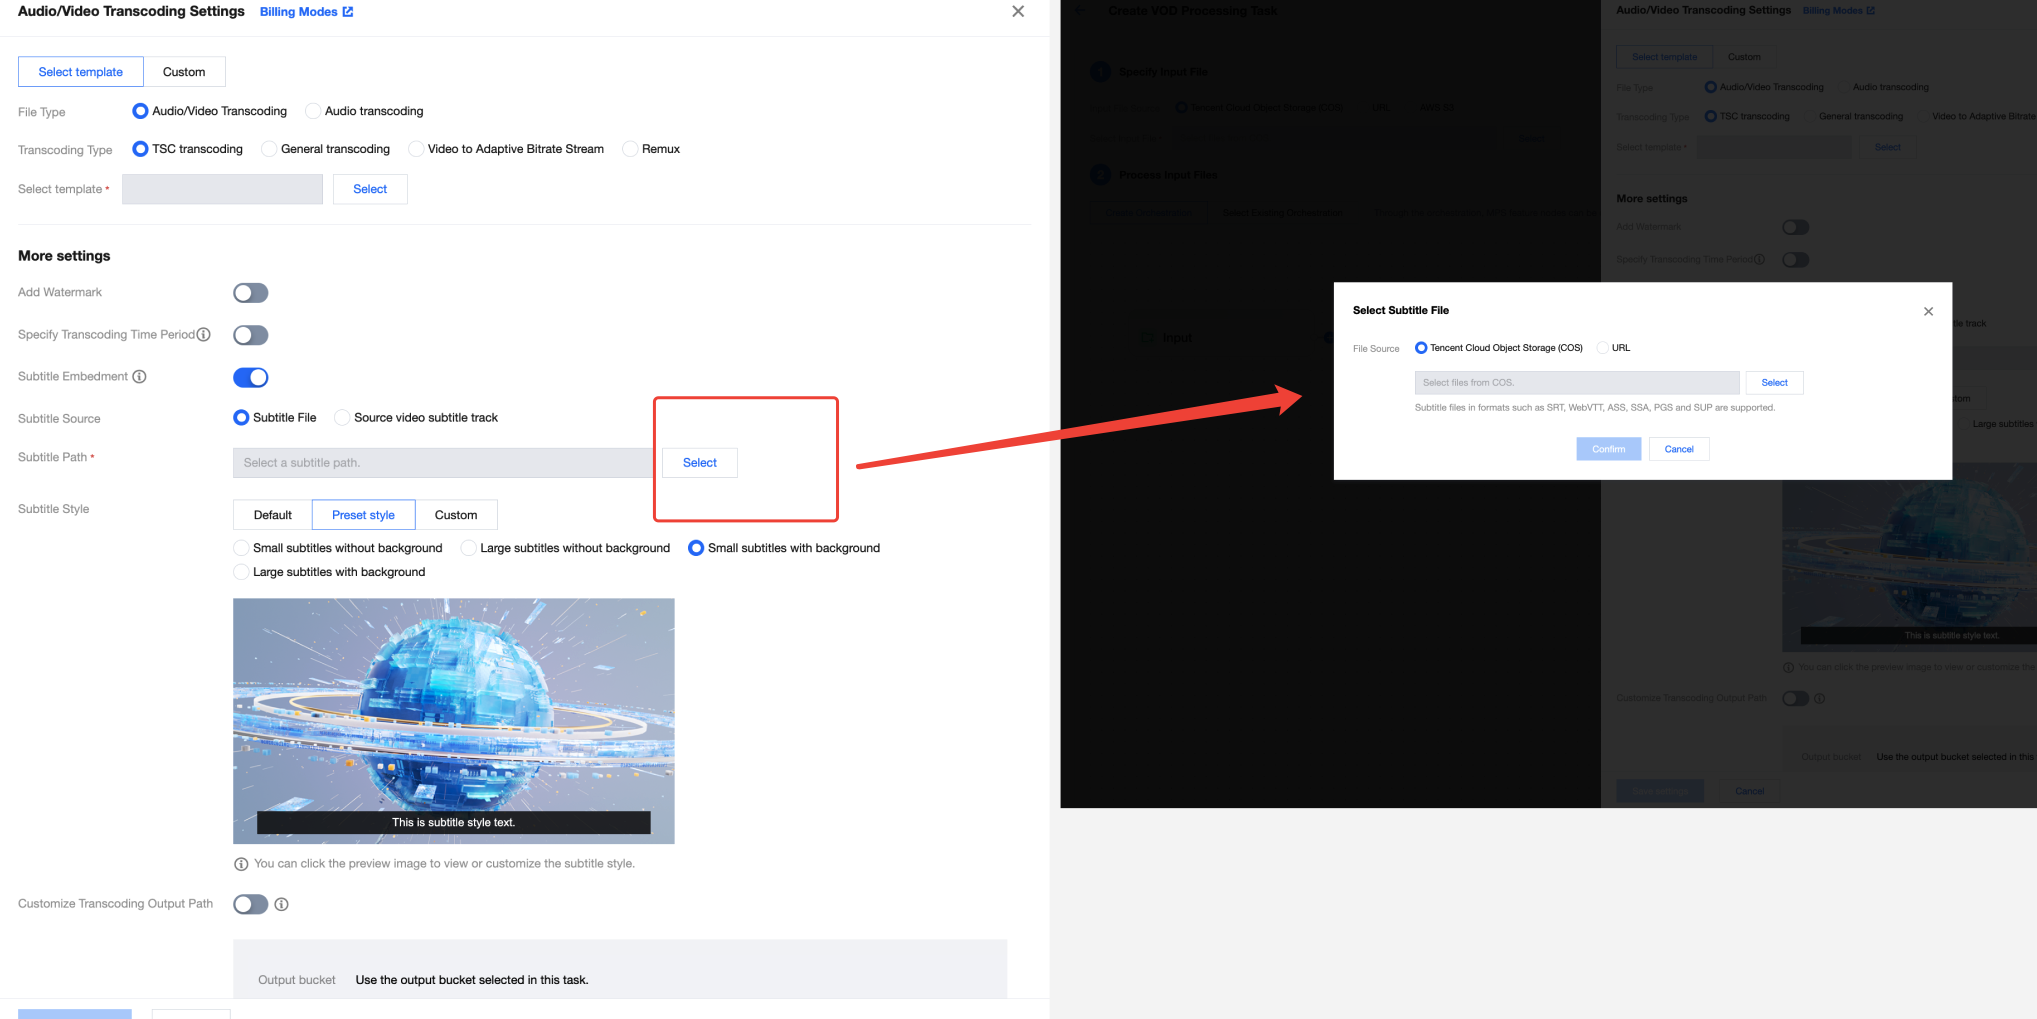
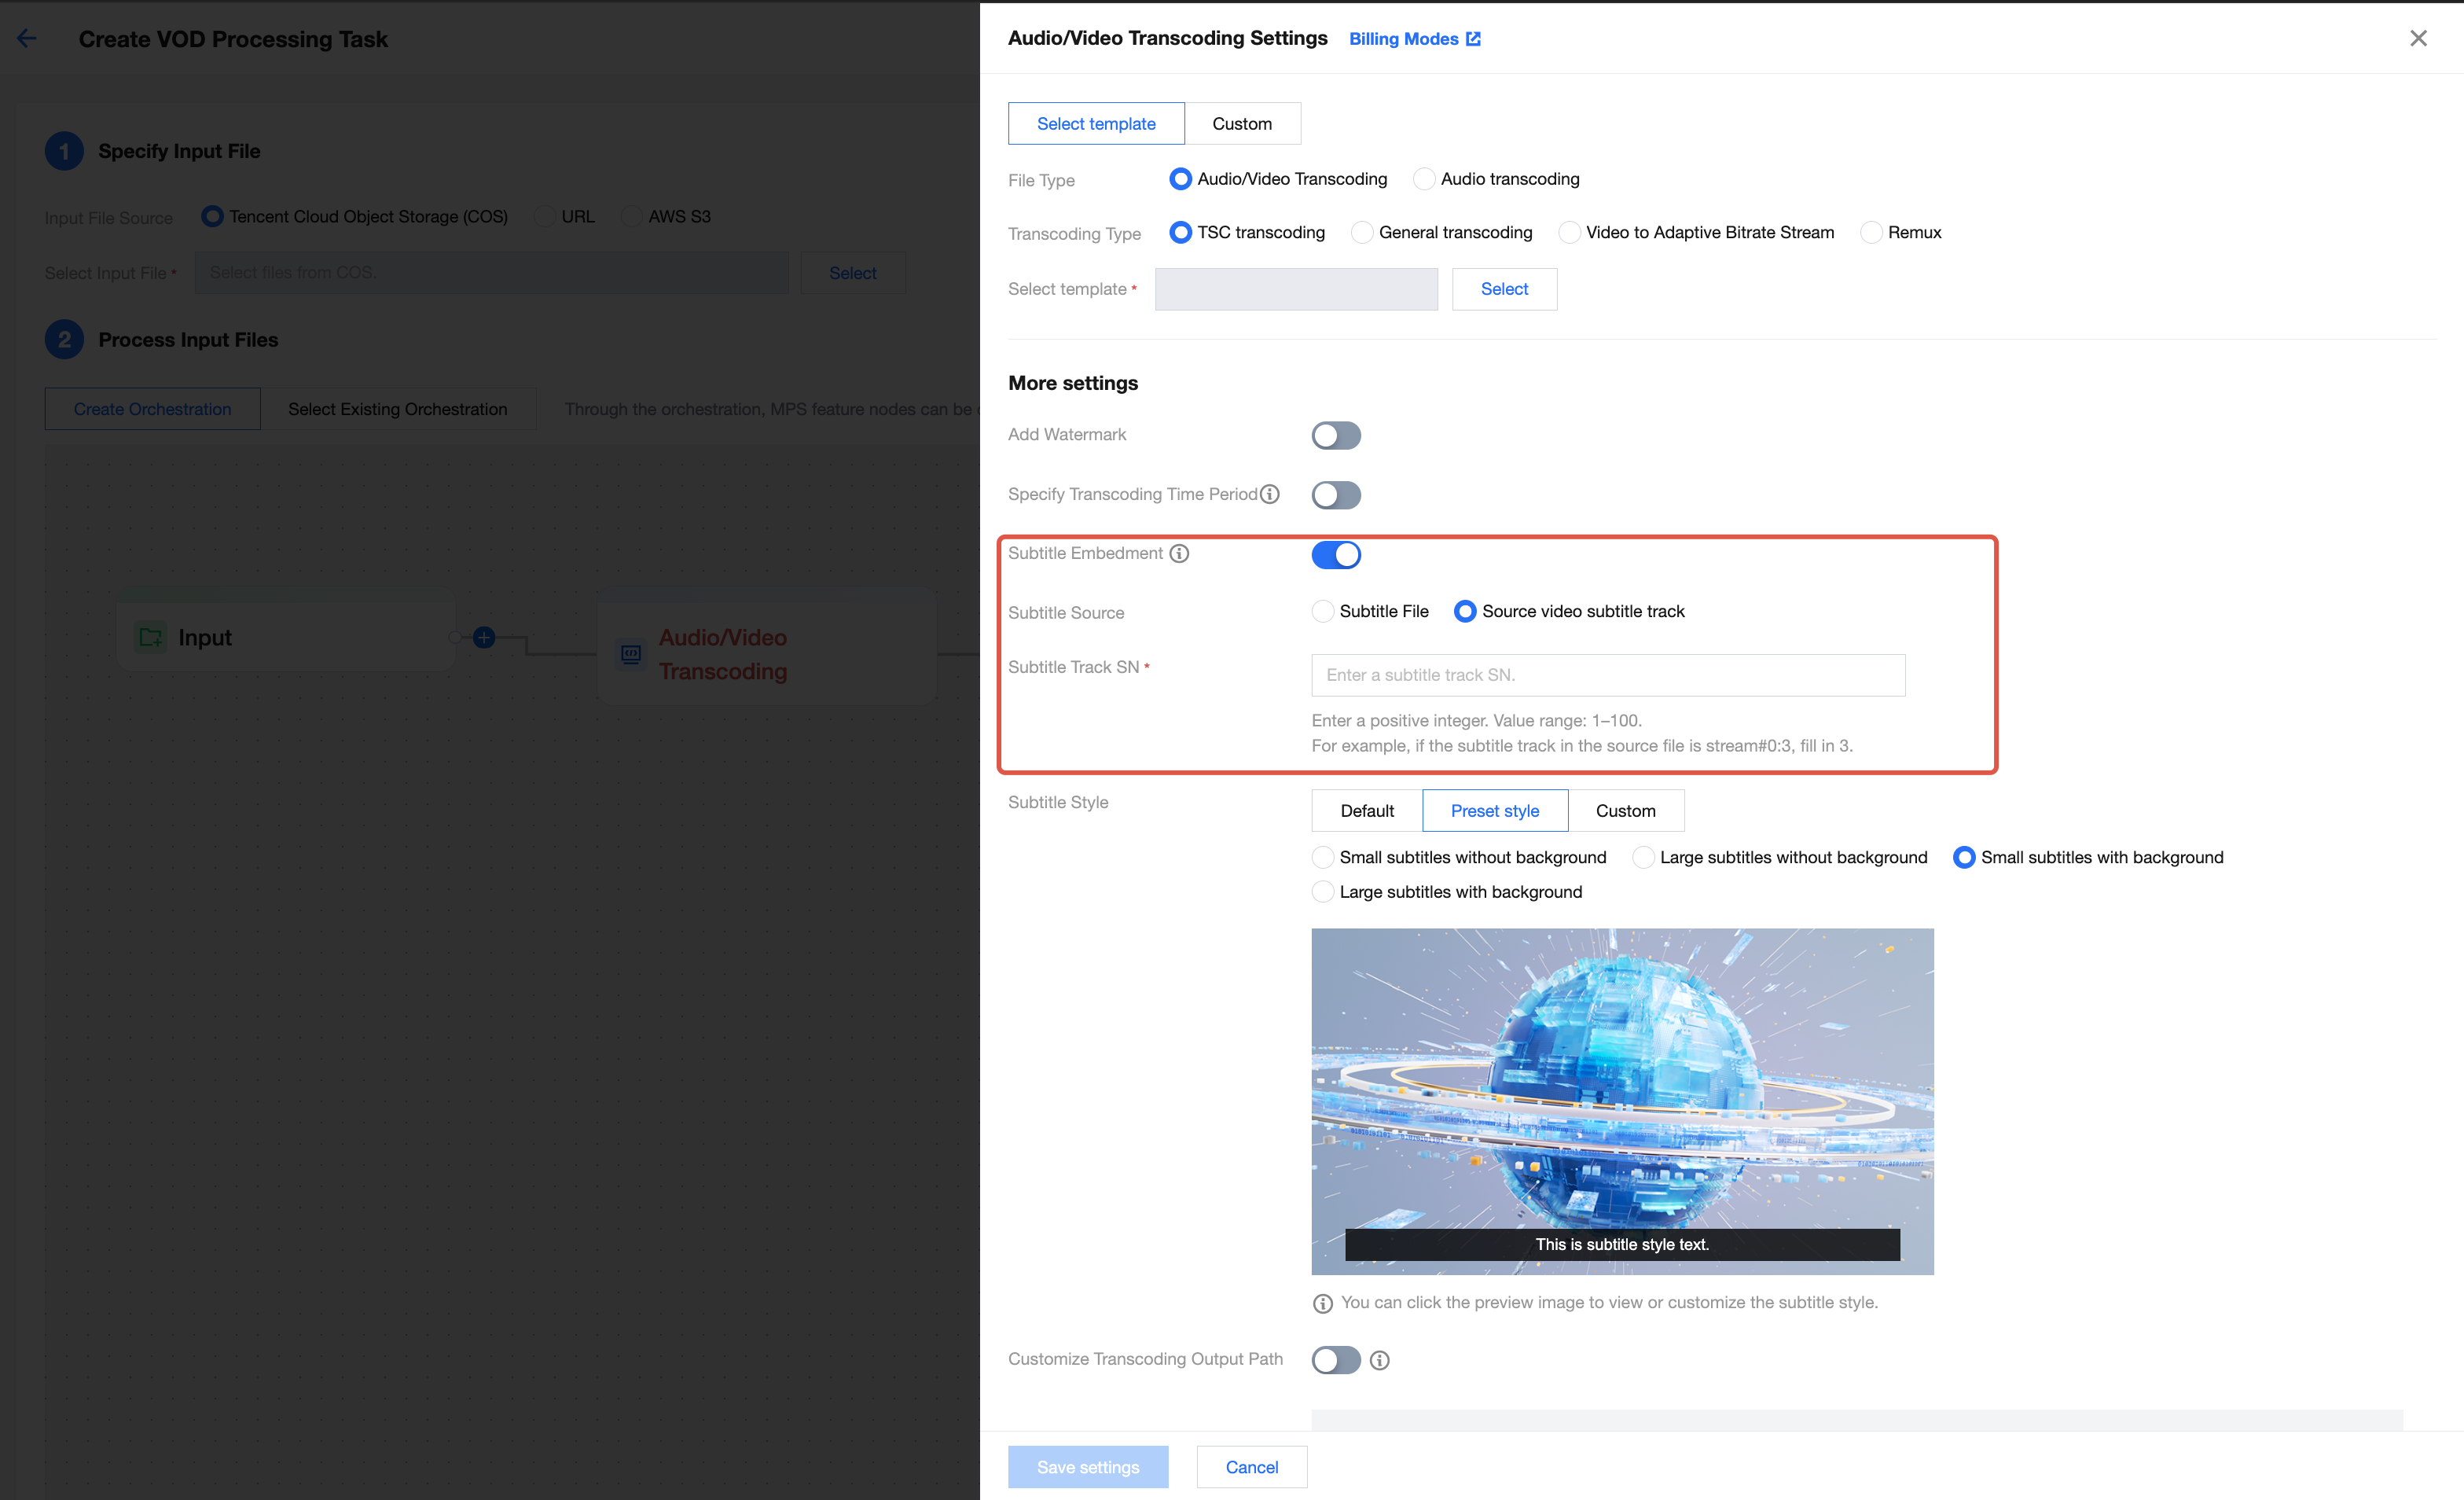
Subtitle track of the source video: Support specifying the subtitle track (with the serial number being a positive integer ranging from 1 to 100) in the source video to embed subtitles into the video image.
You can customize the subtitle display style before embedding subtitles.
Default style: The built-in style of the subtitle file is used. If no built-in style exists, the default style of MPS is applied.
Preset style: Four preset style options are provided: small subtitles without background, large subtitles without background, small subtitles with background, and large subtitles with background. You can click the corresponding preview image to view detailed parameter configurations, which can be adjusted as needed.
Custom style: You can enter the custom configuration page to flexibly adjust all subtitle style parameters.
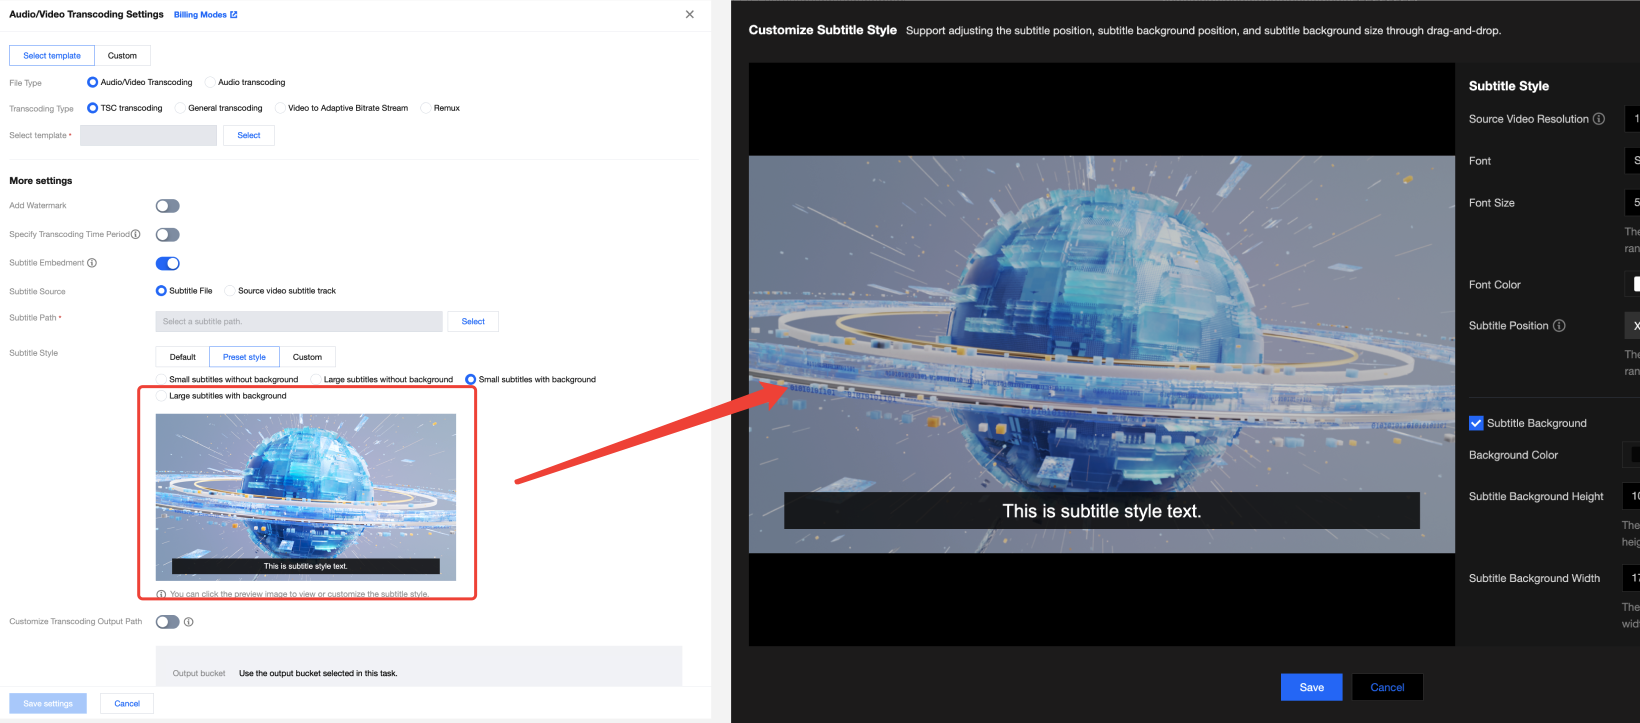
Note:
When customizing the subtitle style, you can manually input values for adjustment in the Subtitle Style area on the right side of the pop-up window. You can also drag subtitles and the subtitle background in the preview area on the left to adjust the position and size. In addition, you can enter multiple lines of subtitles to preview the effect.
Drag subtitles and the subtitle background to adjust the position and size:

Press Enter to edit multi-line subtitles:
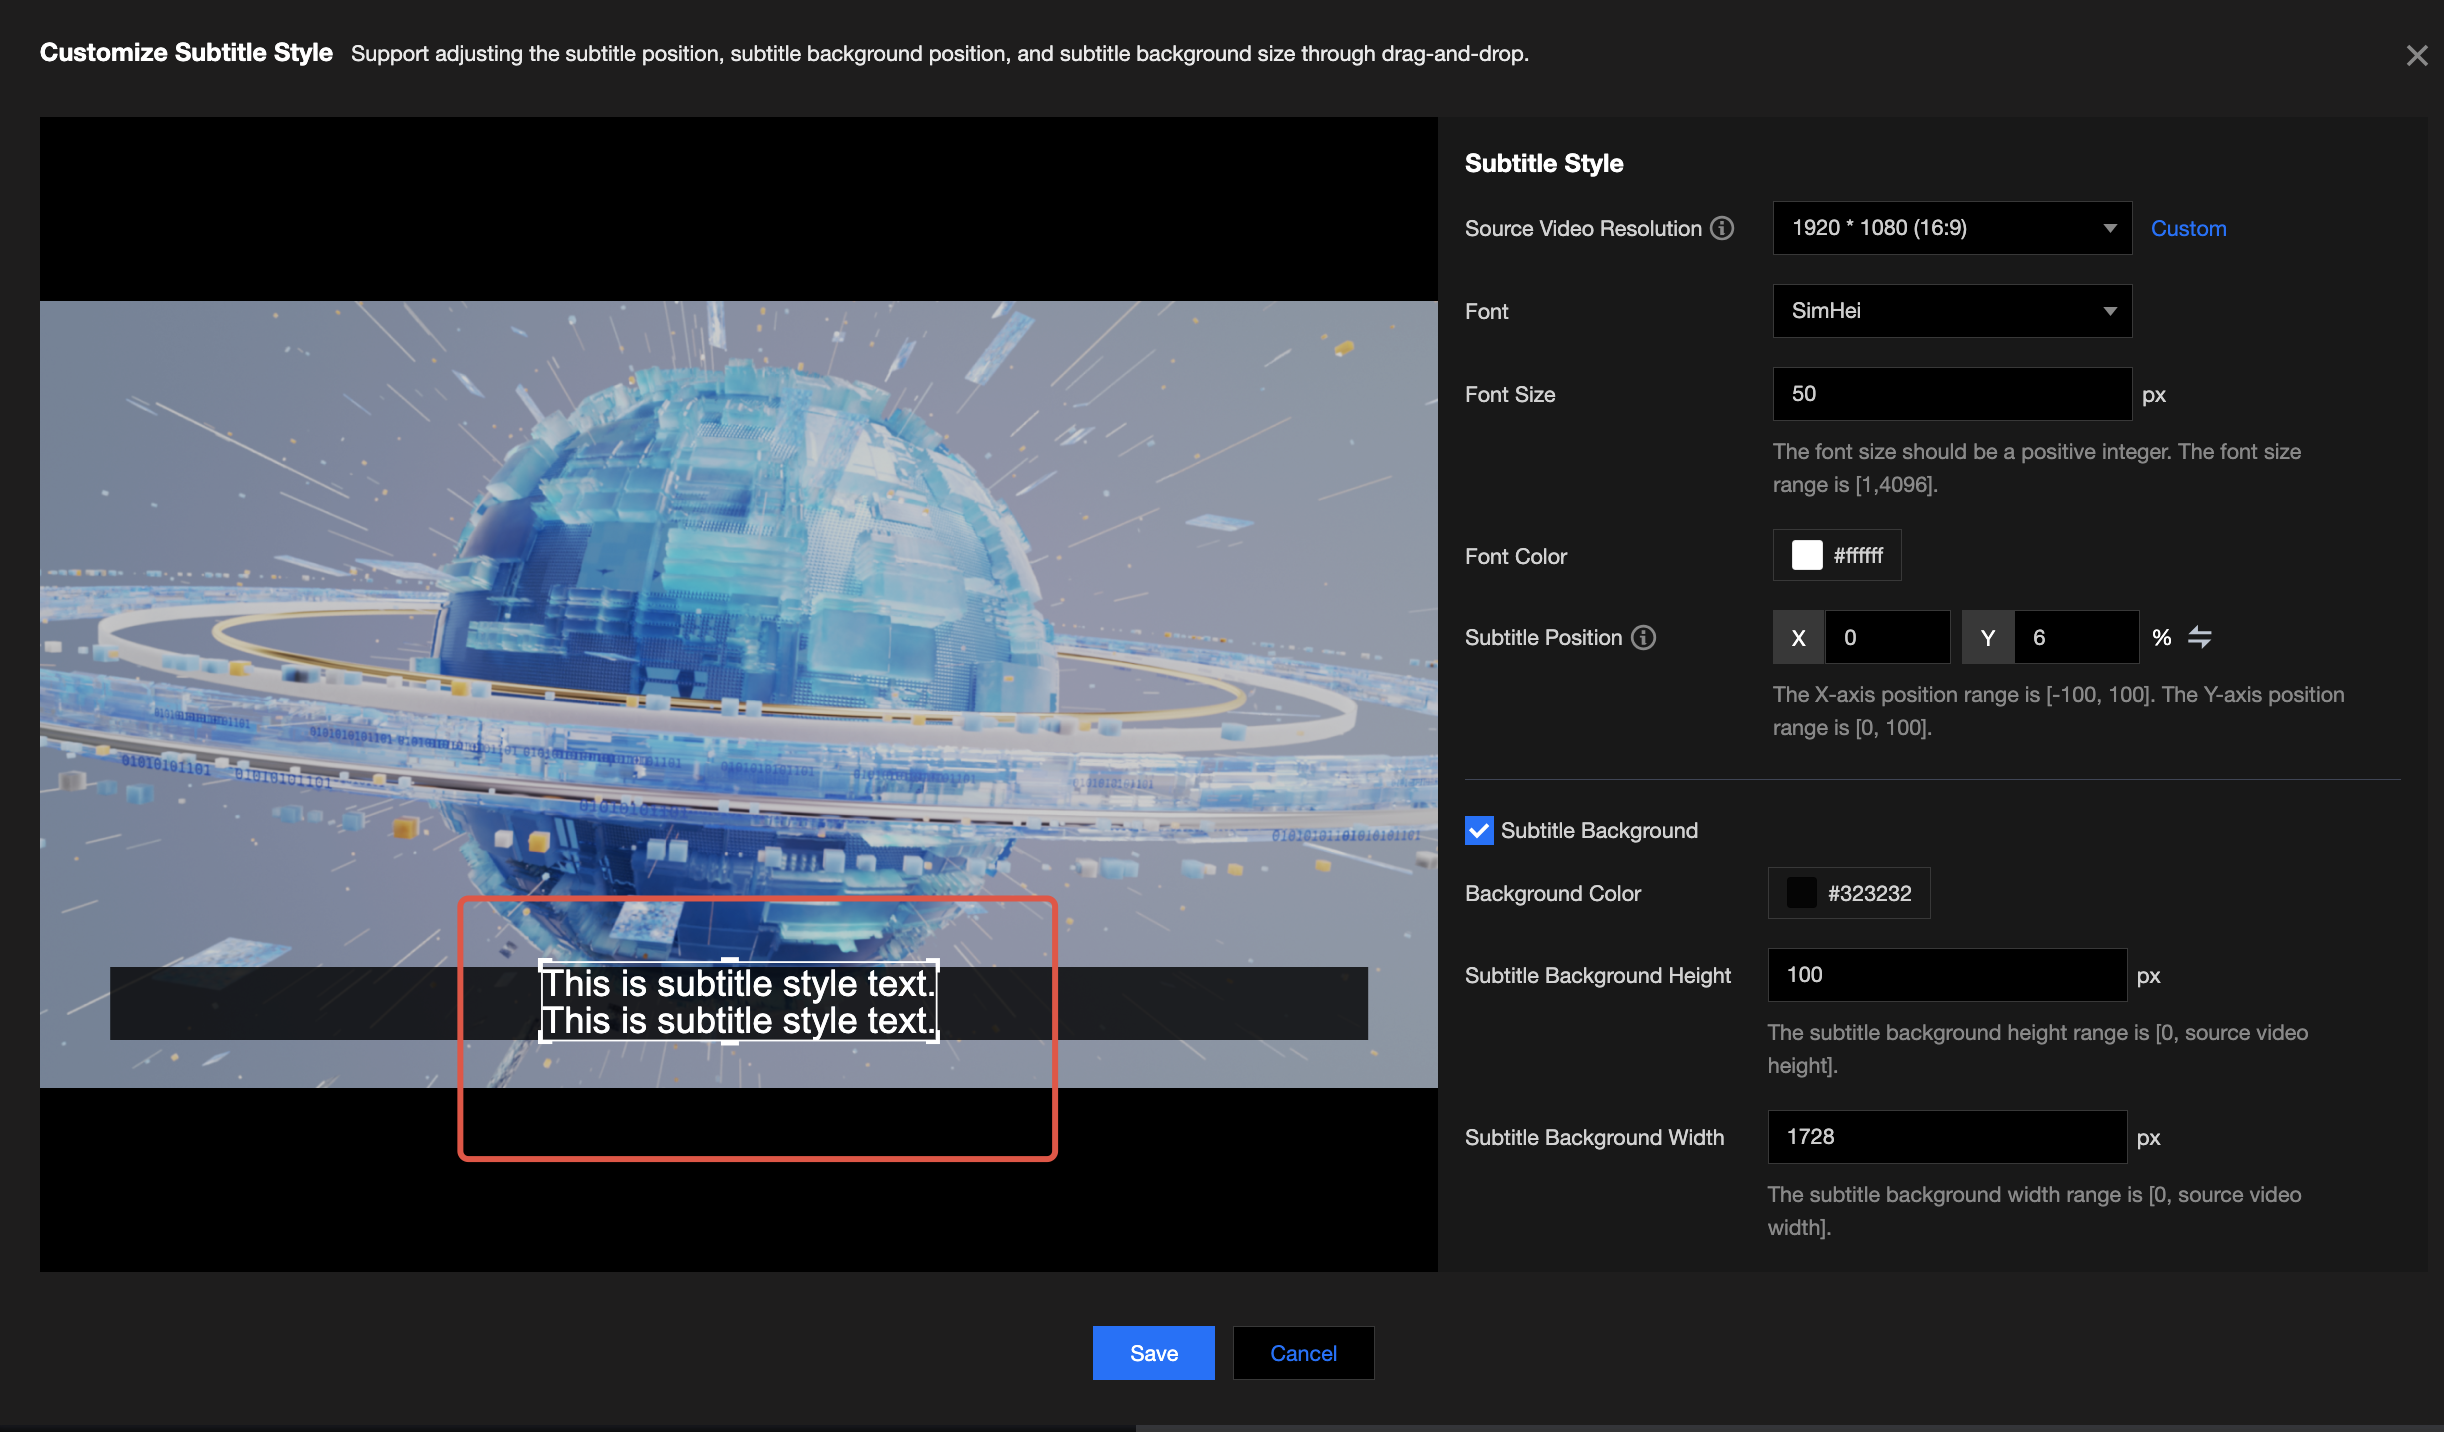
When customizing the subtitle style, you can check the display effect in the preview area to ensure that the final embedment effect meets expectations. The following table provides detailed descriptions of custom style parameters.
Basic Parameter | Source Video Dimensions | Support selecting preset dimensions or manually entering dimensions. If you manually enter dimensions, the range is [0, 4096]. Note: When you select or enter dimensions, ensure that the dimensions are consistent with the source video dimensions. Incorrect settings may cause subtitle rendering exceptions, impacting the final effect. |
| Font | Support selecting a system preset font. |
| Font Size | Support setting the font size in px, with a range of [1, 4096]. Enter a positive integer. Support manually entering values in the subtitle style settings area or selecting and then dragging the subtitle background in the preview area on the left side to resize the subtitle background. |
| Font Color | Support setting the font color and font color transparency. You can specify the A value in RGBA or HSLA to set the font color transparency. Value range: 0 to 1. 0 means completely transparent, and 1 means completely opaque. |
| Subtitle Position | Support setting the subtitle position in px or %. You can manually enter values in the style settings area or select and then drag subtitles in the preview area on the left side to adjust the position. Note: When you adjust the subtitle or background position, make sure that it is completely within the screen view area. Otherwise, the effect may not be as expected. |
Subtitle Background | Background Color | Support setting the subtitle background color and background color transparency. You can specify the A value in RGBA or HSLA to set the color transparency. Value range: 0 to 1. 0 means completely transparent, and 1 means completely opaque. |
| Subtitle Background Height | Support setting the subtitle background height/width in px. Be careful not to exceed the source video height/width when you enter values. Support manually entering values in the subtitle style settings area or selecting and then dragging the subtitle background in the preview area on the left side to resize the subtitle background. |
| Subtitle Background Width | |
| Background Position | Support setting the subtitle background position in px or %. You can manually enter values in the style settings area or select and then drag the subtitle background in the preview area on the left side to adjust the position. Note: When you adjust the subtitle or background position, make sure that it is completely within the screen view area. Otherwise, the effect may not be as expected. |
Arrangement | Line Spacing | Support setting the line spacing in px, with a range of [0, 1000]. |
| Alignment Mode | Support two modes: top alignment and bottom alignment. Top alignment: For a single-line subtitle, the subtitle is at the position of the first line of multi-line subtitles. The top position of subtitles is fixed, and the bottom position changes according to the number of lines. Bottom alignment: For a single-line subtitle, the subtitle is at the position of the last line of multi-line subtitles. The bottom position of subtitles is fixed, and the top position changes according to the number of lines. |
Text Stroke | Color | Support setting the text stroke color and stroke color transparency. You can specify the A value in RGBA or HSLA to set the color transparency. Value range: 0 to 1. 0 means completely transparent, and 1 means completely opaque. |
| Thickness | Support setting the text stroke thickness in px, with a range of [0, 1000]. |
Text Shadow | Color | Support setting the text shadow color and shadow color transparency. You can specify the A value in RGBA or HSLA to set the color transparency. Value range: 0 to 1. 0 means completely transparent, and 1 means completely opaque. |
| Shadow Width | Support setting the shadow width in px, with a range of [0, 1000]. |
Method 2: Initiating Subtitle Embedment Tasks via API Calls
When initiating a transcoding task by calling the API ProcessMedia, you can specify the subtitle file through the SubtitleTemplate field.
{"MediaProcessTask": {"TranscodeTaskSet": [{"Definition": 101005, //Transcoding template ID. 101005 is ID of a preset temlate, can be replaced with the ID of the transcoding template you need."OverrideParameter": { //Overwriting parameters that are used for flexibly overwriting some parameters in the transcoding template."SubtitleTemplate": { //Subtitle embedment configurations."Path": "https://test-1234567.cos.ap-nanjing.myqcloud.com/mps_autotest/subtitle/1.vtt", //Subtitle file path."StreamIndex": 2,"FontType": "simkai.ttf","FontSize": "10px","FontColor": "0xFFFFFF","FontAlpha": 0.9}}}]},"InputInfo": { //Input video information."Type": "URL","UrlInputInfo": {"Url": "https://test-1234567.cos.ap-nanjing.myqcloud.com/mps_autotest/subtitle/123.mkv"}},"OutputStorage": { //Output bucket."Type": "COS","CosOutputStorage": {"Bucket": "test-1234567","Region": "ap-nanjing"}},"OutputDir": "/mps_autotest/output2/", //Output path."Action": "ProcessMedia","Version": "2019-06-12"}
Audio/Video Enhancement
When transcoding, you can choose whether to use the audio/video enhancement feature. For detailed integration instructions, see Audio/Video Enhancement Integration Tutorial.
When using the API, you can enable the enhancement feature by configuring the EnhanceConfig parameter during
transcoding template creation: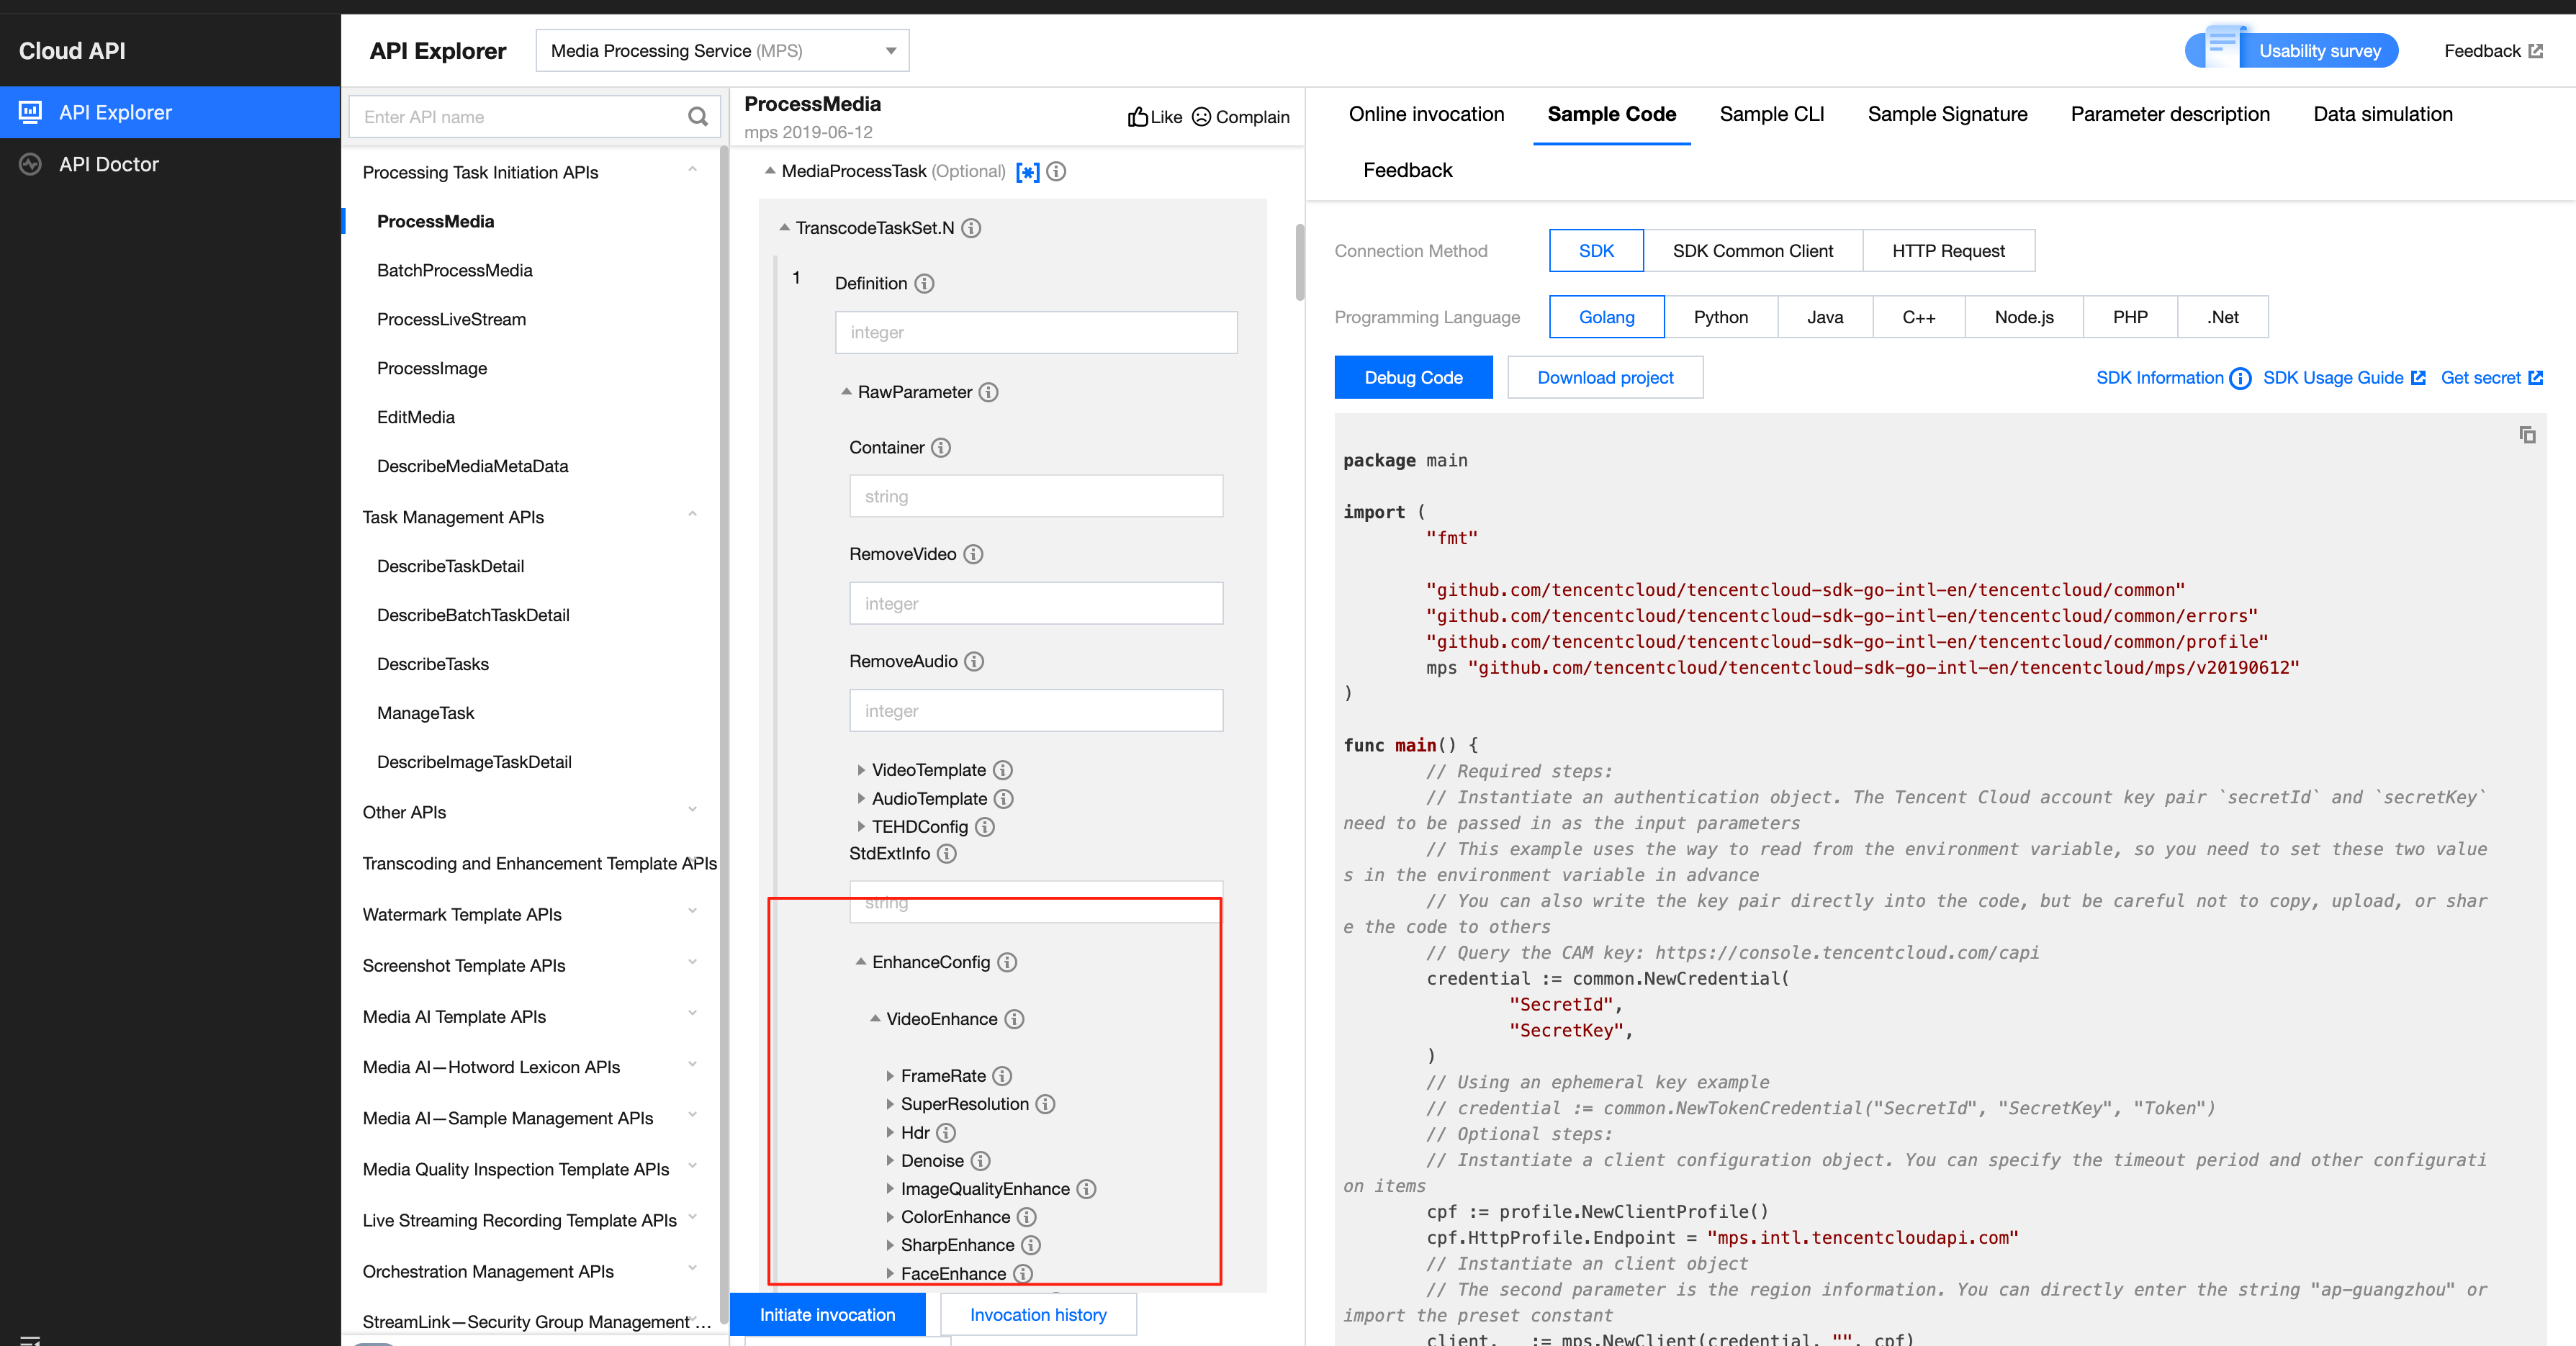
The example JSON is as follows:
{"Container": "mp4","Name": "test","VideoTemplate": { //Video transcoding parameter configuration."Codec": "h264","Fps": 50,"Bitrate": 5000,"Width": 0,"Height": 0,"Gop": 0},"AudioTemplate": { //Audio transcoding parameter configuration."Codec": "aac","Bitrate": 60},"EnhanceConfig": { //Enhancement parameter configuration."VideoEnhance": { //Video enhancement configuration."FrameRate": { //Frame interpolation."Switch": "ON","Fps": 50},"SuperResolution": { //Super resolution."Switch": "ON","Type": "lq"}},"AudioEnhance": { //Audio enhancement configuration."Denoise": { //Audio denoising."Switch": "ON"}}}}
On-demand Processing Solution
While providing high-quality transcoding features, Tencent Cloud's audio and video services offer enhancements and on-demand "Quality Inspection + Transcoding & Enhancement". For usage scenarios targeting cost optimization, a quality inspection process can be performed on the video source before the execution of the transcoding process. Then, based on the quality inspection results, a targeted transcoding template can be selected. For detailed methods of integrating media quality inspection, see the Media Quality Inspection Integration documentation.
FAQs
How to Achieve a Higher Compression Rate?
In addition to setting normal encoding parameters such as bitrate and CRF, we recommend using the extreme compression template in TSC (which contains preset templates for various scenarios) to experience higher compression and better image quality.
How to Improve the Image Quality for Optimal Results?
If there are further requirements for image quality, it is recommended to use the audio/video enhancement feature, which can significantly improve the image quality and has various capabilities such as comprehensive enhancement, face enhancement, artifacts removal, color enhancement, super-resolution, intelligent frame interpolation, and large models. For detailed integration instructions, see Audio/Video Enhancement Integration Tutorial.
Whether Object Storage of Other Platforms Can Be Configured as the Output File Storage Path for Transcoding?
Yes. The object storage path of other platforms can be configured through the additional parameter
StdExtInfo. For details, see the section Appendix: Additional Parameters for Transcoding-Related APIs above.Whether External Subtitles Are Supported?
When using an adaptive bitrate stream for videos, you can specify external subtitle files through the AddOnSubtitles field to generate multi-bitrate HLS with subtitles.
To avoid the risk of character corruption, currently only UTF-8 encoded subtitle files are supported. Accepted formats include: SRT, WebVTT, ASS, and SSA.
{"InputInfo": { //Enter video information."Type": "COS","CosInputInfo": {"Bucket": "test-1234567","Region": "ap-guangzhou","Object": "/test/subtitleinput/test.mp4"}},"OutputStorage": { //Output bucket."Type": "COS","CosOutputStorage": {"Bucket": "cg-1308104797","Region": "ap-guangzhou"}},"OutputDir": "/yunaMPStest/abroutput/", ////Output path."MediaProcessTask": {"AdaptiveDynamicStreamingTaskSet": [ //Adaptive bitrate stream configuration.{"Definition": 1414064, //Adaptive bitrate stream template ID."AddOnSubtitles": [ //External subtitle configuration.{"Type": "subtitle-stream","Subtitle": {"Type": "COS","CosInputInfo": {"Bucket": "test-1234567","Region": "ap-guangzhou","Object": "/test/subtitleinput/chs.srt"}},"SubtitleName": "chs"},{"Type": "subtitle-stream","Subtitle": {"Type": "COS","CosInputInfo": {"Bucket": "test-1234567","Region": "ap-guangzhou","Object": "/test/subtitleinput/cht.srt"}},"SubtitleName": "cht"},{"Type": "subtitle-stream","Subtitle": {"Type": "COS","CosInputInfo": {"Bucket": "test-1234567","Region": "ap-guangzhou","Object": "/test/subtitleinput/eng.srt"}},"SubtitleName": "eng"}]}]}}
Multi-Track Input Video: How to Generate Separate Streams in HLS for Playback Switching
Scenario:
When the source video contains multiple audio tracks (such as bilingual dubbing) or video tracks (e.g., an ABR HLS stream), you can do adaptive bitrate streaming with the following configuration to enable seamless switching between different audio or video tracks during playback.
Solution:
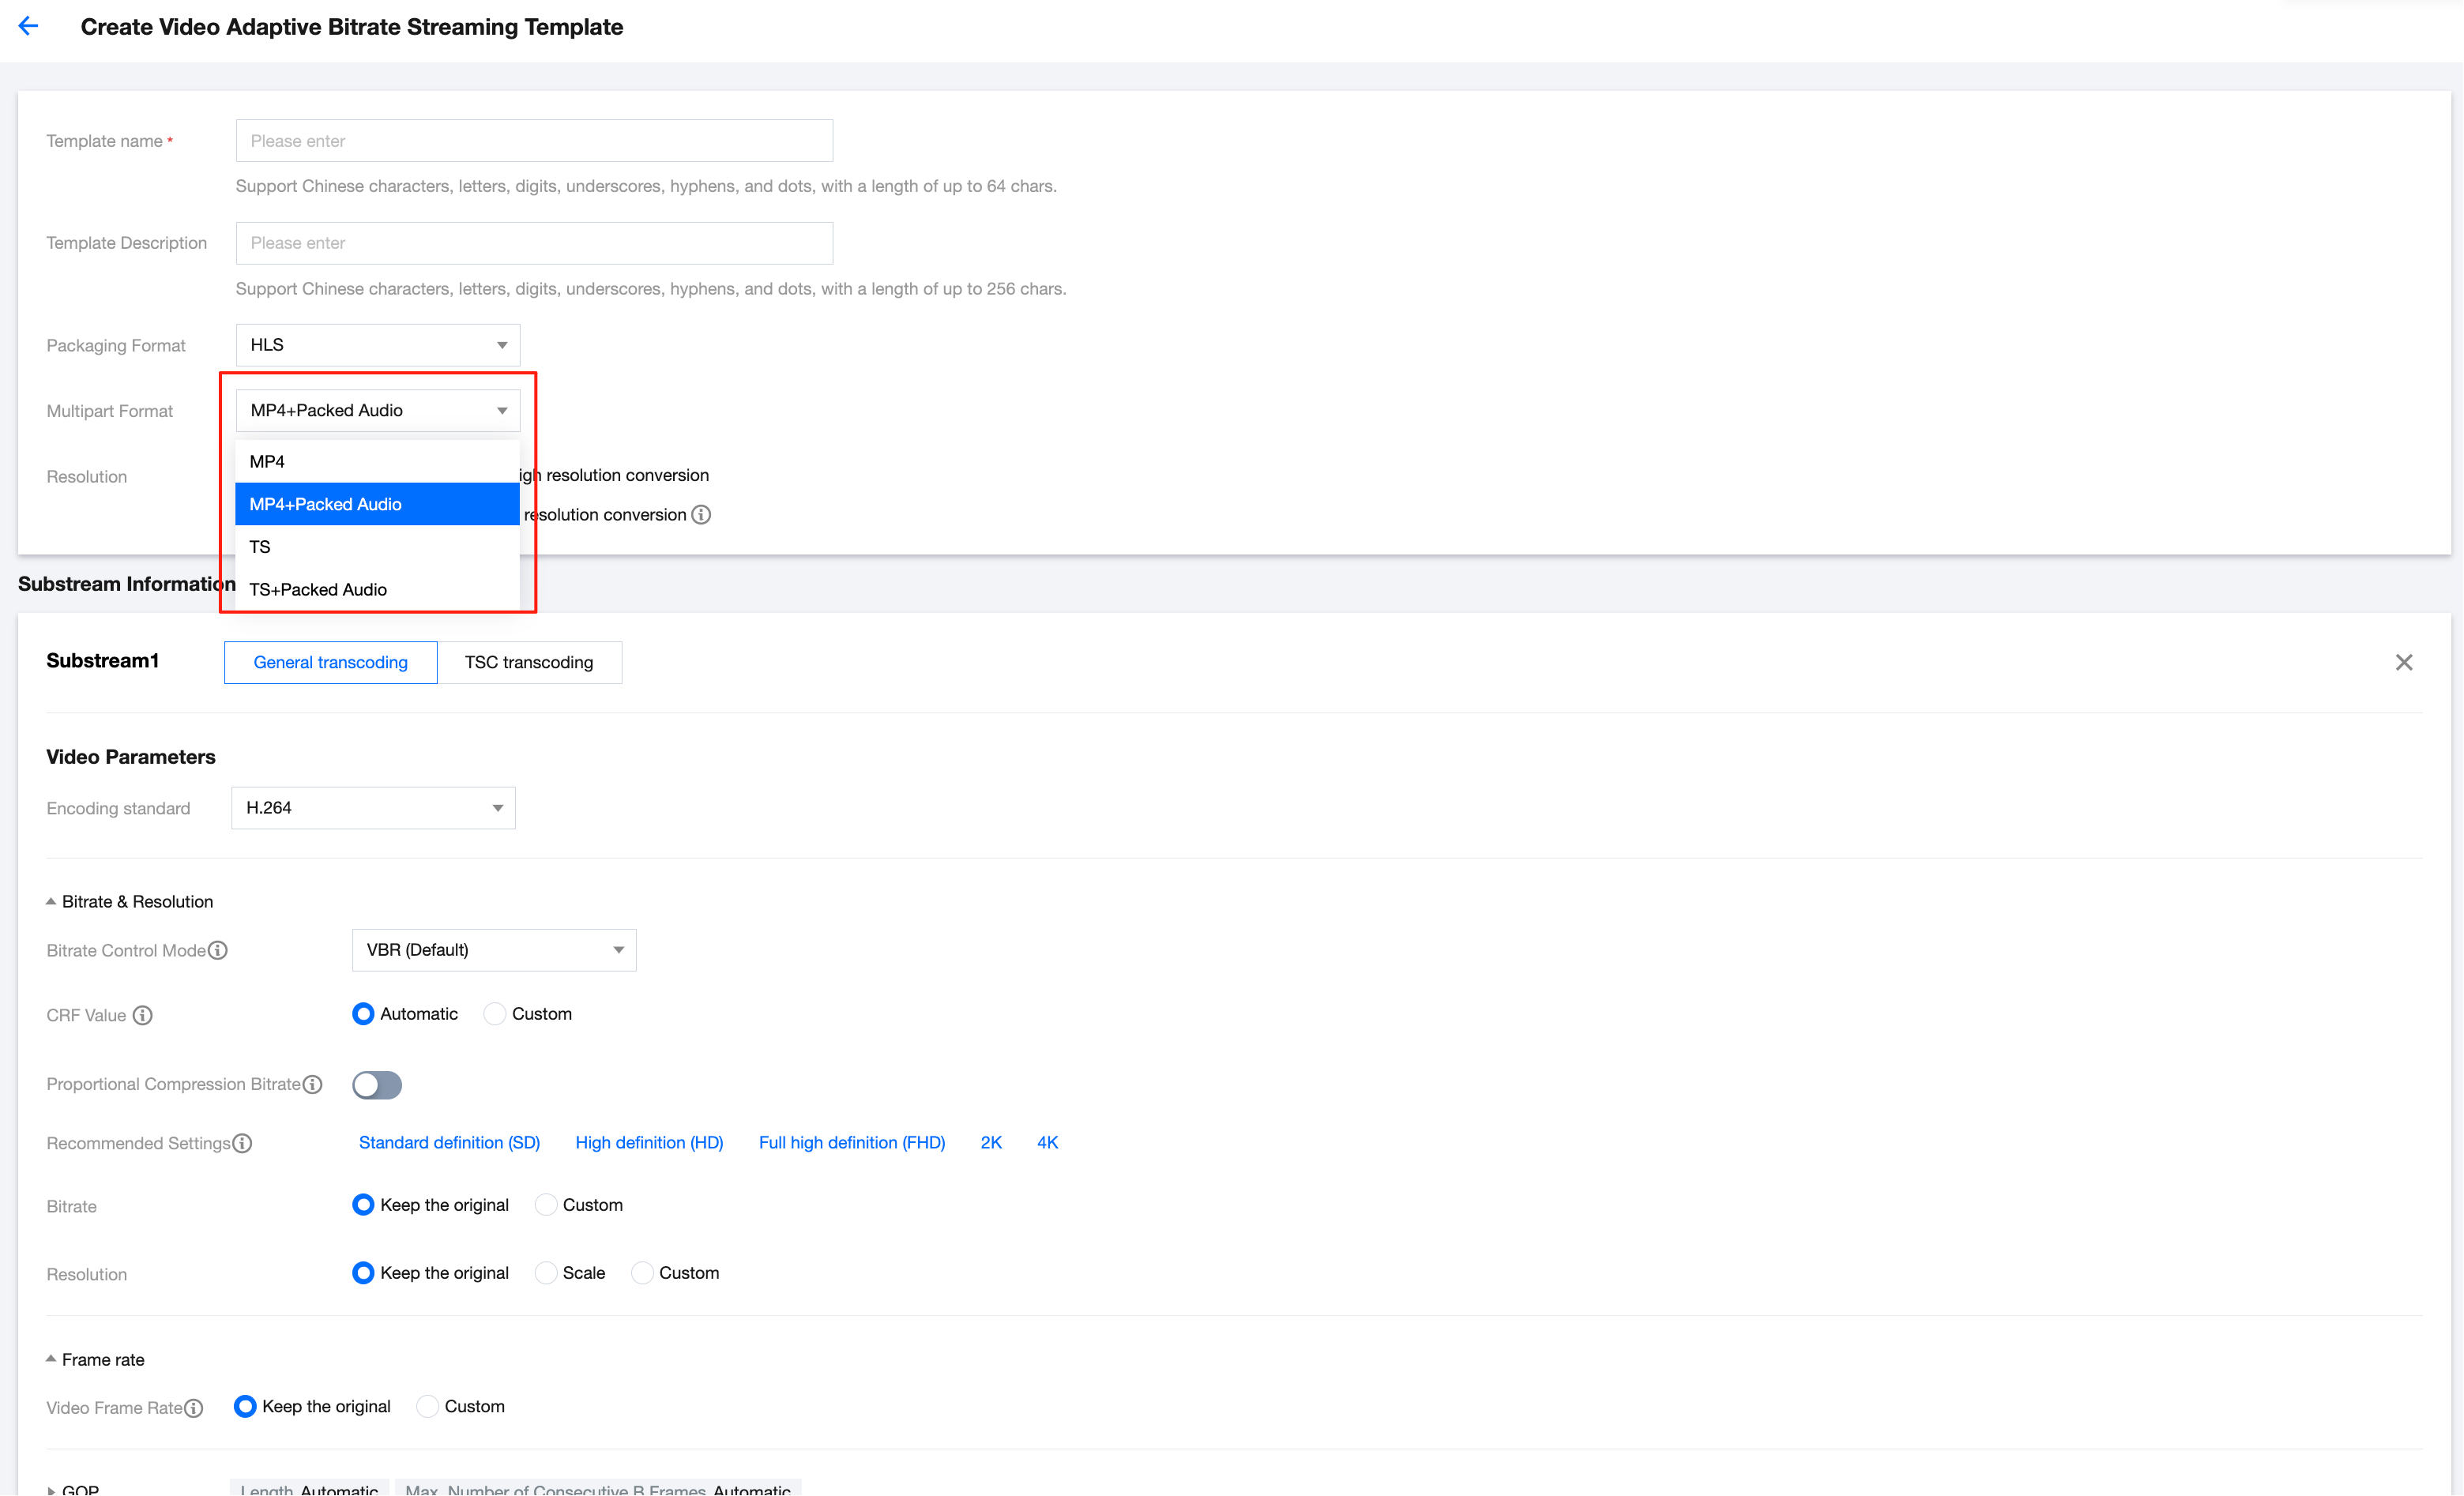
When creating a Video Adaptive Bitrate Streaming Template and selecting HLS as the output format, enable the "TS + Packed Audio" or "MP4 + Packed Audio" mode under the Multipart Format configuration. This will output video files (TS or MP4) alongside standalone raw audio files, allowing you to switch between different audio tracks during playback.
Video Adaptive Bitrate Streaming Template Configuration:
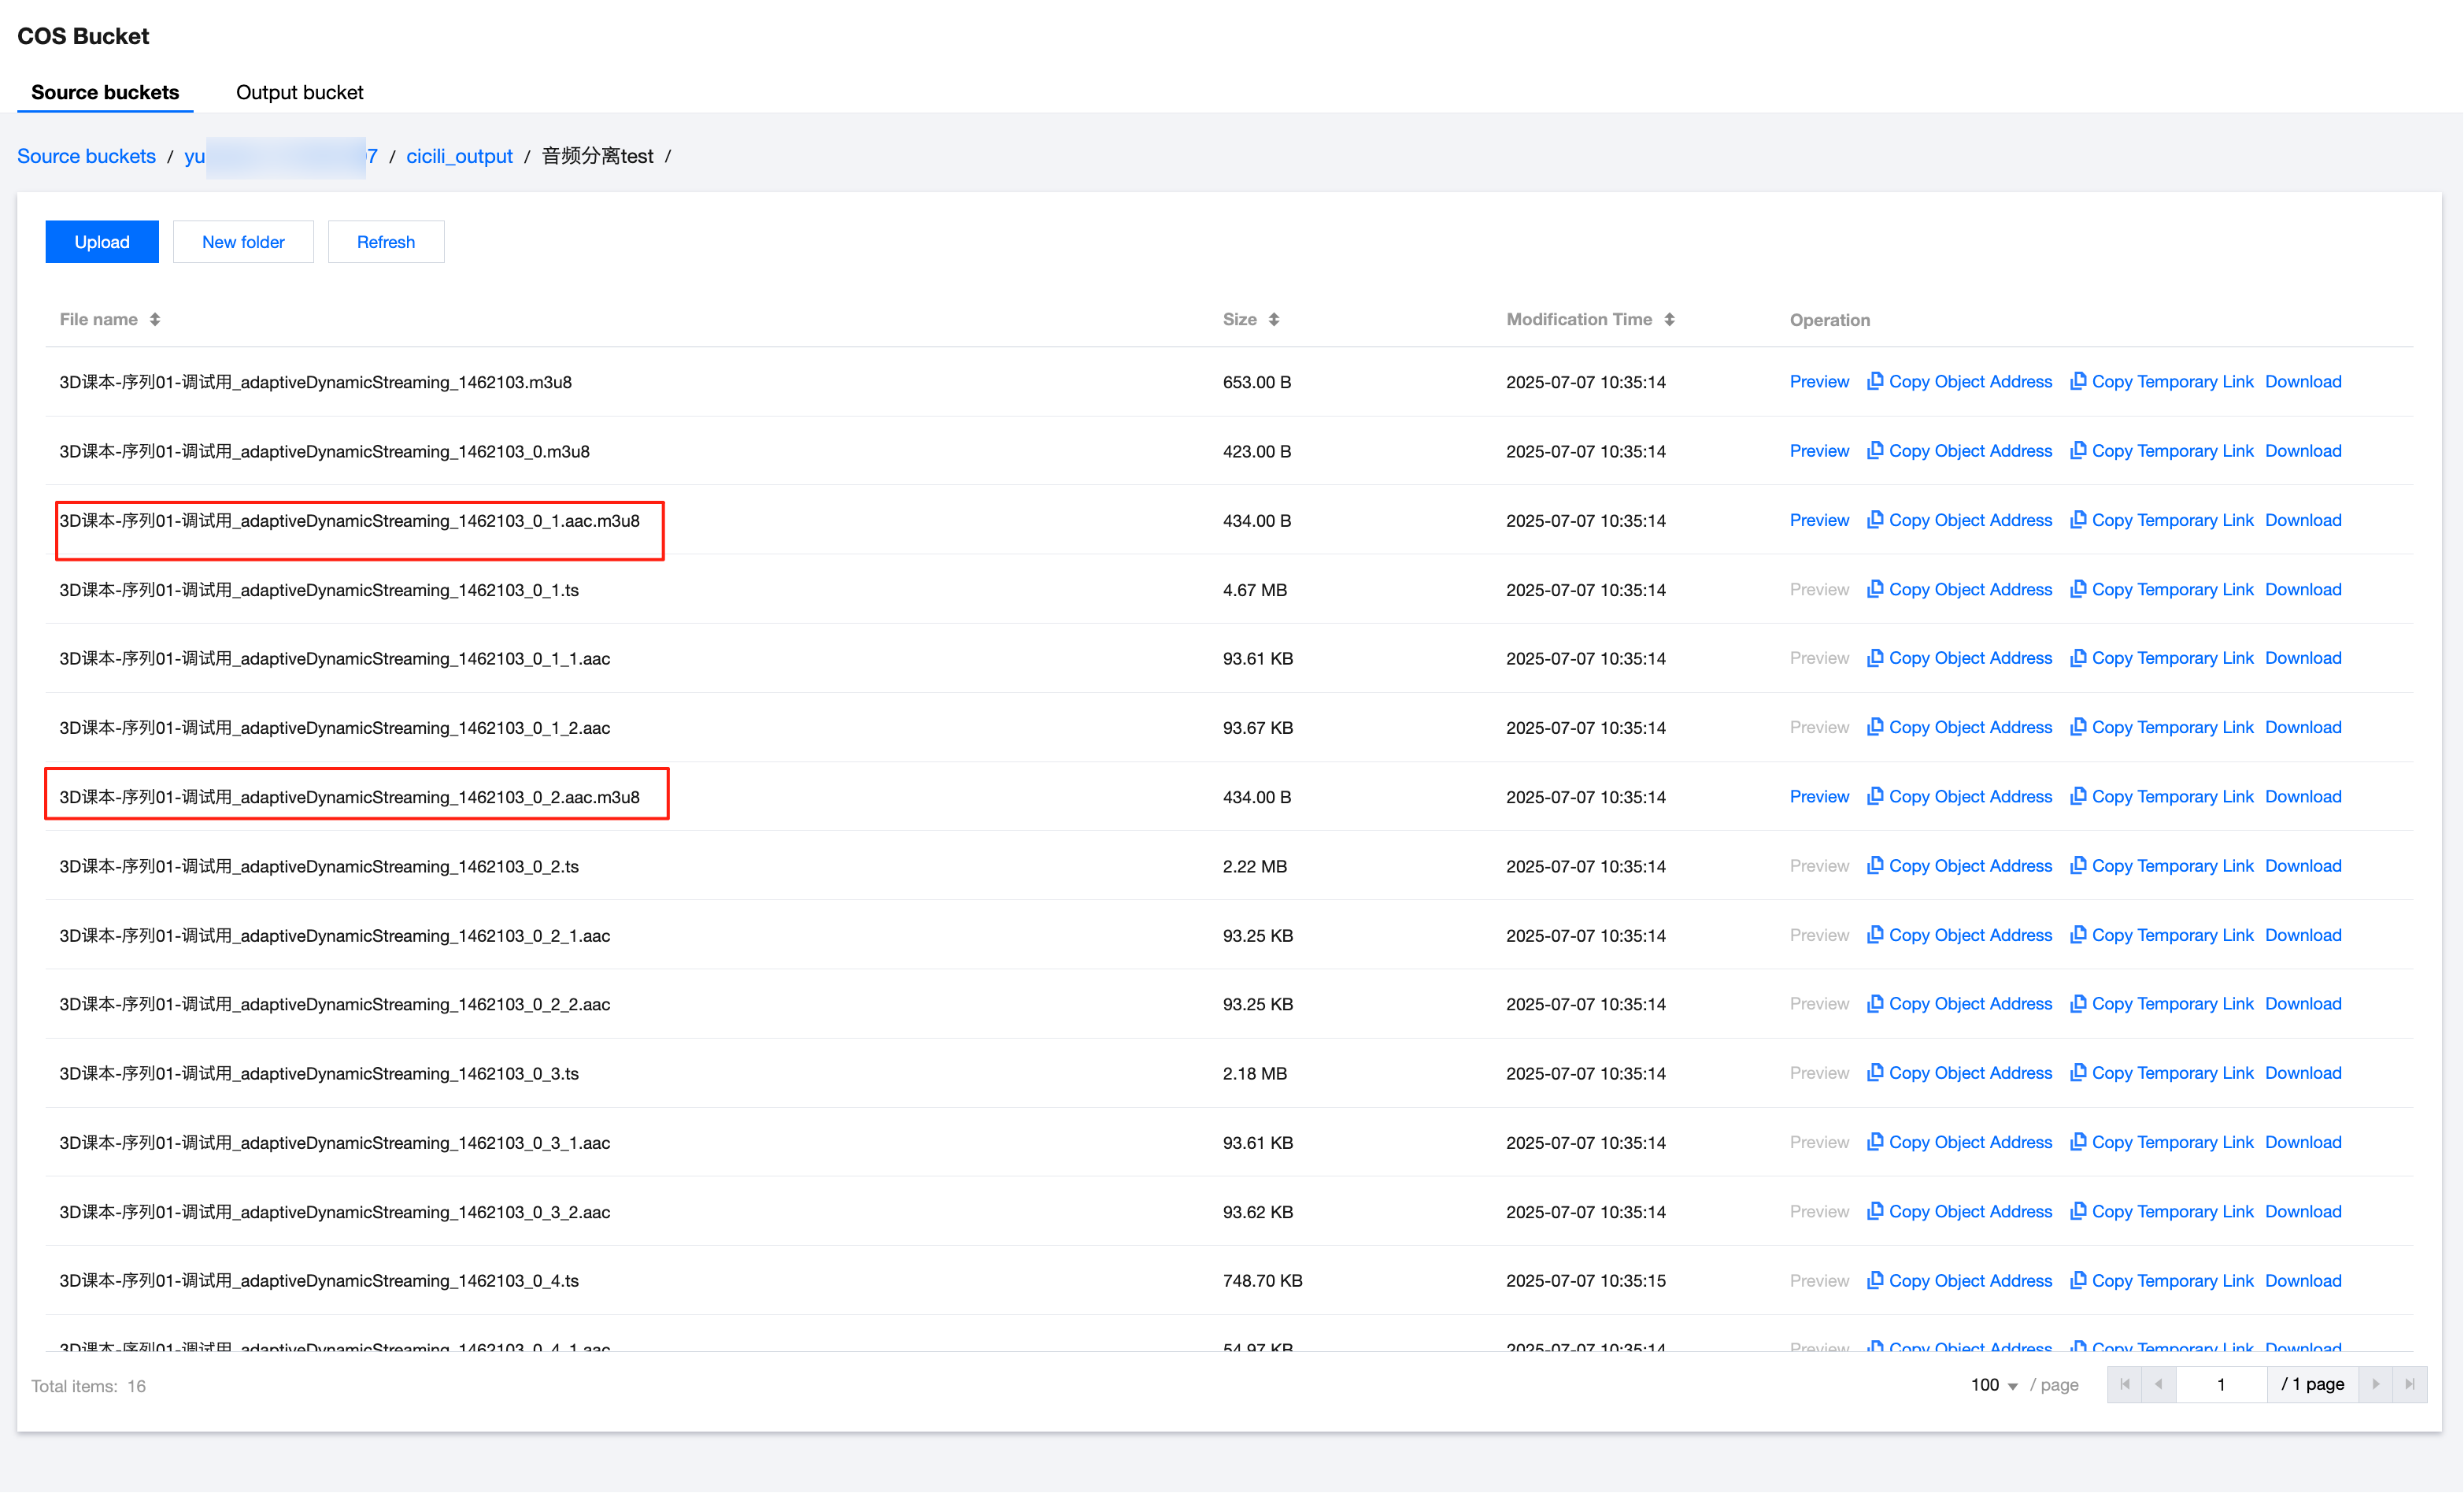
List of output files:
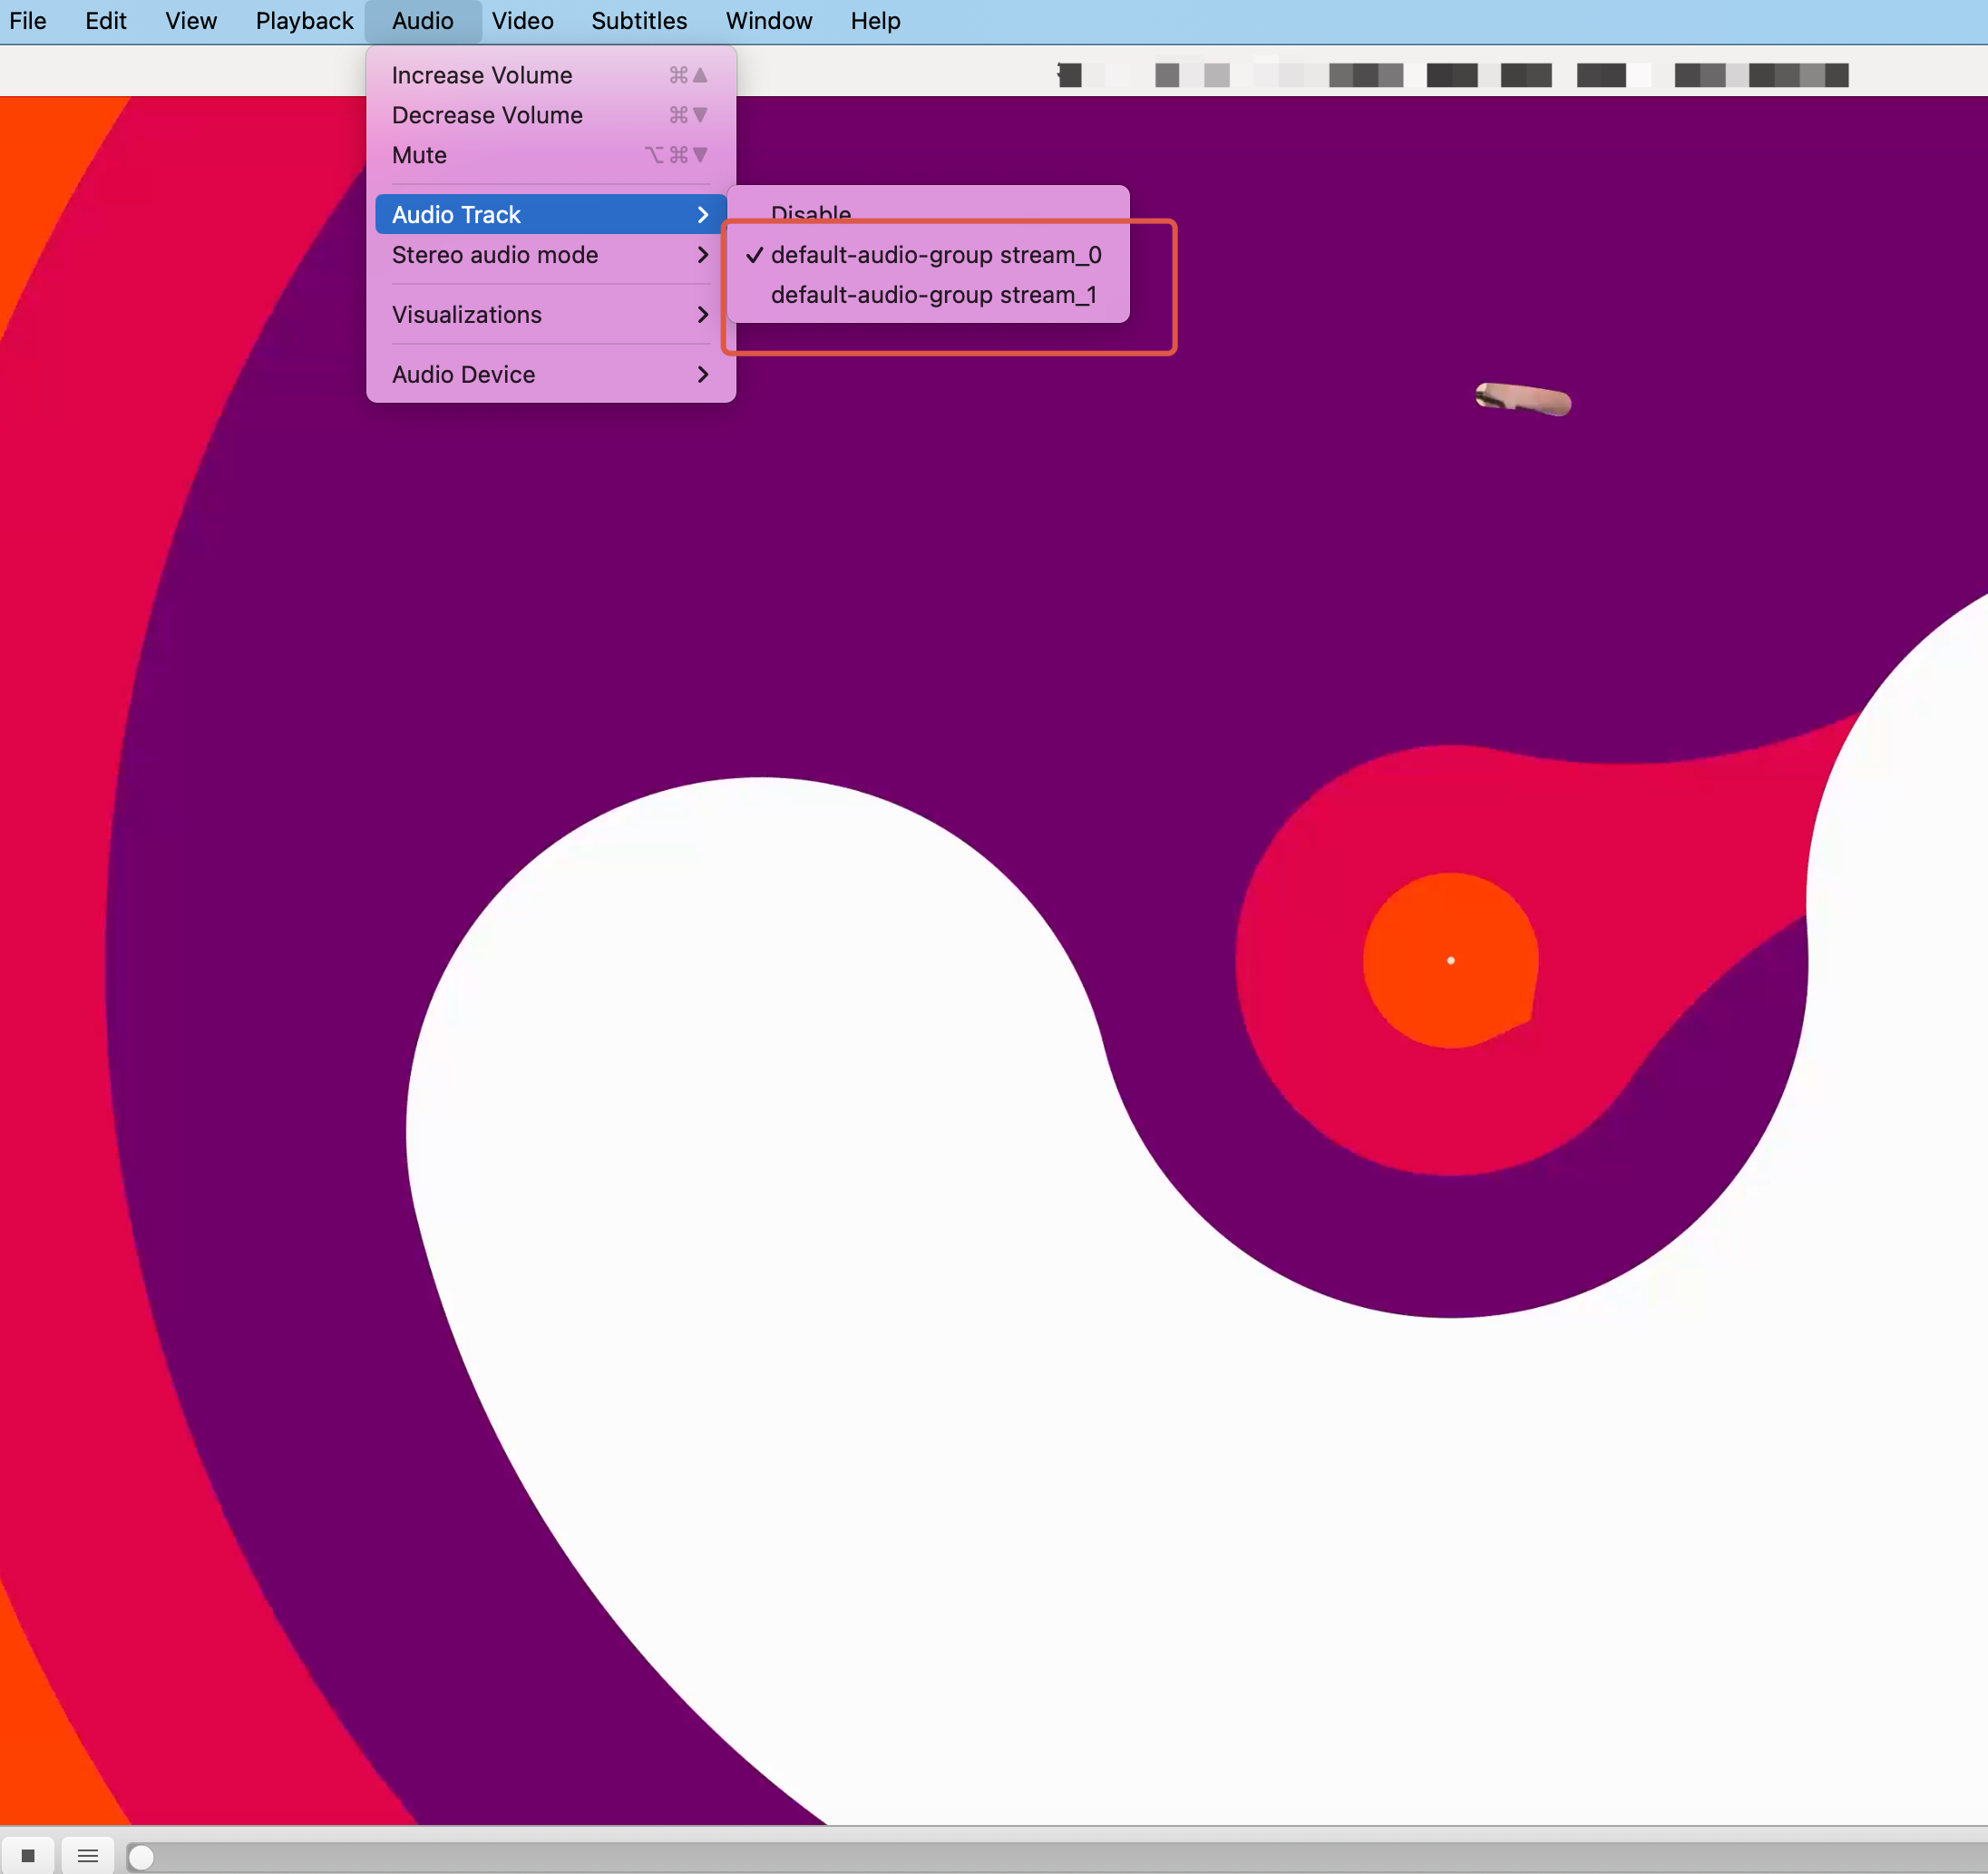
Player switches between different audio tracks:
What is accelerated transcoding? Does the service support it?
Accelerated transcoding significantly speeds up video processing times by splitting the video into segments for parallel encoding. This feature is particularly effective for handling medium to long videos. The Media Processing service supports accelerated transcoding, achieving speed-ups of over 30 times. To enable this feature, please contact us for activation.
Billing Overview
Tencent Cloud Media Processing (MPS) audio/video transcoding service adopts a billing model based on output file duration. It supports multiple processing types such as standard transcoding, Remux, TSC transcoding, audio-only transcoding, and off-peak transcoding. For the complete explanation of various types of billing rules, see Audio/Video Transcoding Billing.