Smart erase enables blurring, mosaic, or seamless processing of elements like logos, subtitles, human faces, and license plates in video images, thereby making it easy to spread and share content. The feature is widely used in multiple fields, such as short drama platforms, short video platforms, cross-border e-commerce, and independent media studios.
Technical Strengths
Support for multiple scenarios: It can automatically recognize and process over ten common logos. It can also erase sensitive information such as watermarks, subtitles, human faces, and license plates, offering multiple effects like blurry, mosaic, and seamless to meet the requirements of different scenarios.
High customizability: It supports customized adjustment of model parameters targeting your specific video scenario, thereby improving accuracy and processing effect of erasing to ensure the finally displayed image is more natural and smooth.
Demo
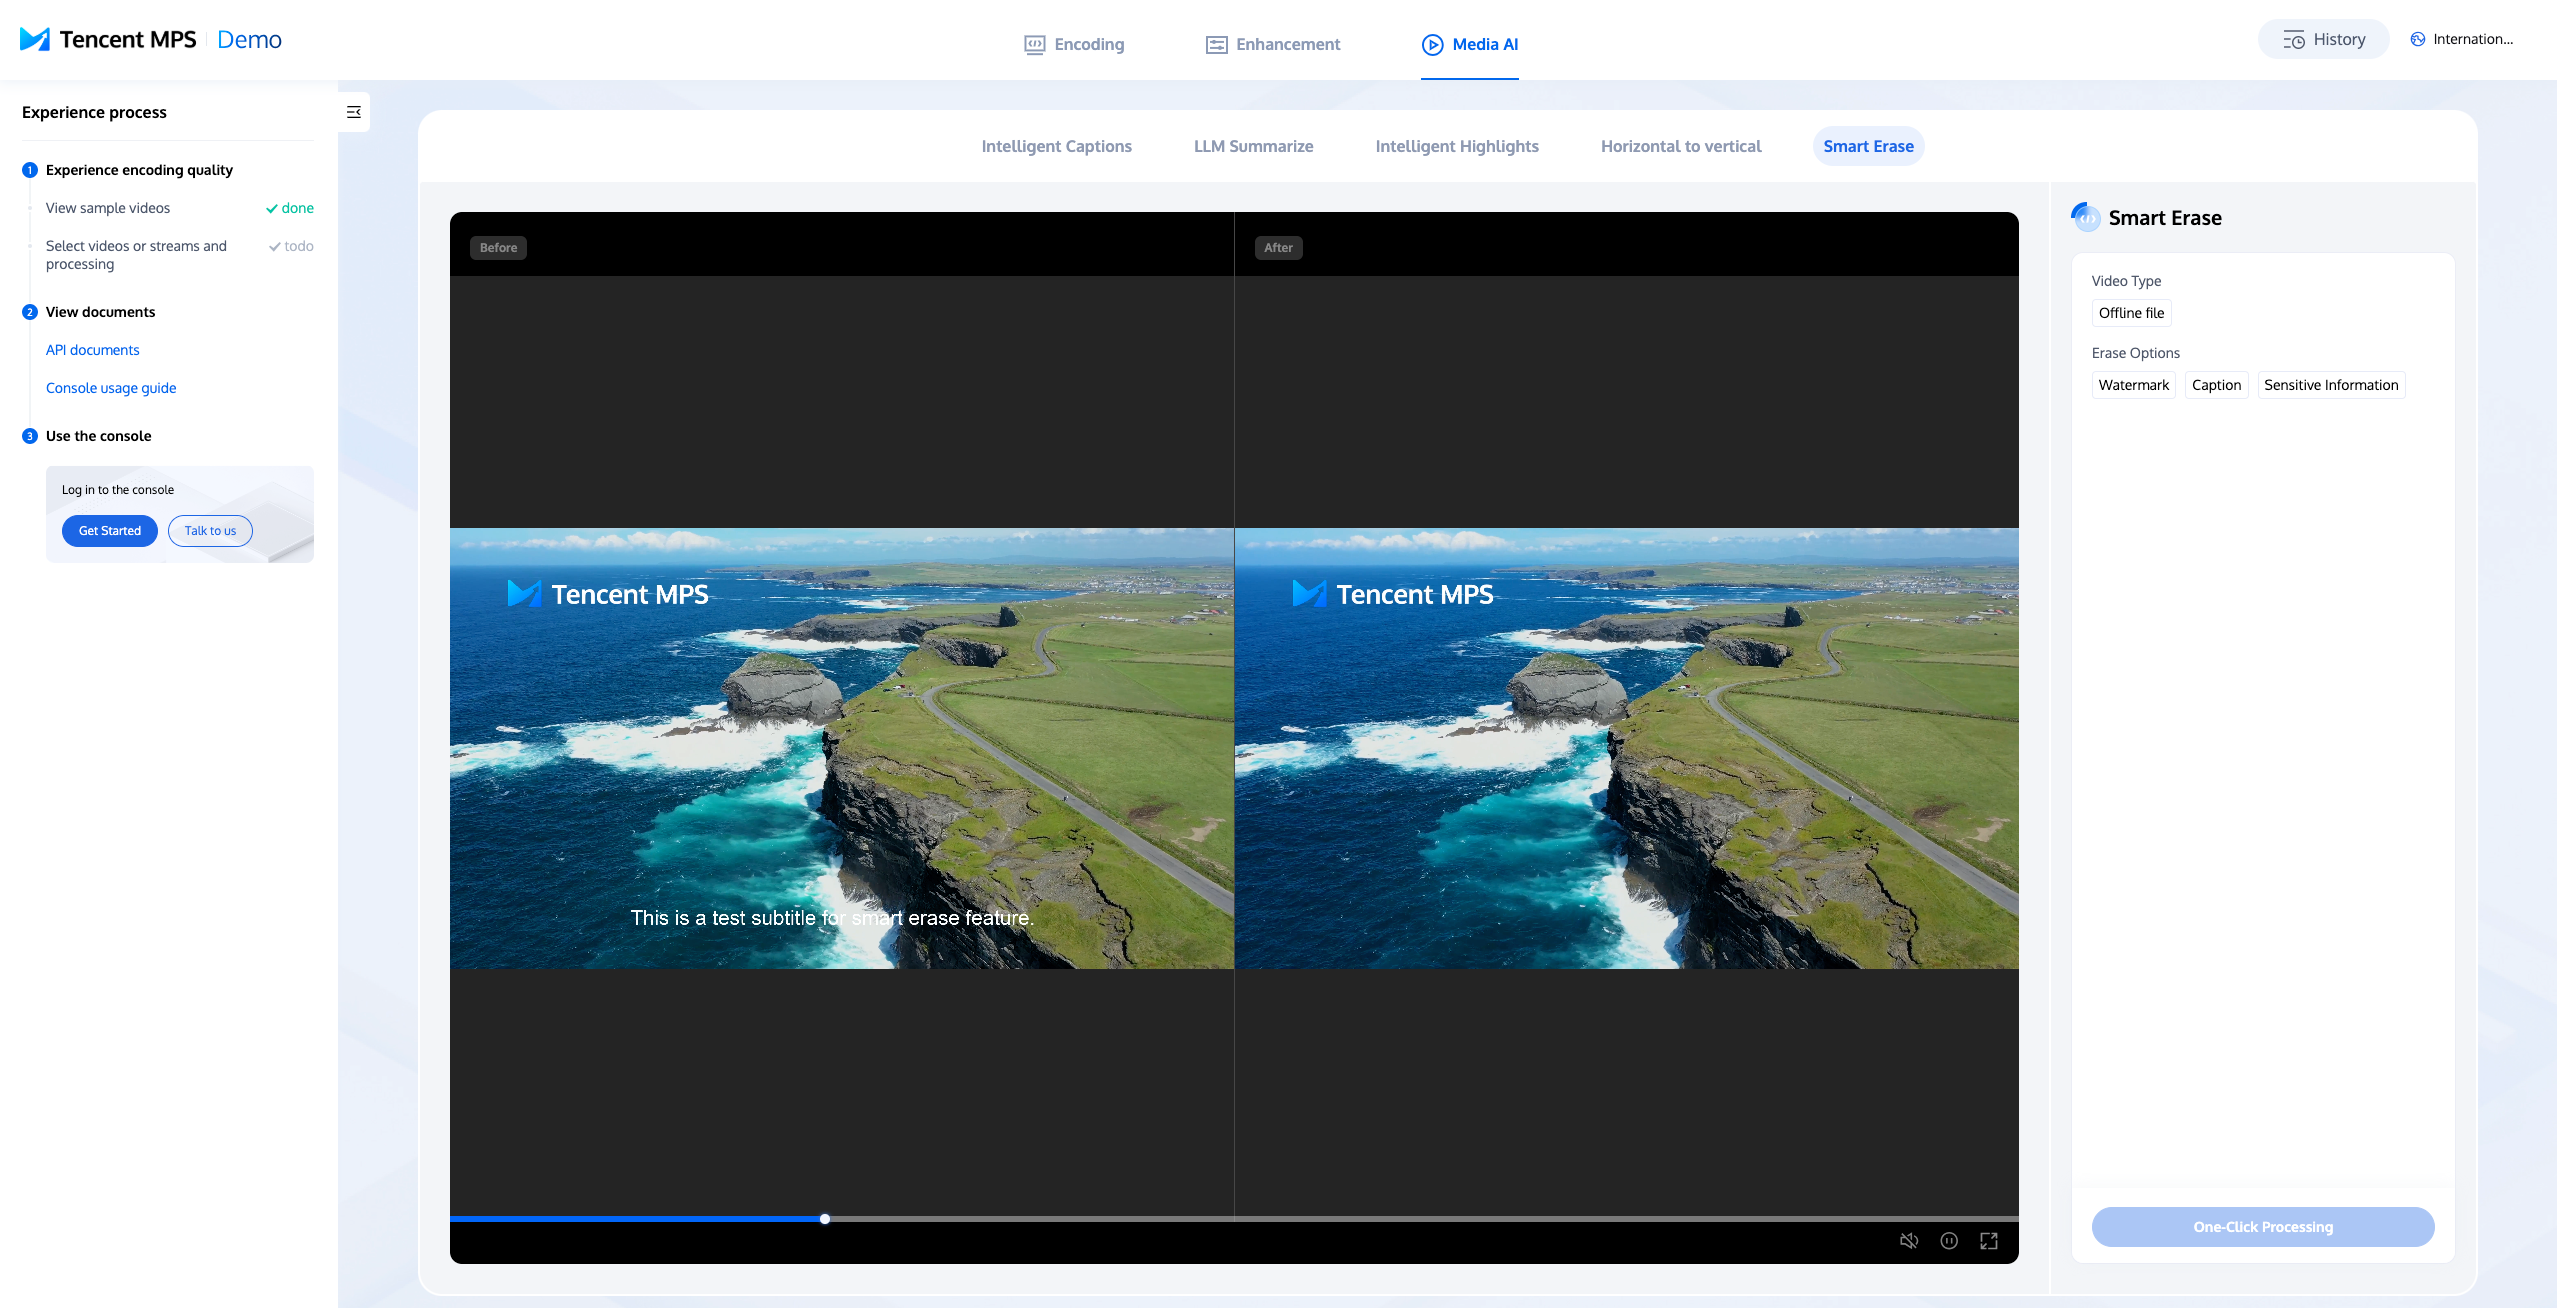
1. Access the Experience Center to navigate to the Smart Erase experience page. On the right-hand side, select either an offline video file or a live stream, and then click One-Click Processing.
2. Once the processing is complete, you can view the results.
Note:
The function of the MPS Demo is relatively simple, only for experiencing the basic effect, please use the API access to test the complete effect.
How to Initiate an Erasing Task
Note:
If an erasing task is initiated through the console, the ExtendedParameter cannot be passed in, and only basic watermark removal can be achieved. Therefore, if you need other capabilities such as subtitle removal or OCR-based subtitle extraction, see the following text to initiate an erasing task via the API method.
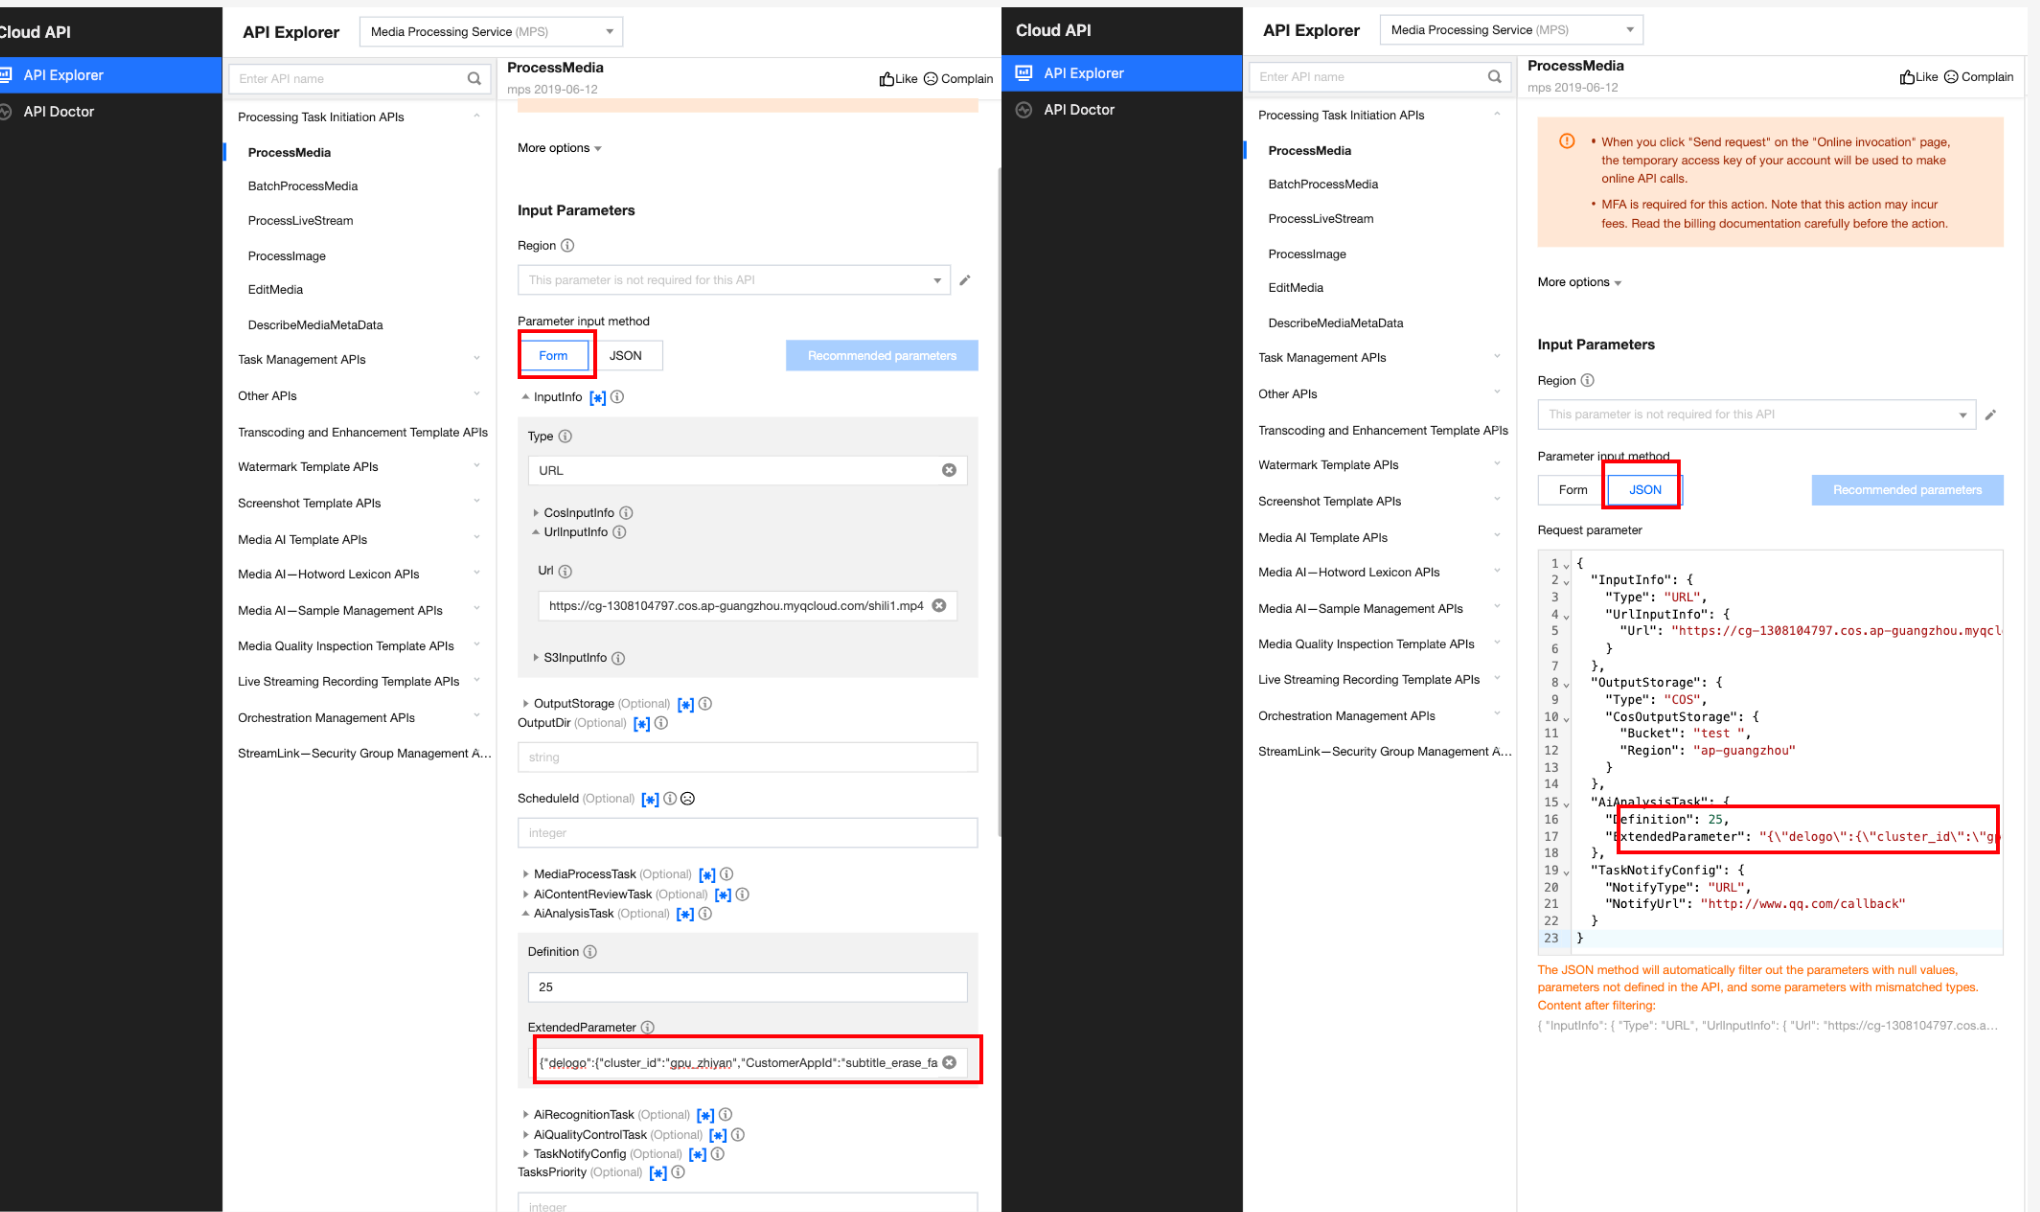
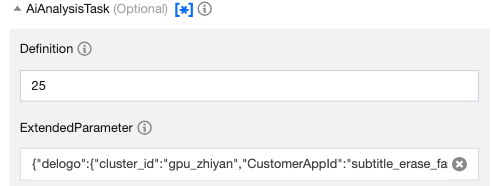
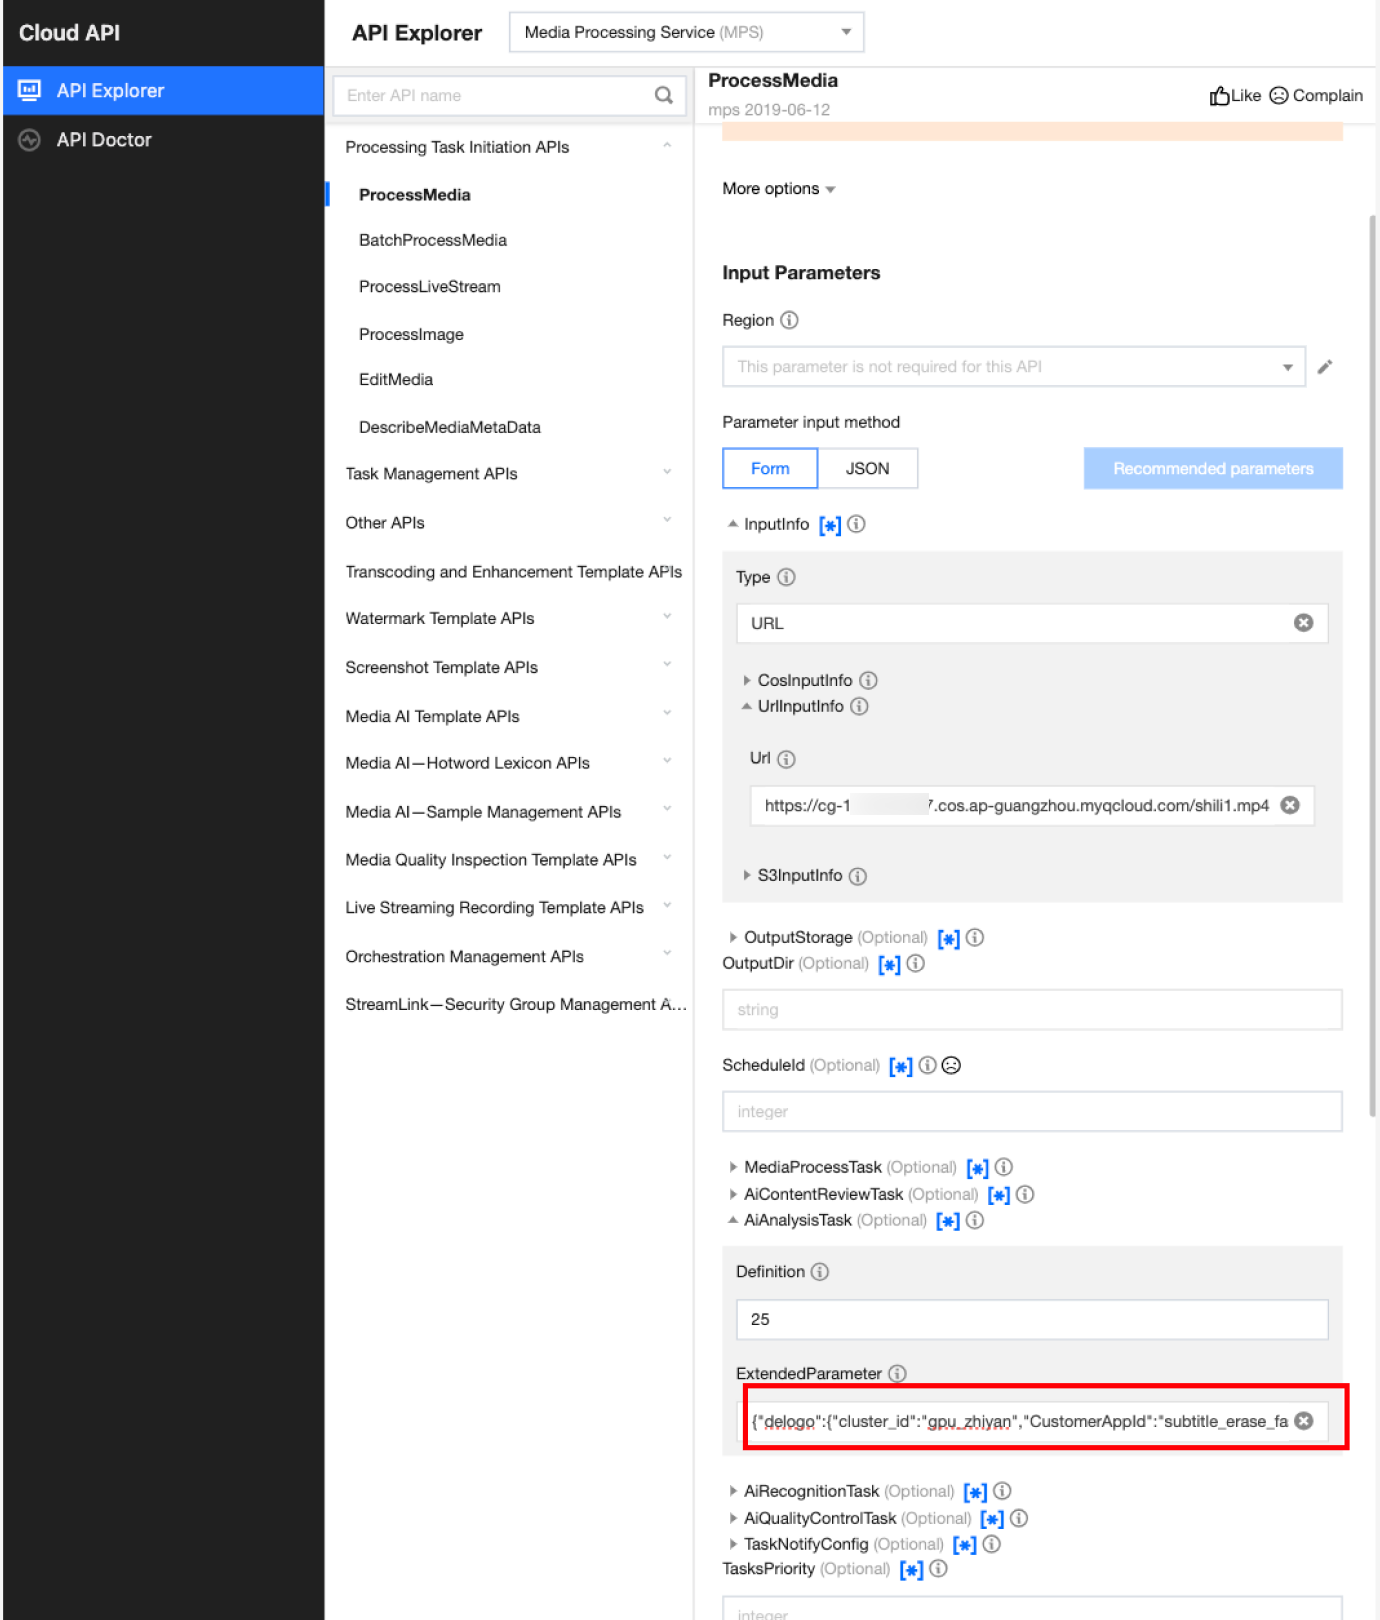
Call the ProcessMedia API, select the AiAnalysisTask task, set Definition to 25 (preset erasing template ID), fill in ExtendedParameter with additional parameters, and achieve different smart erasing capabilities by specifying this parameter. For parameter values, see API Parameter Passing Examples in Different Scenarios below. The JSON example for ProcessMedia is as follows:
{
"InputInfo":{//Input video path. Replace it with your original video.
"OutputDir":"/mps_test/output/",//Output folder path. Replace it.
"AiAnalysisTask":{
"Definition":25,//Preset template ID for smart erasing. Enter 25.
"ExtendedParameter":"{\"delogo\":{\"cluster_id\":\"gpu_zhiyan\",\"CustomerAppId\":\"subtitle_erase_fast\"}}"//Additional parameters. Replace them when selecting a different erasing capability.
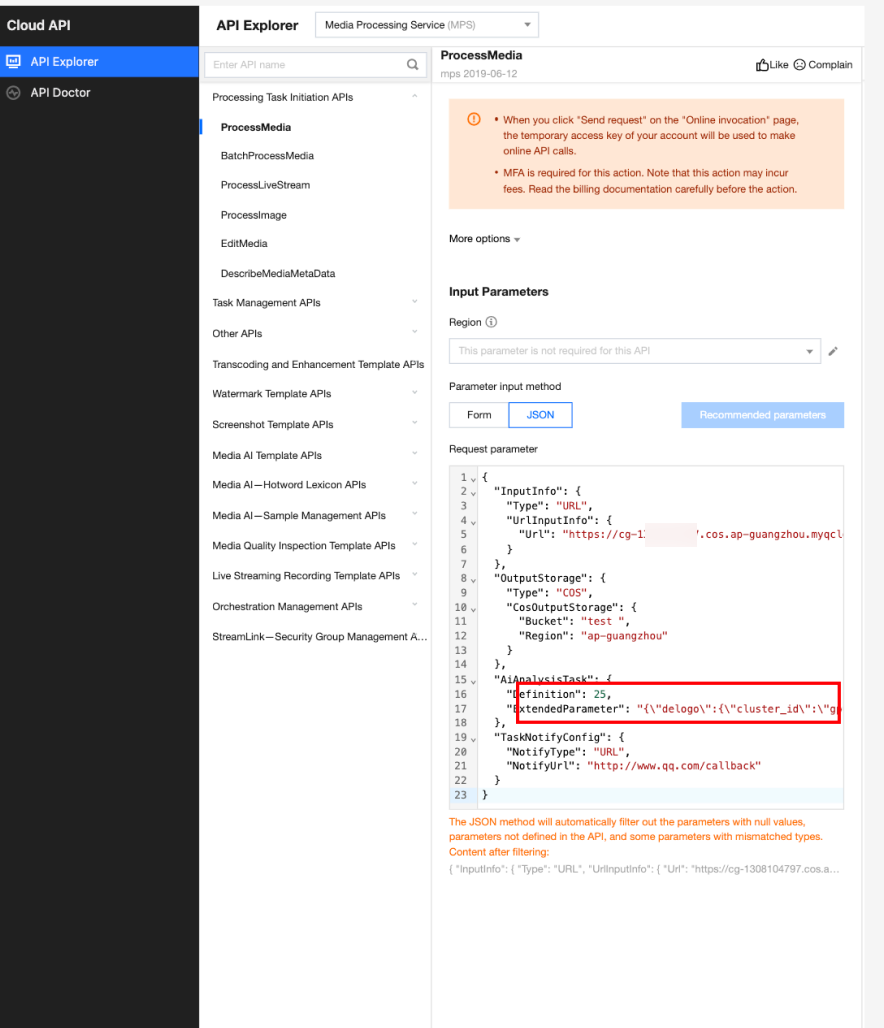
It is recommended that you use API Explorer for rapid verification. You can copy the above JSON to the JSON mode in API Explorer, switch to Form mode for automatic parsing, adjust required parameters such as input and output path, and click Initiate Call.
In API Explorer, the ExtendedParameter positions in both Form and JSON input modes are as follows:
Note:
When using API Explorer's Form mode to fill in ExtendedParameter, you need to directly pass in JSON without escaping it to a string. However, when using API Explorer's JSON mode or directly using the API, you should pass in an escaped string.
In the API Explorer Form mode, pass in JSON to ExtendedParameter:
In the API Explorer JSON mode, pass in an escaped string to ExtendedParameter:
API Parameter Passing Examples in Different Scenarios
The most commonly used atomic capability for smart erase is subtitle removal. To support businesses like short drama going abroad and video translation, it also supports the simultaneous execution of:
OCR-based subtitle extraction and translation: Extract subtitles and translate them to generate subtitle files in the target language.
Audio synthesis: Input a seamless video without subtitles and a calibrated subtitle file in the target language to generate a new video with dubbing in the target language.
Subtitle embedding: Embed subtitles into the video image.
Besides, smart erase also supports:
Logo removal: Remove the logos on the video.
Privacy protection processing: Perform blurring or mosaic processing on human faces and license plates.
To use different capabilities, you need to see the following text to pass in the corresponding ExtendedParameter.
When you use the subtitle removal feature, including automatic erasing, specified area erasing, and secondary processing for missed areas, a "subtitle removal" fee will be charged without distinguishing between the "Area Edition" and "Standard Edition" models. For pricing, see Smart Erase Billing Instructions.
Note:
Since subtitle removal for the output video requires full video encoding/decoding, the billing will be based on the total duration of the output video rather than the erasing period specified by the begin_ms and end_ms fields.
1.1 Subtitle Removal (Automatic Erasing)
Subtitle removal (automatic erasing) refers to automatically recognizing subtitle text content in the video through AI models, performing seamless erasing, and generating a new video. Image interference and special subtitle styles may bring certain missed or incorrect erasings, which can be handled through Subtitle Removal (Specified Area Erasing).
To use the subtitle removal (automatic erasing) capability, the basic passing of ExtendedParameter is as follows:
"OutputDir":"/mps_test/output/",//Output folder path. Replace it.
"AiAnalysisTask":{
"Definition":25,//Preset template ID for smart erasing. Enter 25.
"ExtendedParameter":"{\"delogo\":{\"cluster_id\":\"gpu_zhiyan\",\"CustomerAppId\":\"subtitle_erase_fast\"}}"//Additional parameters. Replace them when selecting a different erasing capability.
Specifying the Approximate Position of Subtitles and Protecting the Video Area that Does Not Require Erasing
The subtitle removal feature will automatically recognize the text areas in the lower central part of the video image by default and perform erasing on these areas.
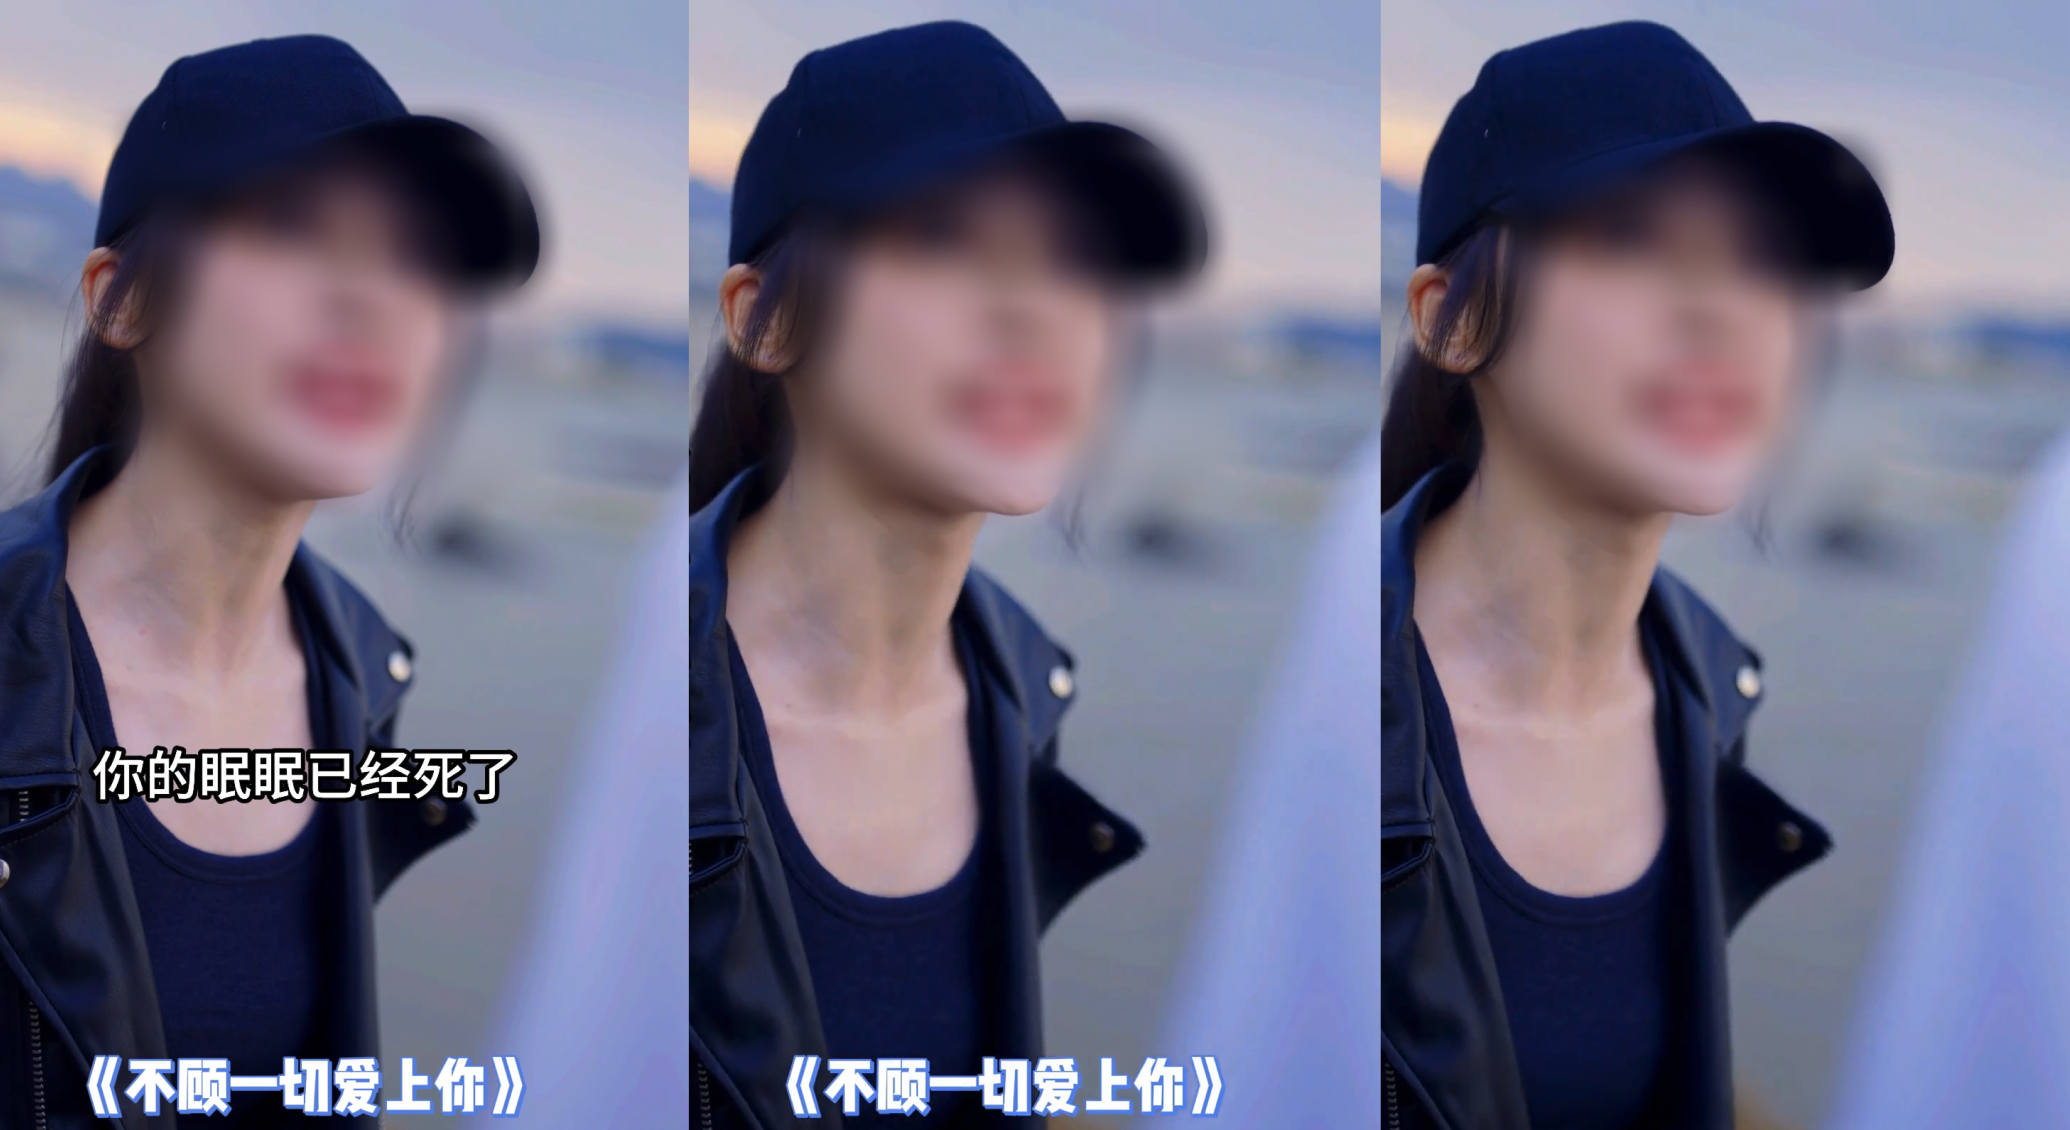
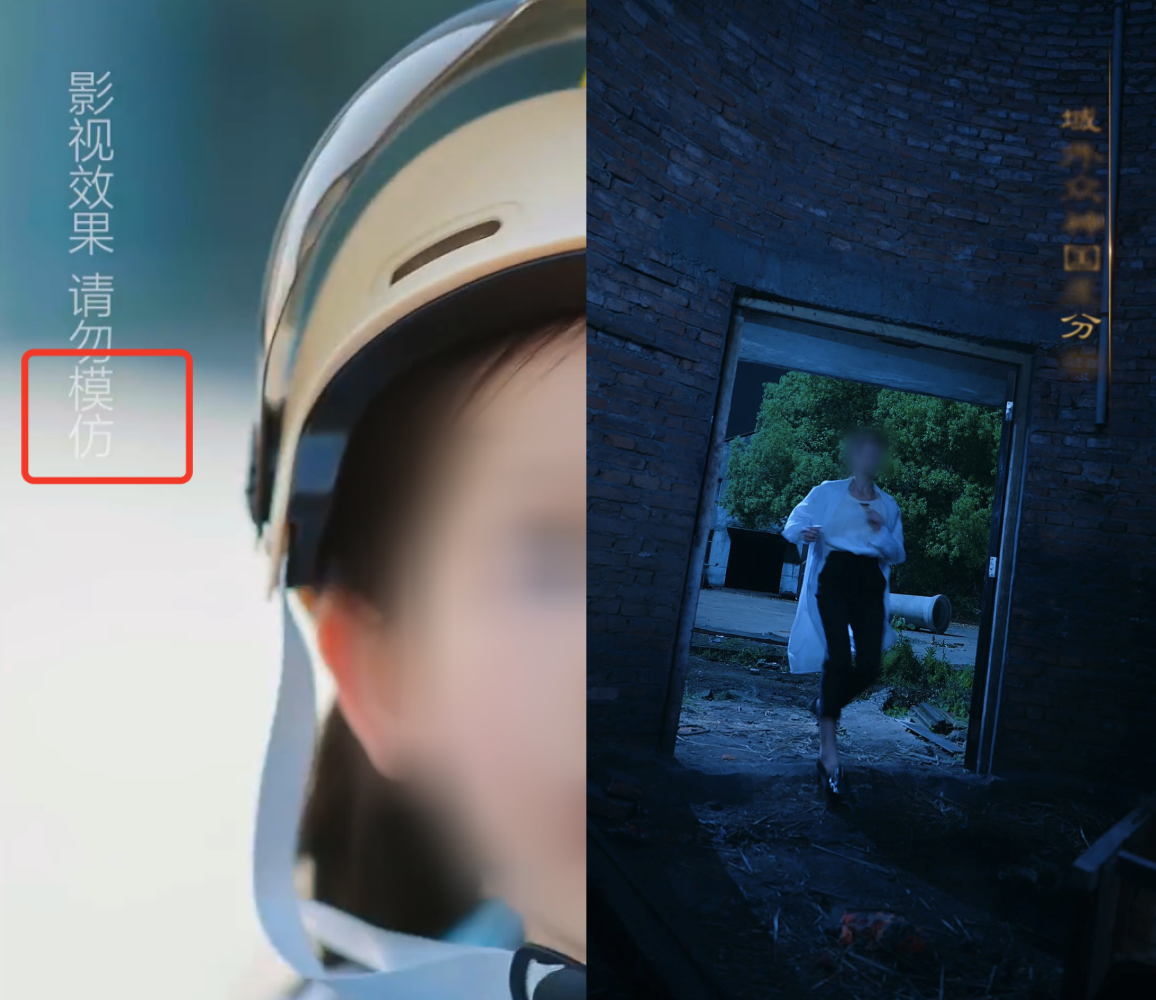
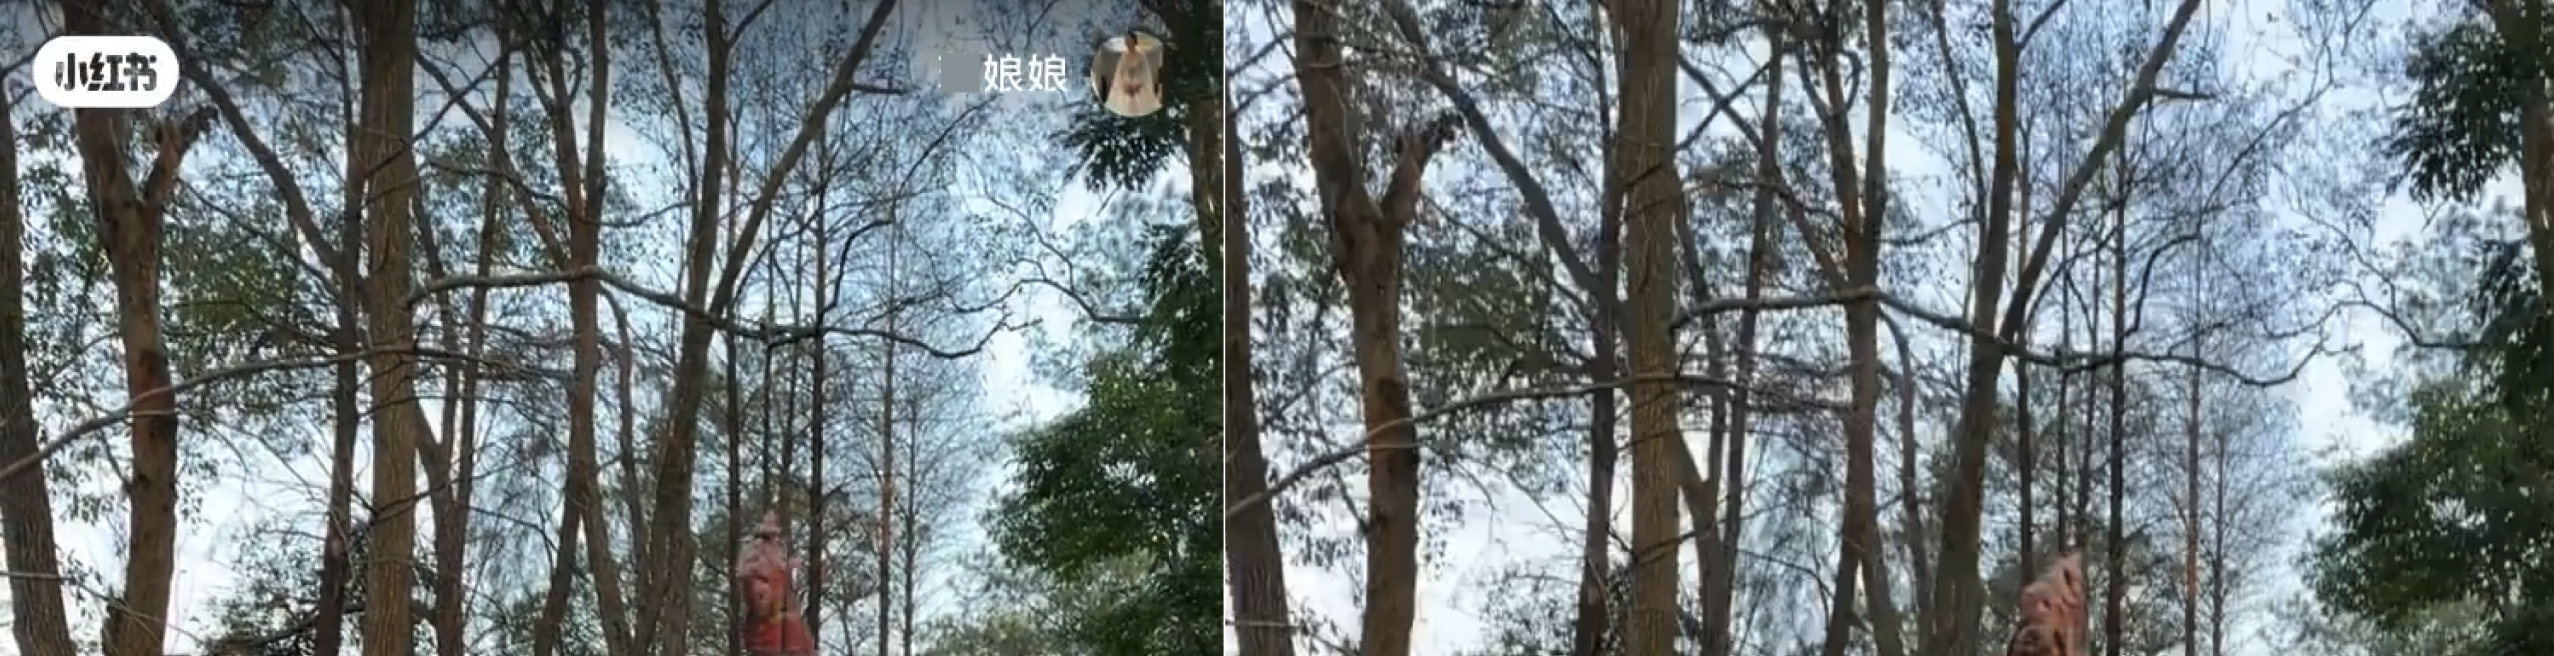
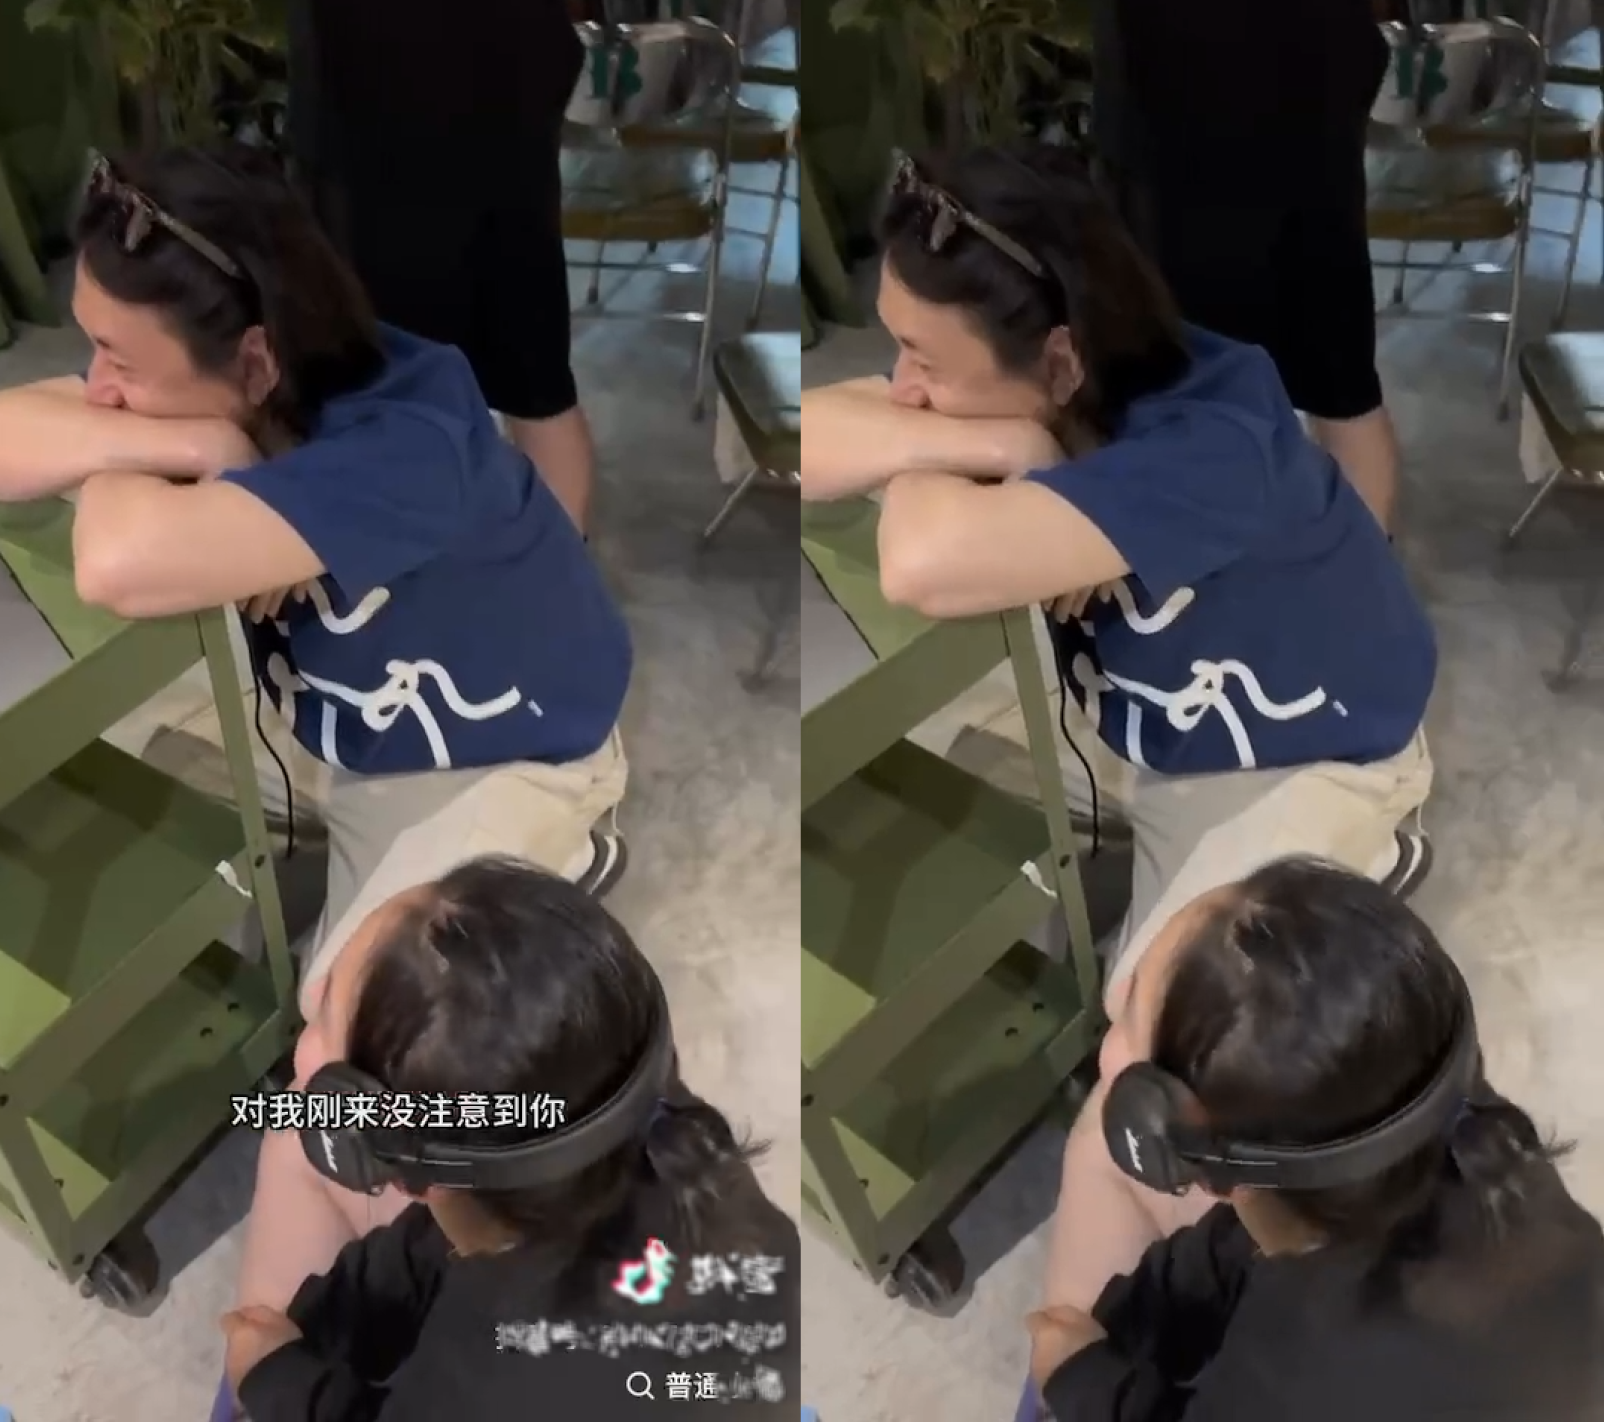
If your video is similar to the example below and has other text content in the lower central part that does not require erasing, you can use the als_filter parameter to specify the approximate position of subtitles to reduce incorrect erasing issues:
Left: Original video (the subtitle "Love You at All Costs" at the bottom does not require erasing). Middle: Use als_filter to specify the erasing effect on the subtitle position. Right: The erasing effect without specifying als_filter.
als_filter: Automatic erasing area. It is used to specify the approximate position of subtitles and reduce incorrect erasing issues caused by image interference.
(lt_x,lt_y) is the coordinate of the upper left point of the area, and (rb_x,rb_y) is the coordinate of the lower right point. Coordinate value:
[0, 1]: represents the percentage of video width or height.
(1, +): represents pixels.
*/
Complete JSON example for calling ProcessMedia to initiate a task:
{
"InputInfo":{//Input video path. Replace it with your original video.
"OutputDir":"/mps_test/output/",//Output folder path. Replace it.
"AiAnalysisTask":{
"Definition":25,//Preset template ID for smart erasing. Enter 25.
"ExtendedParameter":"{\"delogo\":{\"cluster_id\":\"gpu_zhiyan\",\"CustomerAppId\":\"subtitle_erase_fast\",\"als_filter\":{\"active_areas\":[{\"lt_x\":0.097,\"lt_y\":0.626,\"rb_x\":0.928,\"rb_y\":0.705}]}}}"//Additional parameters. Replace them when selecting a different erasing capability.
If you wish to automatically erase full-screen text content, you can set the als_filter area size to full-screen video size as much as possible. See the following example:
als_filter: Automatic erasing area. It is used to specify the approximate position of subtitles and reduce incorrect erasing issues caused by image interference.
(lt_x,lt_y) is the coordinate of the upper left point of the area, and (rb_x,rb_y) is the coordinate of the lower right point. Coordinate value:
[0, 1]: represents the percentage of video width or height.
(1, +): represents pixels.
*/
Complete JSON example for calling ProcessMedia to initiate a task:
{
"InputInfo":{//Input video path. Replace it with your original video.
"OutputDir":"/mps_test/output/",//Output folder path. Replace it.
"AiAnalysisTask":{
"Definition":25,//Preset template ID for smart erasing. Enter 25.
"ExtendedParameter":"{\"delogo\":{\"cluster_id\":\"gpu_zhiyan\",\"CustomerAppId\":\"subtitle_erase_fast\",\"als_filter\":{\"active_areas\":[{\"lt_x\":0,\"lt_y\":0,\"rb_x\":0.9999,\"rb_y\":0.9999}]}}}"//Additional parameters. Replace them when selecting a different erasing capability.
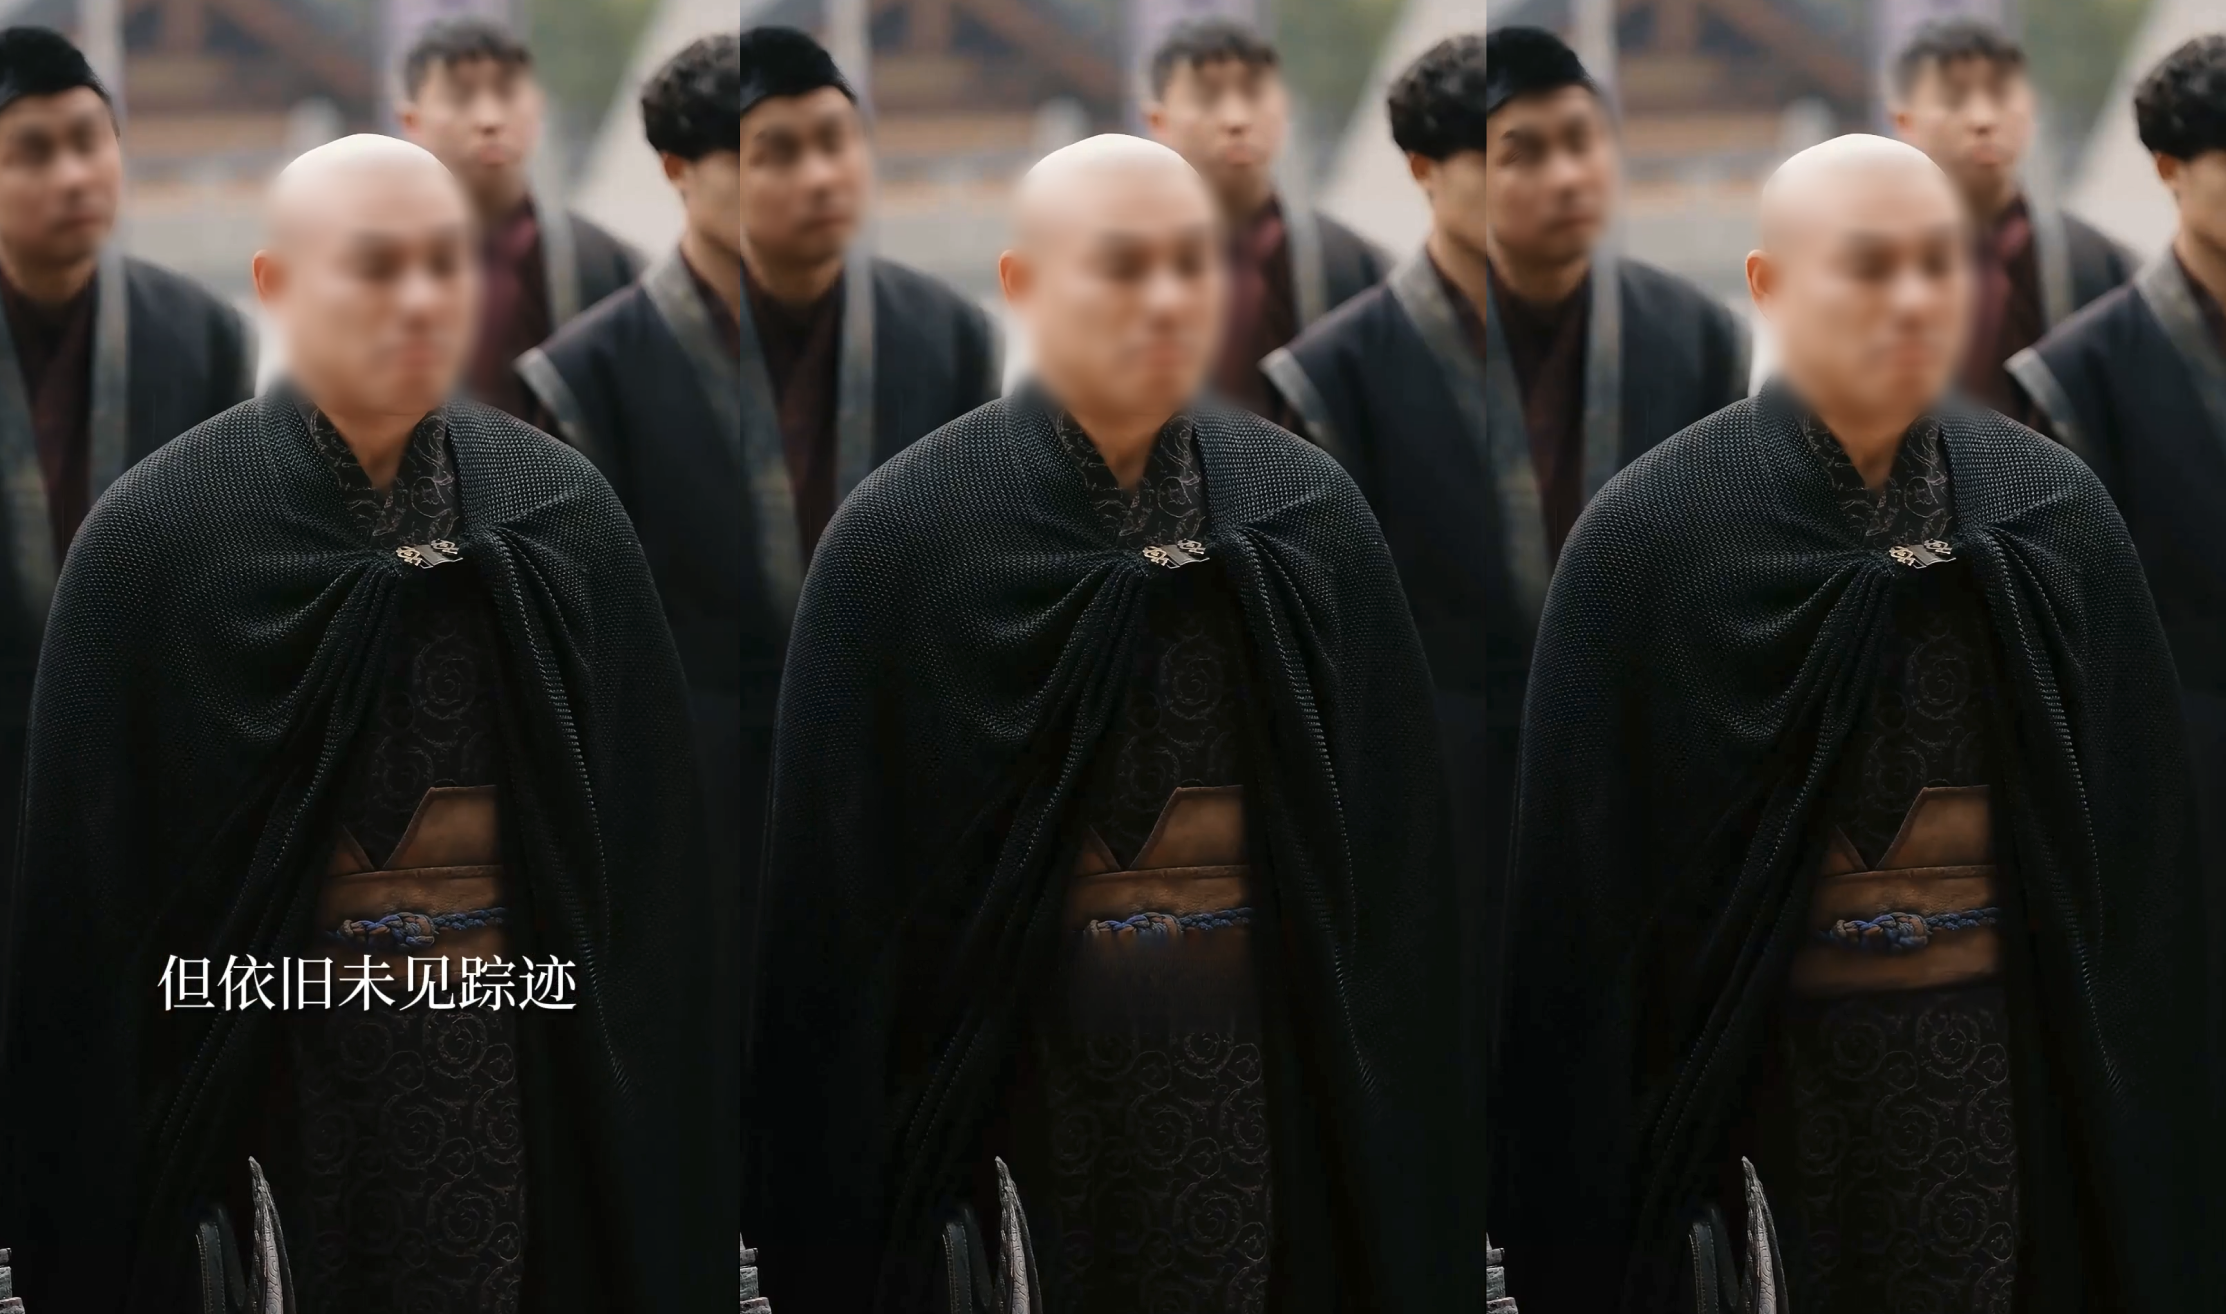
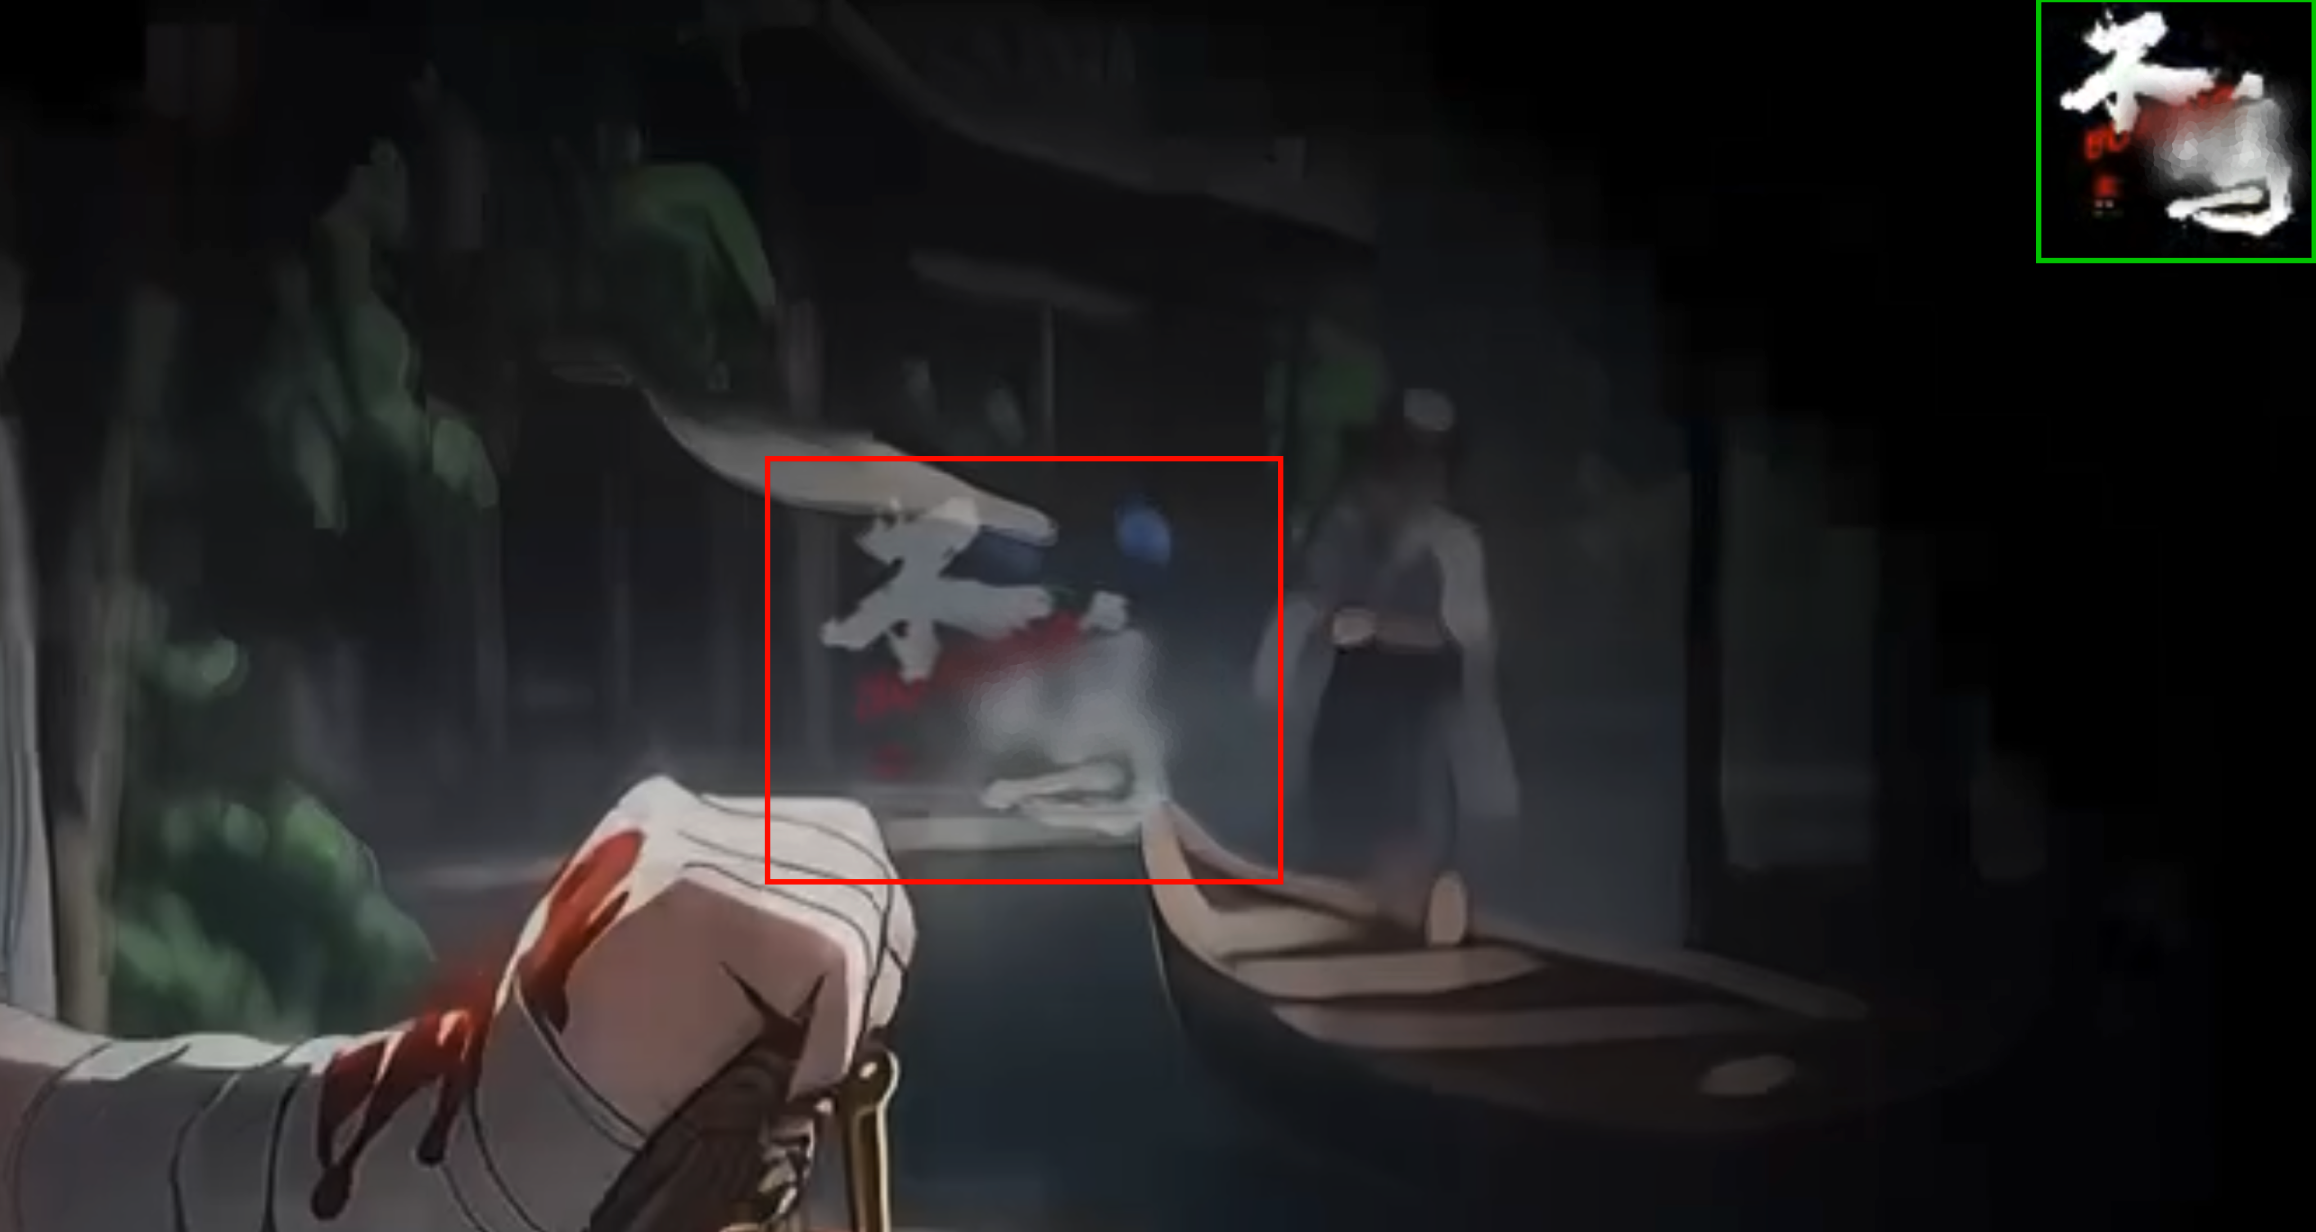
Usually, subtitle removal (automatic erasing) can automatically recognize the subtitle position accurately. But in specific cases, missed erasings may occur, as shown in the figure below:
Left: The subtitle in the red box has too low background contrast. Right: The subtitle style is cursive with a gradient effect.
Therefore, if your subtitle position is fixed, it is recommended that you use custom_objs to directly specify the erasing area to reduce missed erasings to the maximum extent.
Note:
After custom_objs is specified, the system will directly erase the selected area without automatically recognizing or erasing text in other parts of the video. Therefore, you should fully pass in the target erasing area.
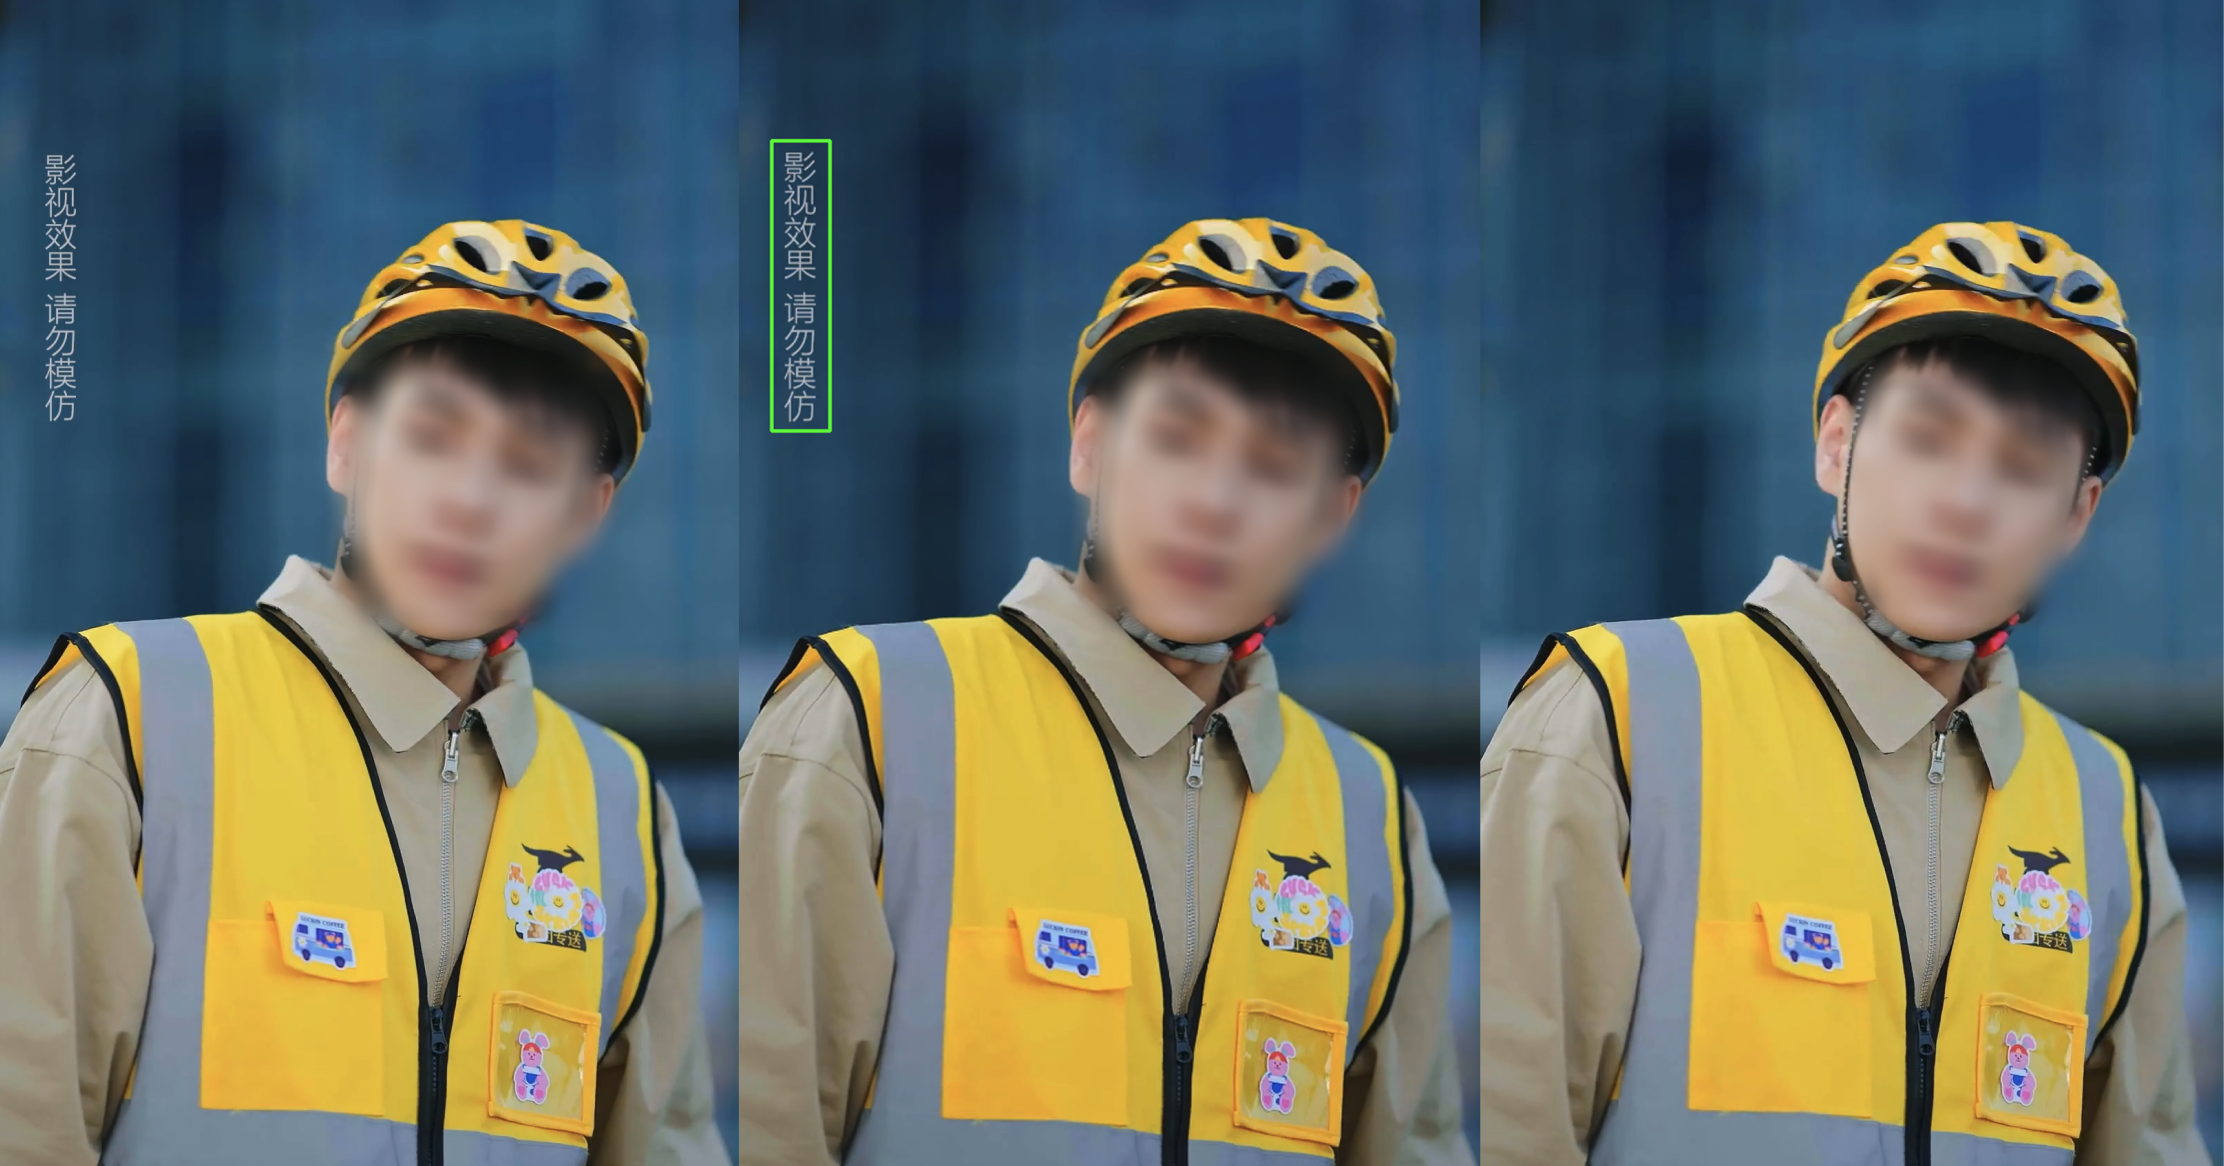
Example:
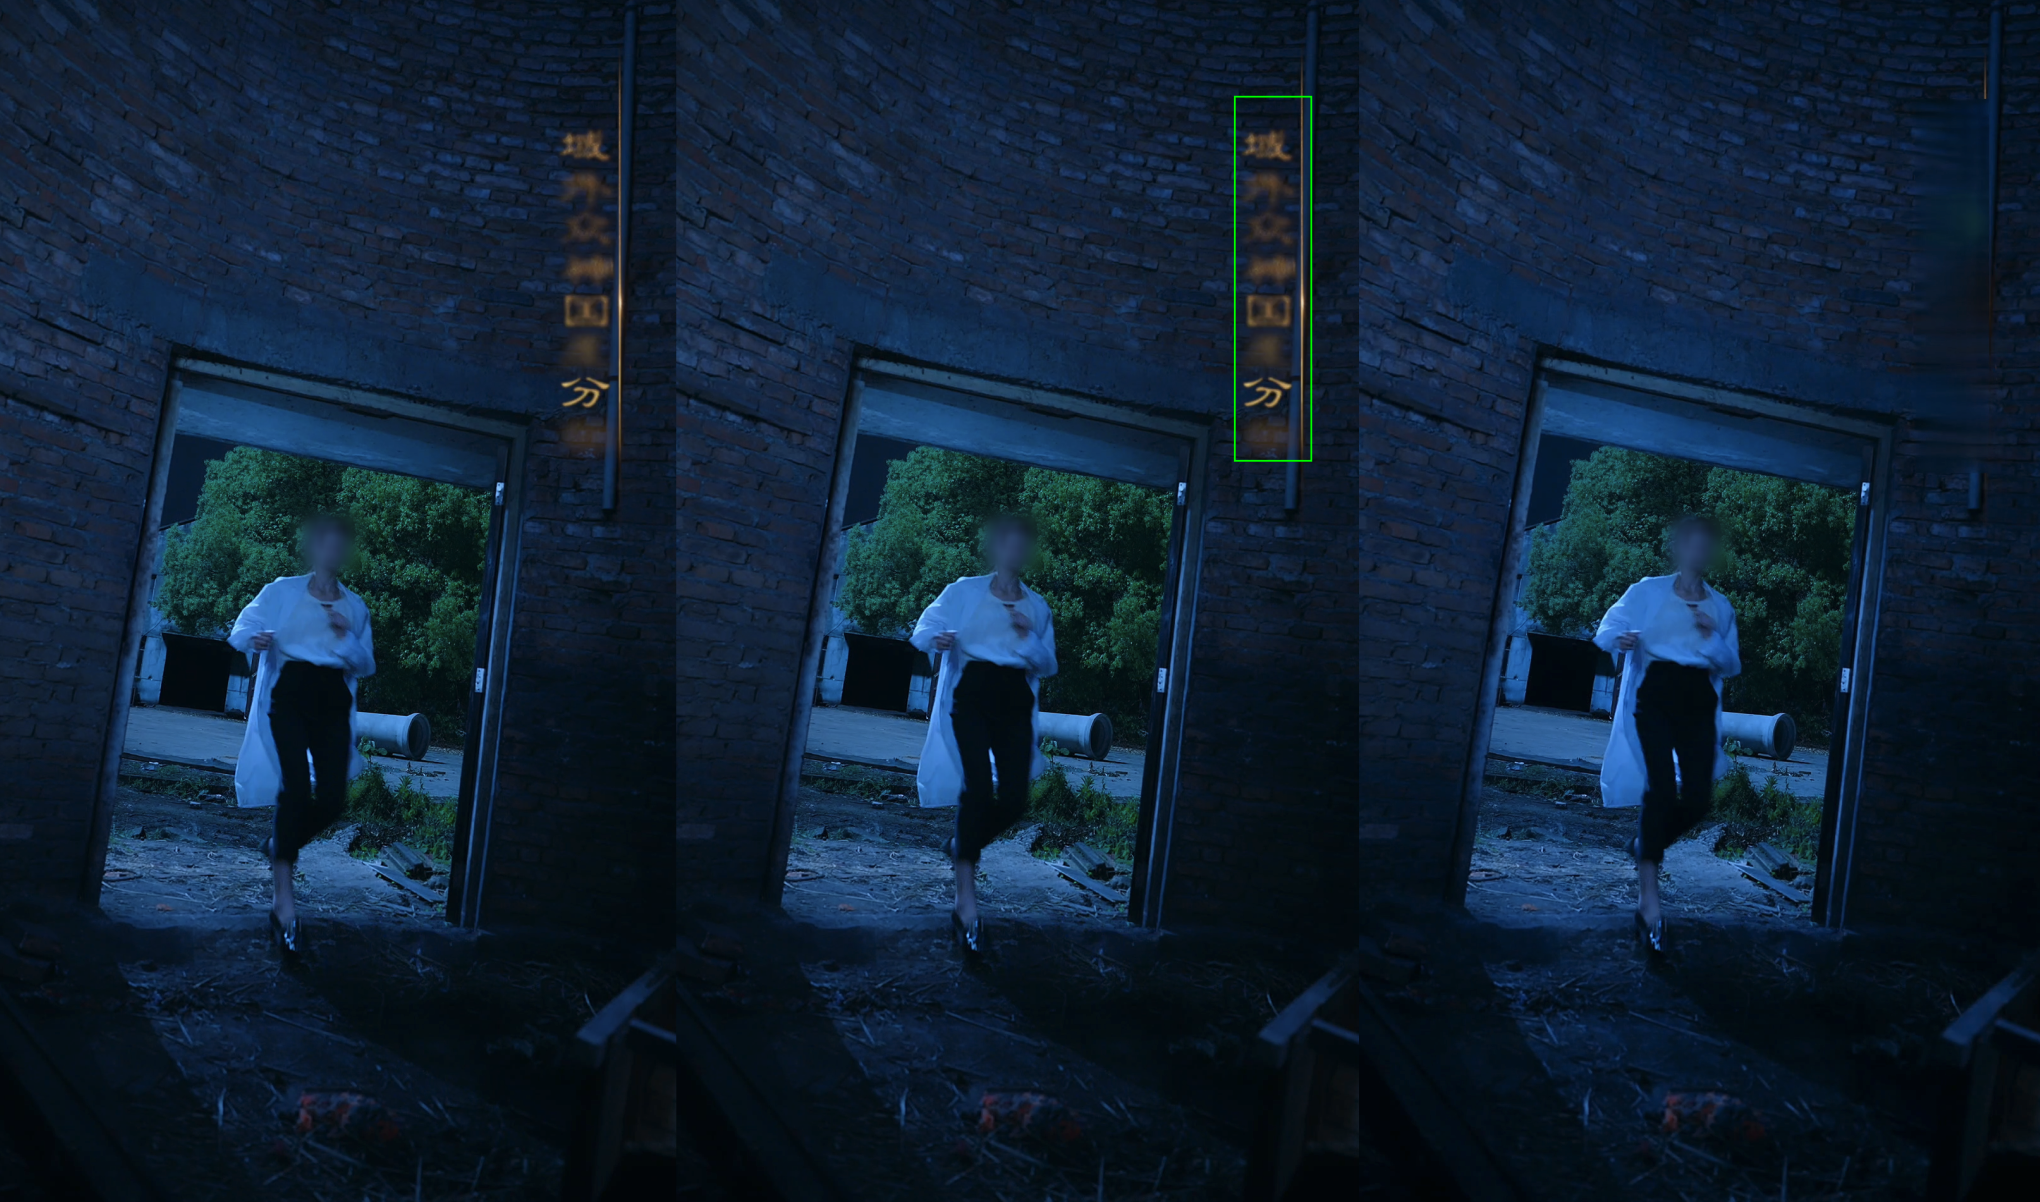
Left: Original video. Middle: The green box represents the erasing area specified by custom_objs. Right: Erasing effect.
You can specify multiple erasing areas (it is not recommended to exceed 10 areas).
(lt_x,lt_y) is the coordinate of the upper left point of the erasing area, and (rb_x,rb_y) is the coordinate of the lower right point. Coordinate value:
[0, 1): represents the percentage of video width or height.
[1, +): represents pixels.
*/
Complete JSON example for calling ProcessMedia to initiate a task:
{
"InputInfo":{//Input video path. Replace it with your original video.
"OutputDir":"/mps_test/output/",//Output folder path. Replace it.
"AiAnalysisTask":{
"Definition":25,//Preset template ID for smart erasing. Enter 25.
"ExtendedParameter":"{\"delogo\":{\"cluster_id\":\"gpu_zhiyan\",\"CustomerAppId\":\"subtitle_erase_fast\",\"custom_objs\":{\"type\":0,\"time_objs\":[{\"objs\":[{\"type\":2,\"score\":100,\"rect\":{\"lt_x\":53,\"lt_y\":228,\"rb_x\":137,\"rb_y\":644}}]}]}}}"//Additional parameters. Replace them when selecting a different erasing capability.
Subtitle removal provides two model editions, suitable for different subtitle styles:
Standard Edition (recommended): Usually, this edition is recommended. It is suitable for videos with standard subtitle styles, with better effectiveness for seamless processing and superior detail restoration.
If subtitle_erase_fast is passed in to CustomerAppId, it means using the "Standard Edition".
Left: Original video. Middle: Processing effect of the Area Edition. Right: Processing effect of the Standard Edition. If the subtitle style in your video is similar to this example, choose the Standard Edition.
Area Edition: Suitable for special style subtitles (such as background shadow, cursive fonts, and dynamic effects), with a larger erasing area but less seamless effect than the Standard Edition.
To specify the "Area Edition", Pass in subtitle_erase_area to CustomerAppId. For example:
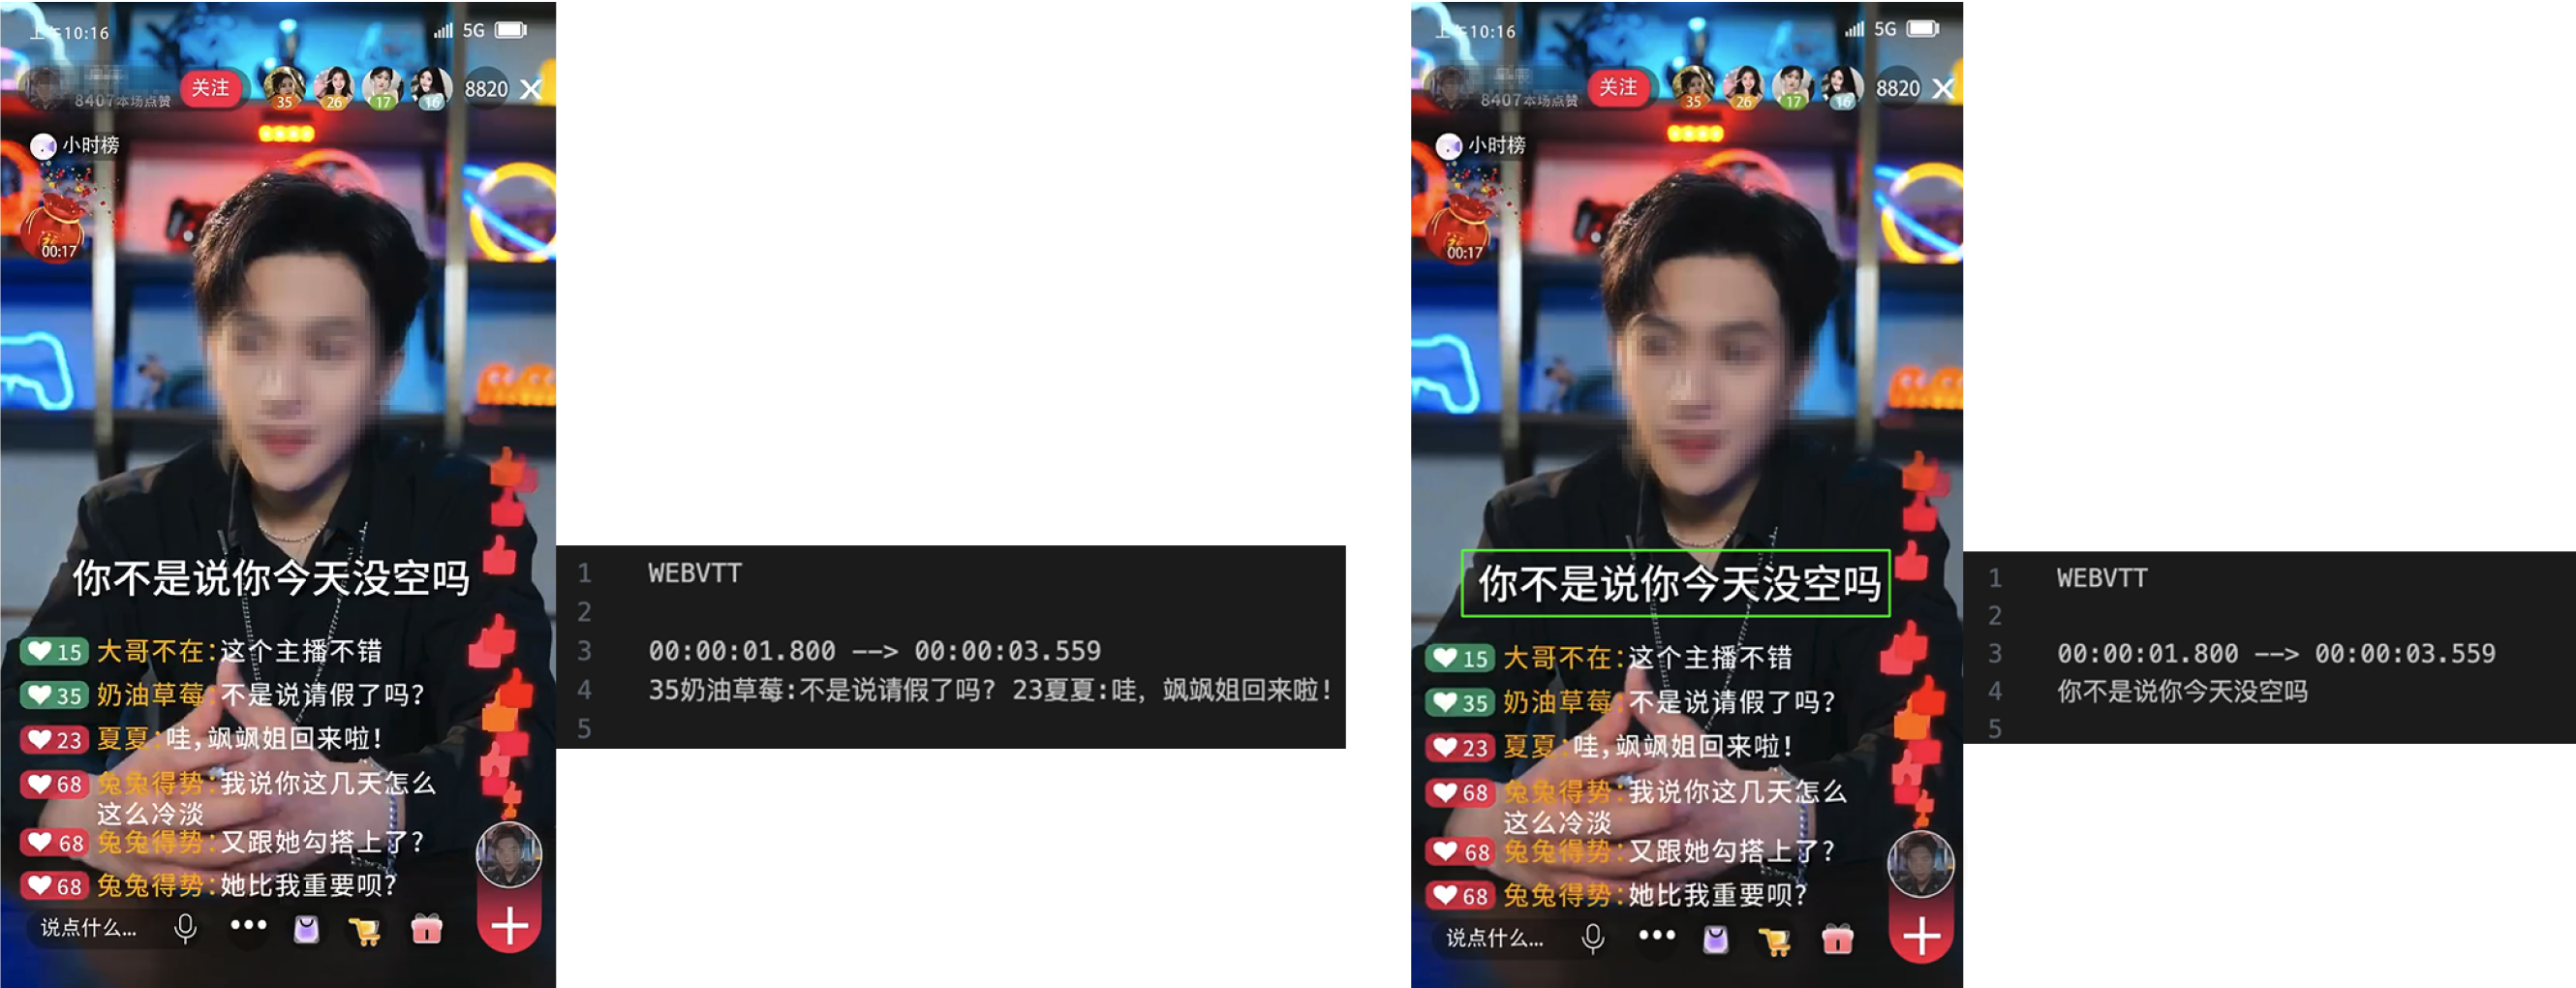
Left: Original video. Middle: The green box represents the erasing area specified by custom_objs. Right: Erasing effect (due to the special subtitle style, the Area Edition subtitle removal model is used).
The subtitle_erase_area indicates the usage of the "Area Edition" subtitle removal model, which is suitable for special style subtitles.
You can specify multiple erasing areas (it is not recommended to exceed 10 areas).
(lt_x,lt_y) is the coordinate of the upper left point of the erasing area, and (rb_x,rb_y) is the coordinate of the lower right point. Coordinate value:
[0, 1): represents the percentage of video width or height.
[1, +): represents pixels.
*/
Complete JSON example for calling ProcessMedia to initiate a task:
{
"InputInfo":{//Input video path. Replace it with your original video.
"OutputDir":"/mps_test/output/",//Output folder path. Replace it.
"AiAnalysisTask":{
"Definition":25,//Preset template ID for smart erasing. Enter 25.
"ExtendedParameter":"{\"delogo\":{\"cluster_id\":\"gpu_zhiyan\",\"CustomerAppId\":\"subtitle_erase_area\",\"custom_objs\":{\"type\":0,\"time_objs\":[{\"objs\":[{\"type\":2,\"score\":100,\"rect\":{\"lt_x\":879,\"lt_y\":169,\"rb_x\":997,\"rb_y\":761}}]}]}}}"//Additional parameters. Replace them when selecting a different erasing capability.
1.4 Secondary Processing for Missed Subtitle Areas
If there are still some missed areas after you use subtitle removal (automatic erasing), it is usually caused by the subtitle style or video background. You can change the subtitle removal model to the "Area Edition" (subtitle_erase_area) and specify the missed area positions through custom_objs for fixing. You can also specify the time period for secondary processing using the begin_ms and end_ms fields. Note that to ensure the fixing effect, the missed area positions and time period should be as accurate as possible.
"OutputDir":"/mps_test/output/",//Output folder path. Replace it.
"AiAnalysisTask":{
"Definition":25,//Preset template ID for smart erasing. Enter 25.
"ExtendedParameter":"{\"delogo\":{\"cluster_id\":\"gpu_zhiyan\",\"CustomerAppId\":\"subtitle_erase_area\",\"custom_objs\":{\"type\":0,\"time_objs\":[{\"begin_ms\":3000,\"end_ms\":5000,\"objs\":[{\"type\":2,\"score\":100,\"rect\":{\"lt_x\":0.0,\"lt_y\":10,\"rb_x\":10,\"rb_y\":20}}]}]}}}"//Additional parameters. Replace them when selecting a different erasing capability.
When you use the subtitle removal feature, including automatic erasing, specified area erasing, and secondary processing for missed areas, a "subtitle removal" fee will be charged without distinguishing between the "Area Edition" and "Standard Edition" models. For pricing, see Smart Erase Billing Instructions.
Note:
Since subtitle removal for the output video requires full video encoding/decoding, the billing will be based on the total duration of the output video rather than the erasing period specified by the begin_ms and end_ms fields.
II. OCR-based Subtitle Extraction
Based on OCR, the original subtitles are extracted from the video and translated to generate a subtitle file in the target language.
Note:
In the erasing scenario, the original video usually comes with original subtitles. Using OCR for subtitle extraction delivers better and more accurate results. Therefore, the smart erase feature only integrates OCR capabilities. If you wish to generate subtitle files via ASR, you can use the smart subtitle feature. See Smart Subtitle Access Tutorial for details.
If subtitles are in Chinese or English, using OCR for extraction can achieve the best effect.
Billing Instructions
When you use OCR-based subtitle extraction (automatic) or OCR-based subtitle extraction (specified area), if only original subtitles are extracted, the "OCR-based subtitle extraction" fee will be charged; if the target translation language is passed in to translate_dst_language, subtitle translation is enabled, and the "OCR-based subtitle extraction and translation" fee will be charged.
CustomerAppId: If subtitle_extract_v1 is passed in, it means performing OCR-based extraction.
translate_dst_language: It is used to specify the target language. If it is left blank, no translation will be performed, and only the original subtitles will be output.
The corresponding relationships for other values are: en-English, zh-Chinese, ja-Japanese, ko-Korean, de-German, pt-Portuguese, id-Indonesian, th-Thai, and ms-Malay.
The above is only a list of commonly used languages. We support hundreds of translation languages. Contact us to get the complete list.
subtitle_fmt: It specifies the output subtitle file format, which is WebVTT by default. If srt is passed in, the SRT format will be adopted.
min_sdur_ms: It is the minimum subtitle duration per sentence in milliseconds. For example, setting it to 1000 means subtitles with a duration less than 1,000ms will be ignored.
output_pattern: It specifies the output filename. The placeholder identifier is {}, and the placeholder can be task_type and session_id.
If left blank, the default output is {task_type}-{session_id}.
*/
Complete JSON example for calling ProcessMedia to initiate a task:
{
"InputInfo":{//Input video path. Replace it with your original video.
"OutputDir":"/mps_test/output/",//Output folder path. Replace it.
"AiAnalysisTask":{
"Definition":25,//Preset template ID for smart erasing. Enter 25.
"ExtendedParameter":"{\"delogo\":{\"CustomerAppId\":\"subtitle_extract_v1\",\"subtitle_param\":{\"translate_dst_language\":\"\",\"subtitle_fmt\":\"srt\"}}}"//Additional parameters. Replace them when selecting a different erasing capability.
2.2 OCR-based Subtitle Extraction (Specified Area), Filtering Interference Text
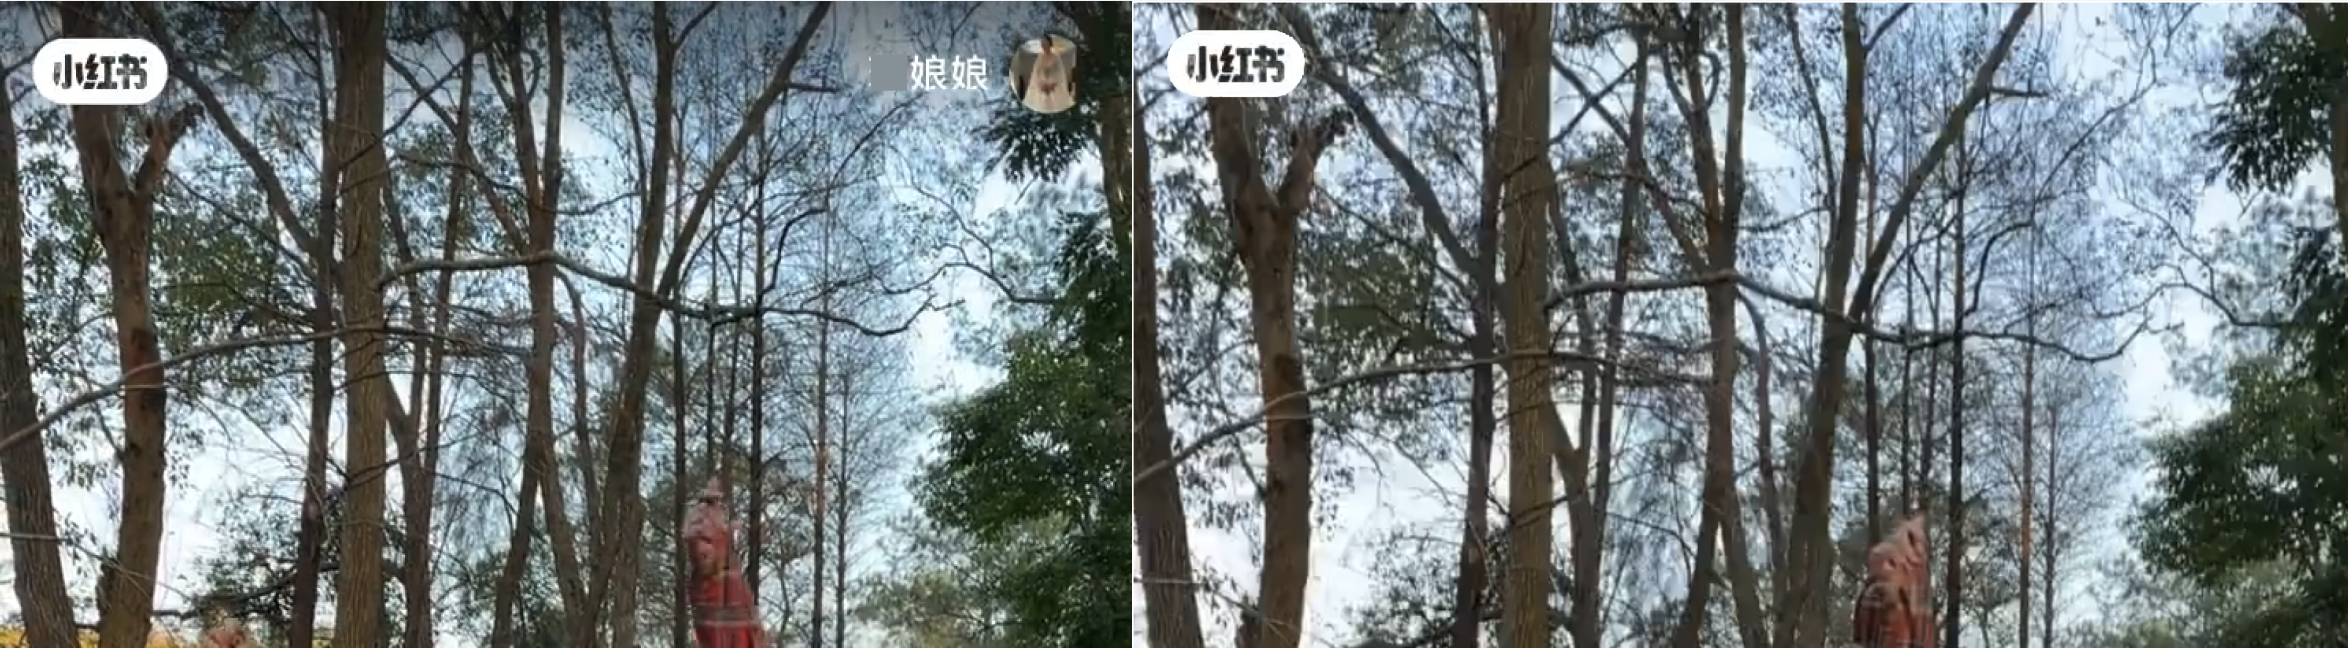
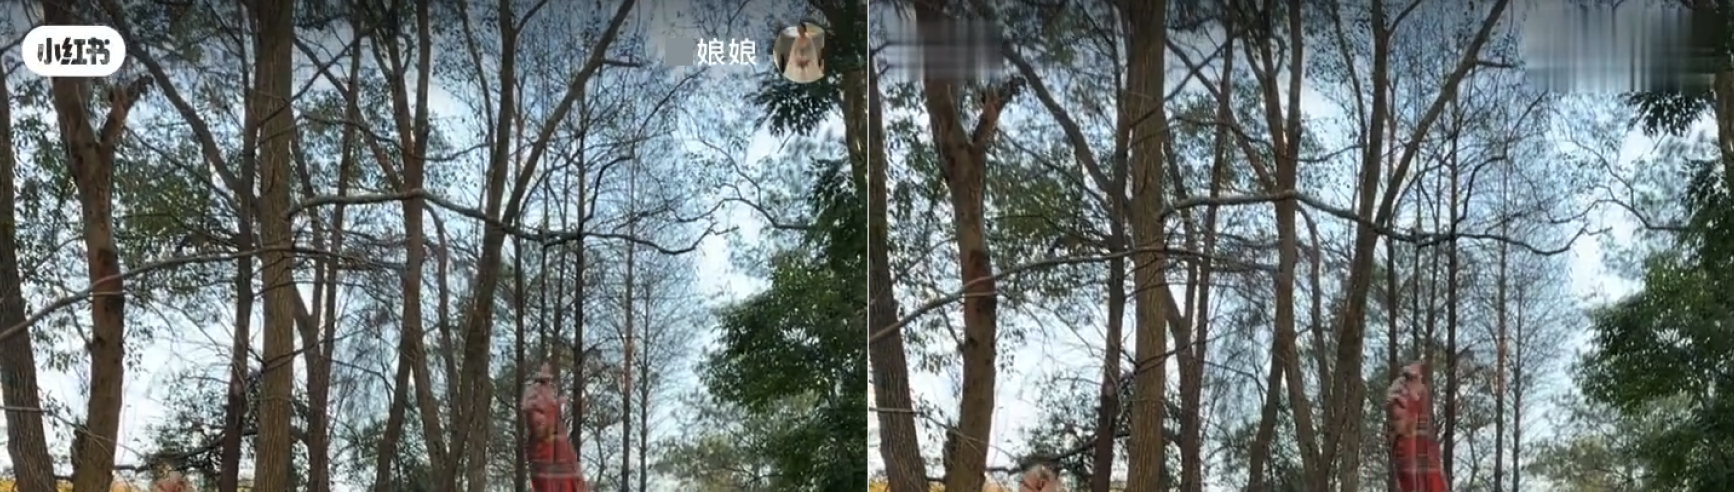
When other interference text appears in the lower central part of the video image, automatic extraction may result in false detection. Therefore, for videos with fixed subtitle positions, it is recommended that you use als_filter to specify the extraction area.
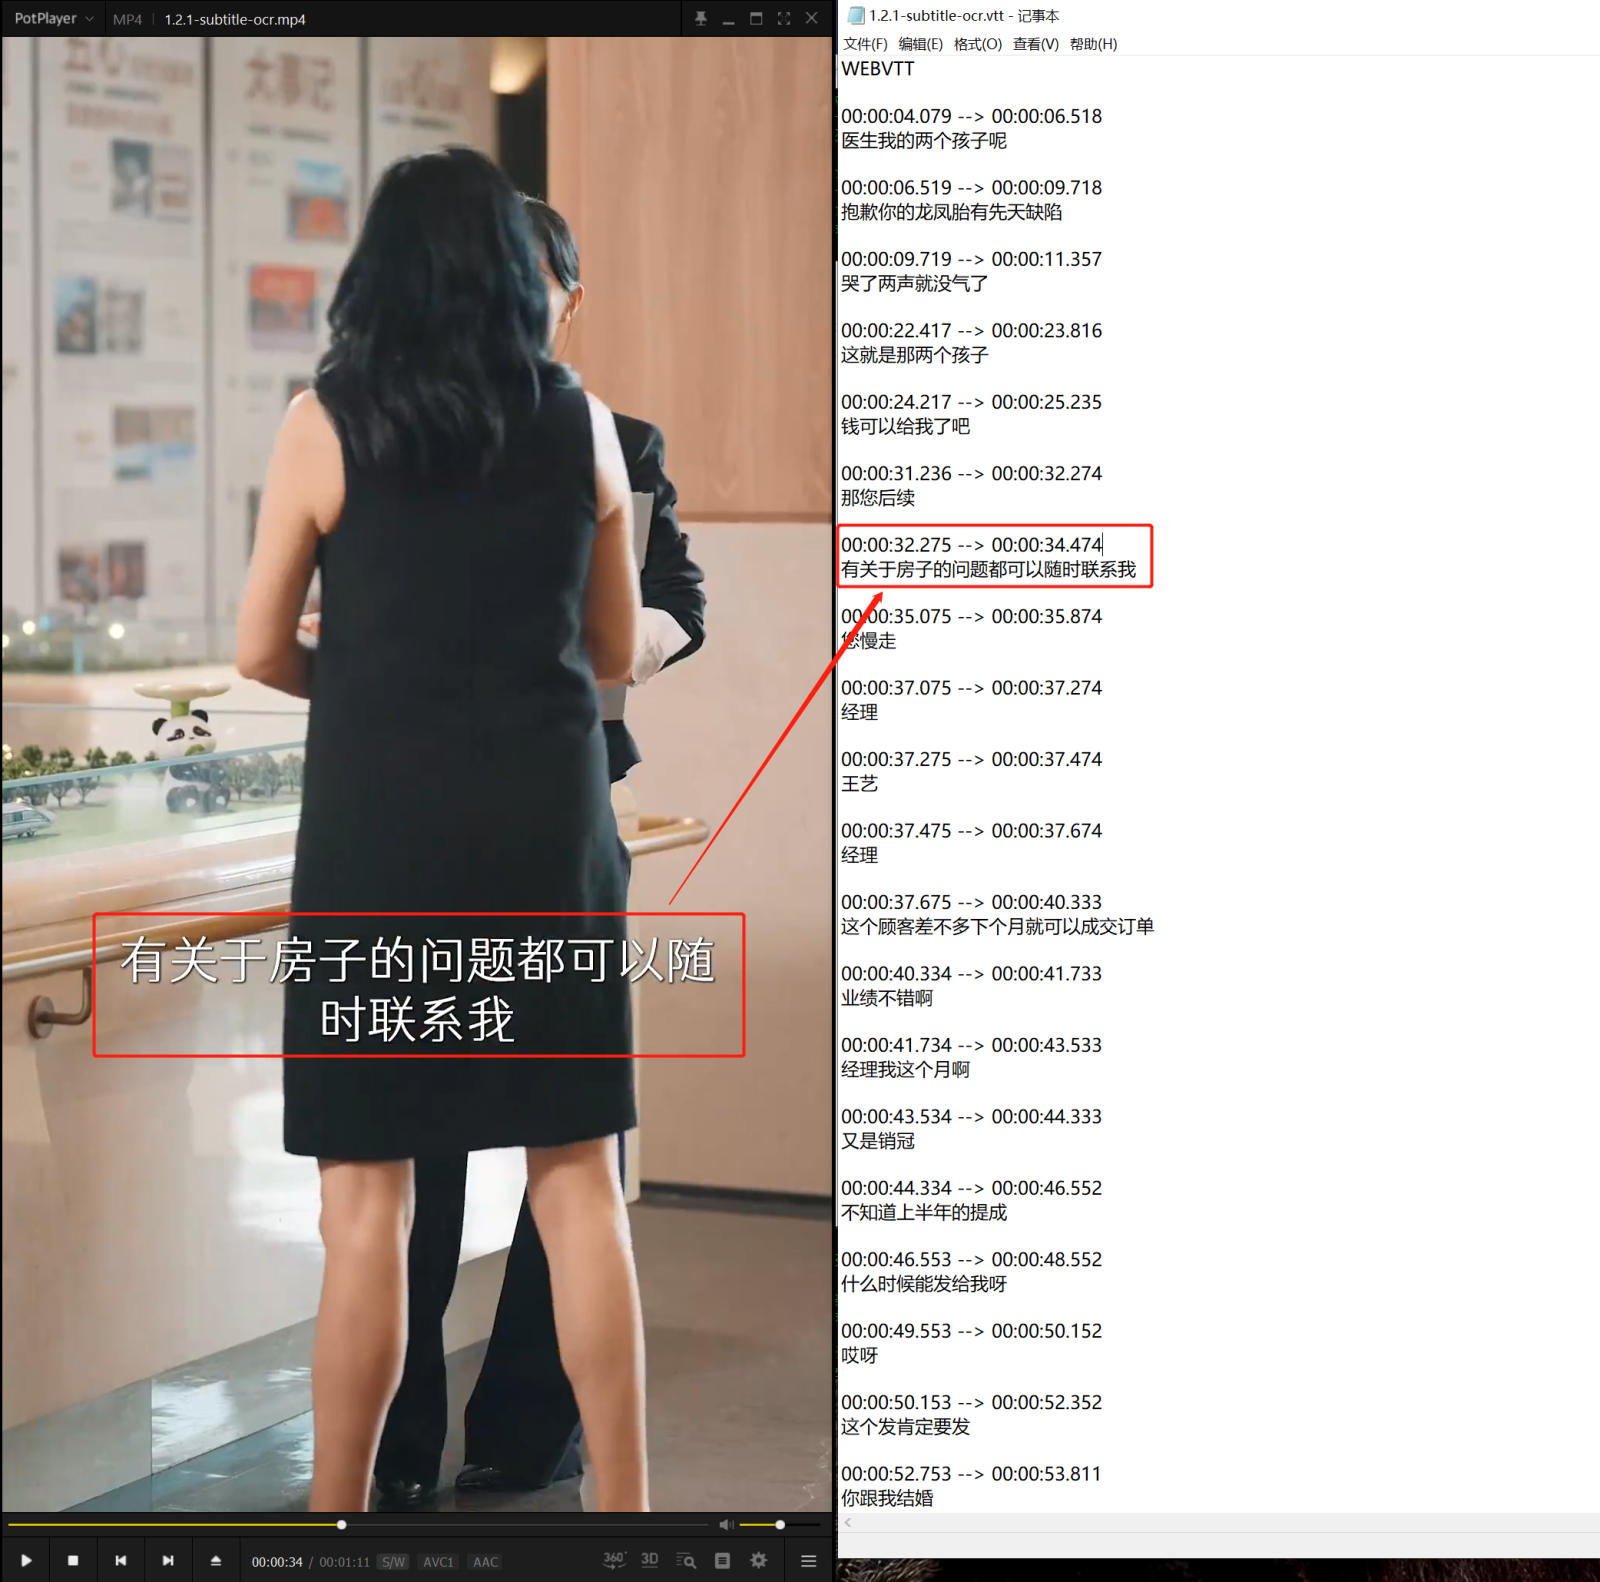
The left figure: No specified area. The extracted text contains interference information. The right figure: The green box represents the specified subtitle area, and the extracted subtitle content is more accurate.
als_filter: Automatic extraction area. It is used to specify the approximate position of subtitles and reduce false detection issues.
(lt_x,lt_y) is the coordinate of the upper left point of the area, and (rb_x,rb_y) is the coordinate of the lower right point. Coordinate value:
[0, 1]: represents the percentage of video width or height.
(1, +): represents pixels.
translate_dst_language: It is used to specify the target language. If it is left blank, no translation will be performed, and only the original subtitles will be output.
The corresponding relationships for other values are: en-English, zh-Chinese, ja-Japanese, ko-Korean, de-German, pt-Portuguese, id-Indonesian, th-Thai, and ms-Malay.
The above is only a list of commonly used languages. We support hundreds of translation languages. Contact us to get the complete list.
*/
Complete JSON example for calling ProcessMedia to initiate a task:
{
"InputInfo":{//Input video path. Replace it with your original video.
"OutputDir":"/mps_test/output/",//Output folder path. Replace it.
"AiAnalysisTask":{
"Definition":25,//Preset template ID for smart erasing. Enter 25.
"ExtendedParameter":"{\"delogo\":{\"CustomerAppId\":\"subtitle_extract_v1\",\"subtitle_param\":{\"translate_dst_language\":\"\"},\"als_filter\":{\"active_areas\":[{\"type\":2,\"lt_x\":72,\"lt_y\":703,\"rb_x\":618,\"rb_y\":787}]}}}"//Additional parameters. Replace them when selecting a different erasing capability.
III. Speech Translation and Replacement (Audio Synthesis and Source Video Dubbing Replacement)
Through the subtitle removal and OCR-based subtitle extraction capabilities described above, you can obtain:
1. Erased video without subtitles.
2. Subtitle file in the target language.
Next, you can use these two files as input to perform audio synthesis and source dubbing replacement, obtaining a new video with dubbing in the target language.
Note:
Note: The speech translation and replacement feature is in beta testing. Contact us for support if you need to test the experience.
This feature offers two types of voice options: standard tone and clone tone:
Standard Tone: Supports Chinese, English, and Japanese, providing a variety of male, female, and child voice selections.
Clone Tone: Powered by advanced AI voice cloning technology, it authentically replicates voice characteristics and supports the following languages:
Languages
Code
Chinese
zh
English
en
Japanese
ja
German
de
French
fr
Korean
ko
Russian
ru
Ukrainian
uk
Portuguese
pt
Italian
it
Spanish
es
Indonesian
id
Dutch
nl
Turkish
tr
Filipino
fil
Malay
ms
Greek
el
Finnish
fi
Croatian
hr
Slovak
sk
Polish
pl
Swedish
sv
Hindi
hi
Bulgarian
bg
Romanian
ro
Arabic
ar
Czech
cs
Danish
da
Tamil
ta
3.1 Billing Instructions
The "AI Voice Replacement (Standard Tone)" or "AI Voice Replacement (Clone Tone)" fee will be charged. For pricing, see Smart Erase Billing Instructions.
Output video with subtitles in the target language.
Note:
If you wish to use subtitle embedding separately, you can implement it via the audio/video transcoding feature. For details, see Subtitle Embedding and External Subtitles in Audio/Video Transcoding Integration.
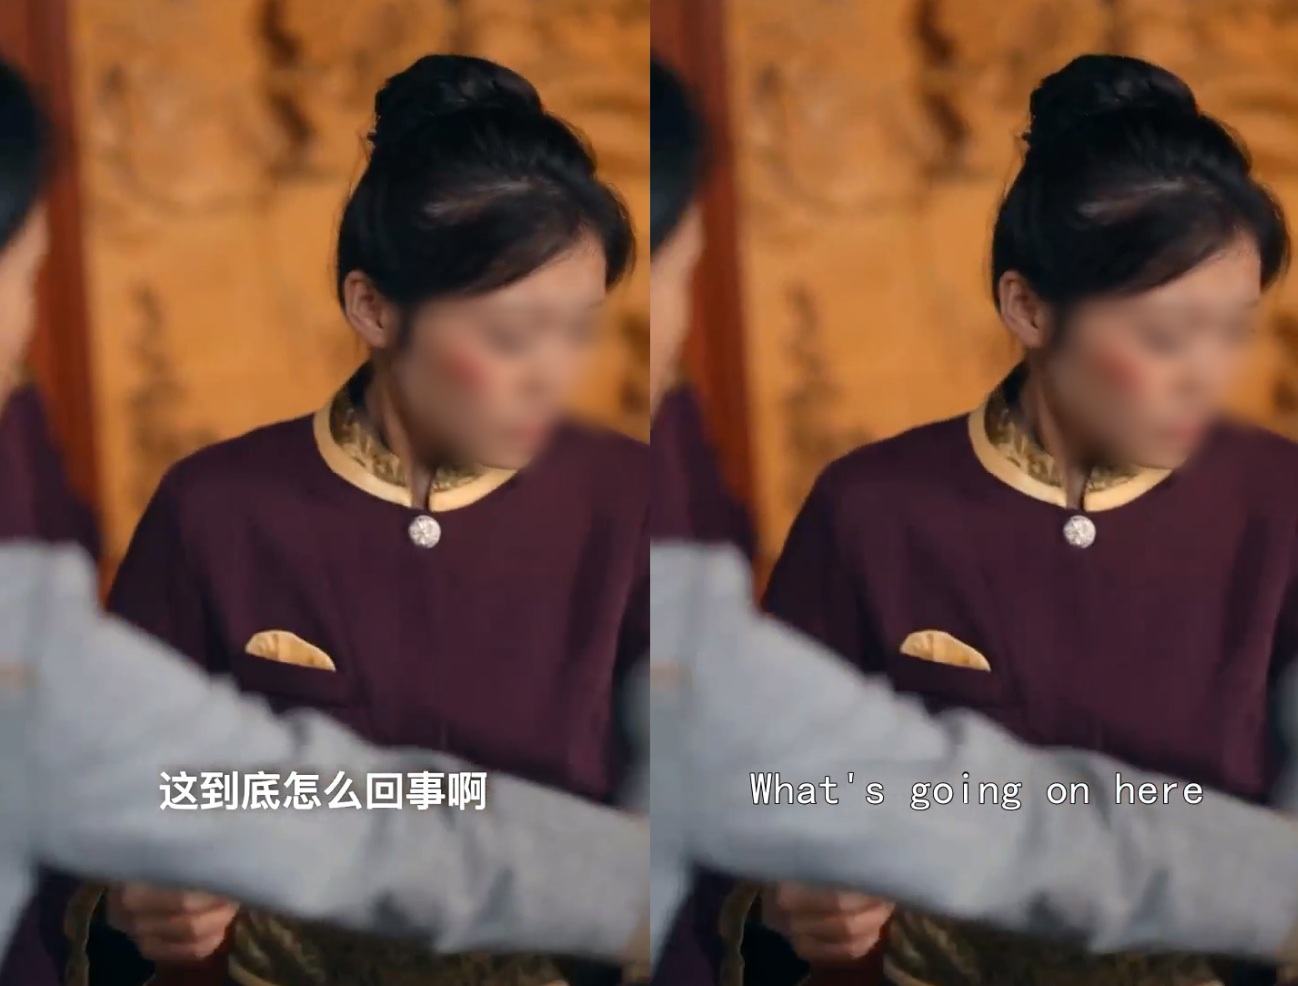
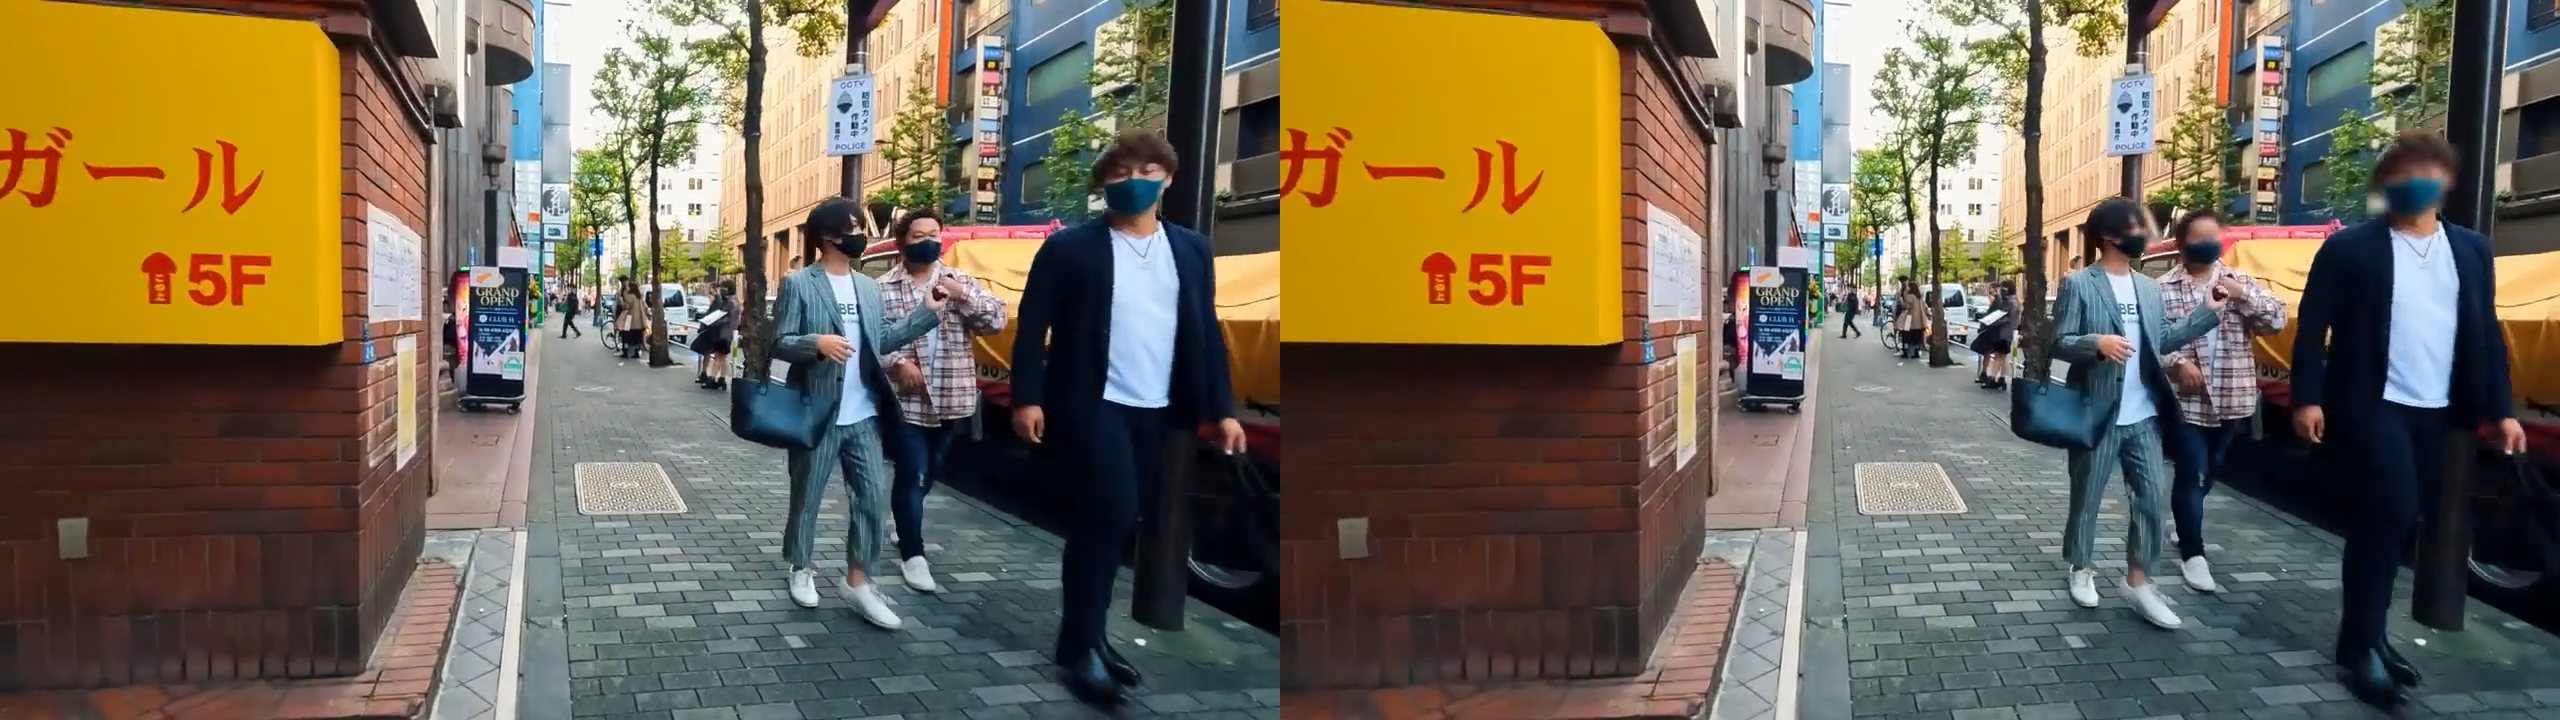
The left figure: Original short video in Chinese. The right figure: Processed output video with English subtitles.
Billing Instructions
The "subtitle removal" + "OCR-based subtitle extraction and translation + subtitle embedding" fee will be charged. For pricing, see Smart Erase Billing Instructions.
"OutputDir":"/mps_test/output/",//Output folder path. Replace it.
"AiAnalysisTask":{
"Definition":25,//Preset template ID for smart erasing. Enter 25.
"ExtendedParameter":"{\"delogo\":{\"cluster_id\":\"gpu_zhiyan\",\"CustomerAppId\":\"subtitle_erase_and_translate\",\"subtitle_param\":{\"translate_dst_language\":\"en\"}}}"//Additional parameters. Replace them when selecting a different erasing capability.
The logo removal feature supports two modes: Basic Edition and Advanced Edition.
Basic Edition: Provides a basic blur effect. It is cost-effective and suitable for animation or videos with a clean background. The "basic fee of smart erase (Logo Removal - Basic Edition)" fee will be charged.
Advanced Edition: Provides a better erasing effect, suitable for reality-style videos such as short drama. The "Logo Removal - Advanced Edition" fee will be charged.
Left: Raw video. The red box shows the logo position. Middle: Basic Edition processing effect. Right: Advanced Edition processing effect.
5.1 Logo Removal - Advanced Edition
Compared with Logo Removal - Basic Edition, the Advanced Edition offers a better erasing effect. If CustomerAppId is set to ai_delogo_v1, Logo Removal - Advanced Edition is used.
Two processing methods (automatic erasing and specified area erasing) are supported:
Automatic erasing: AI models are used to automatically recognize and erase logos in full-screen video images, supporting both static and dynamic logos.
Currently, we support more than ten common Internet logos. For logos not in the supported range, we also offer customized training services, which will be charged separately as a model training fee.
Image interference may negatively impact automatic erasing, possibly causing missed or incorrect erasings. This can be fixed through specified area erasing.
Specified area erasing: For static logos in a fixed position, it is recommended to use specified area erasing to reduce missed or incorrect erasings.
Red box: dynamic logo that is constantly moving. It is recommended to use automatic erasing (uncommon Internet logos require model training). Green box: Static logo in a fixed position, which can be removed using the specified area erasing.
Billing Instructions
When you use the Logo Removal - Advanced Edition, the "Logo Removal - Advanced Edition" fee will be charged. For pricing, see Smart Erase Billing Instructions.
5.1.1. Automatic Erasing
Left: original video with a logo in the upper left corner and an icon in the upper right corner. Right: automatic erasing effect of Logo Removal - Advanced Edition.
"OutputDir":"/mps_test/output/",//Output folder path. Replace it.
"AiAnalysisTask":{
"Definition":25,//Preset template ID for smart erasing. Enter 25.
"ExtendedParameter":"{\"delogo\":{\"cluster_id\":\"gpu_zhiyan\",\"CustomerAppId\":\"ai_delogo_v1\"}}"//Extended parameters. Replace them when you select a different erasing capability.
5.1.2. Automatic Erasing with the Logo Position Specified to Protect Areas Requiring No Erasing
The automatic erasing feature removes globally detected logos by default. If als_filter is passed, you can specify the approximate position of a logo. The system will filter out logos outside this area during automatic erasing, thereby protecting areas of the video that do not require erasing.
Left: original video with a logo in the upper left corner and an icon in the upper right corner. Right: effect of erasing only the icon in the upper right corner.
"OutputDir":"/mps_test/output/",//Output folder path. Replace it.
"AiAnalysisTask":{
"Definition":25,//Preset template ID for smart erasing. Enter 25.
"ExtendedParameter":"{\"delogo\":{\"cluster_id\":\"gpu_zhiyan\",\"CustomerAppId\":\"ai_delogo_v1\",\"als_filter\":{\"active_areas\":[{\"type\":1,\"lt_x\":527,\"lt_y\":13,\"rb_x\":701,\"rb_y\":78}]}}}"//Extended parameters. Replace them when you select a different erasing capability.
Automatic erasing only supports processing logos in the MPS model library. Uncommon Internet logos are generally not in the MPS model library. Handle them in the following two scenarios:
Logo with a dynamically changing position: Model training is required to implement erasing. This process incurs additional model training fees.
Logo with a fixed position: custom_objs can be used to directly specify the area for erasing. This incurs no additional model training fees. Example:
Left: original video with the logo erasing area marked in red. Right: erasing effect.
"OutputDir":"/mps_test/output/",//Output folder path. Replace it.
"AiAnalysisTask":{
"Definition":25,//Preset template ID for smart erasing. Enter 25.
"ExtendedParameter":"{\"delogo\":{\"cluster_id\":\"gpu_zhiyan\",\"CustomerAppId\":\"ai_delogo_v1\",\"custom_objs\":{\"type\":0,\"time_objs\":[{\"objs\":[{\"type\":1,\"value\":\"customobjs\",\"score\":100,\"rect\":{\"lt_x\":0.024,\"lt_y\":0.027,\"rb_x\":0.14,\"rb_y\":0.198}}]}]}}}"//Extended parameters. Replace them when you select a different erasing capability.
Logo Removal - Basic Edition provides an erasing effect of blurring the logo and also supports automatic erasing and specified area erasing.
Billing Instructions
When you use the Logo Removal - Basic Edition, including automatic erasing and specified area erasing, the "basic fee of smart erase (Logo Removal - Basic Edition)" fee will be charged. For pricing, see Smart Erase Billing Instructions.
5.2.1. Automatic Erasing
Left: original video with a logo in the upper left corner and an icon in the upper right corner. Right: automatic erasing effect of Logo Removal - Basic Edition.
Using the JSON Mode of API Explorer
Using the Form Mode of API Explorer
ExtendedParameter can be skipped.
Complete JSON example for calling ProcessMedia to initiate a task:
{
"InputInfo":{//Input video path. Replace it with your original video.
Similar to Logo Removal - Advanced Edition, automatic erasing of the Basic Edition only supports processing logos in the MPS model library. Uncommon Internet logos are generally not in the MPS model library. Handle them in the following two scenarios:
Logo with a dynamically changing position: Model training is required to implement erasing. This process incurs additional model training fees.
Logo with a fixed position: custom_objs can be used to directly specify the area for erasing. This incurs no additional model training fees. Example:
"OutputDir":"/mps_test/output/",//Output folder path. Replace it.
"AiAnalysisTask":{
"Definition":25,//Preset template ID for smart erasing. Enter 25.
"ExtendedParameter":"{\"delogo\":{\"custom_objs\":{\"type\":0,\"time_objs\":[{\"objs\":[{\"type\":1,\"value\":\"customobjs\",\"score\":100,\"rect\":{\"lt_x\":0.024,\"lt_y\":0.027,\"rb_x\":0.14,\"rb_y\":0.198}}]}]}}}"//Extended parameters. Replace them when you select a different erasing capability.
If you use both subtitle removal and logo removal, the "Logo Removal - Advanced Edition" fee and the "Subtitle Removal" fee are charged. For pricing, see billing instructions in Smart Erase.
User Guide
When a video contains both subtitles (text) and logos (graphics), specify CustomerAppId as subtitle_logo_erase to simultaneously remove subtitles and logos.
For common internet logos, the system will erase them automatically without requiring logo position specification. You only need to define the subtitle area via als_filter.
"OutputDir":"/mps_test/output/",//Output folder path. Replace it.
"AiAnalysisTask":{
"Definition":25,//Preset template ID for smart erasing. Enter 25.
"ExtendedParameter":"{\"delogo\":{\"cluster_id\":\"gpu_zhiyan\",\"CustomerAppId\":\"subtitle_logo_erase\",\"als_filter\":{\"active_areas\":[{\"type\":2,\"lt_x\":0.106,\"lt_y\":0.733,\"rb_x\":0.901,\"rb_y\":0.825},{\"type\":2,\"lt_x\":0.612,\"lt_y\":0.911,\"rb_x\":0.988,\"rb_y\":0.984}]}}}"//Additional parameters. Replace them when selecting a different erasing capability.
"OutputDir":"/mps_test/output/",//Output folder path. Replace it.
"AiAnalysisTask":{
"Definition":25,//Preset template ID for smart erasing. Enter 25.
"ExtendedParameter":"{\"delogo\":{\"cluster_id\":\"gpu_zhiyan\",\"CustomerAppId\":\"subtitle_logo_erase\",\"custom_objs\":{\"type\":0,\"time_objs\":[{\"objs\":[{\"type\":1,\"value\":\"customobjs\",\"score\":100,\"rect\":{\"lt_x\":0.024,\"lt_y\":0.027,\"rb_x\":0.14,\"rb_y\":0.198}}]}]}}}"//Additional parameters. Replace them when selecting a different erasing capability.
VII. Privacy Protection Processing (Human Faces and License Plates)
Billing Instructions
If you use the privacy protection processing feature, the "Privacy Protection Processing (Face and License Plate)" fee is charged. For pricing, see billing instructions in Smart Erase.
7.1 Human Face Processing
Perform blurring or mosaic processing and generate a new video after human faces are recognized in the video image.
Blur Effect
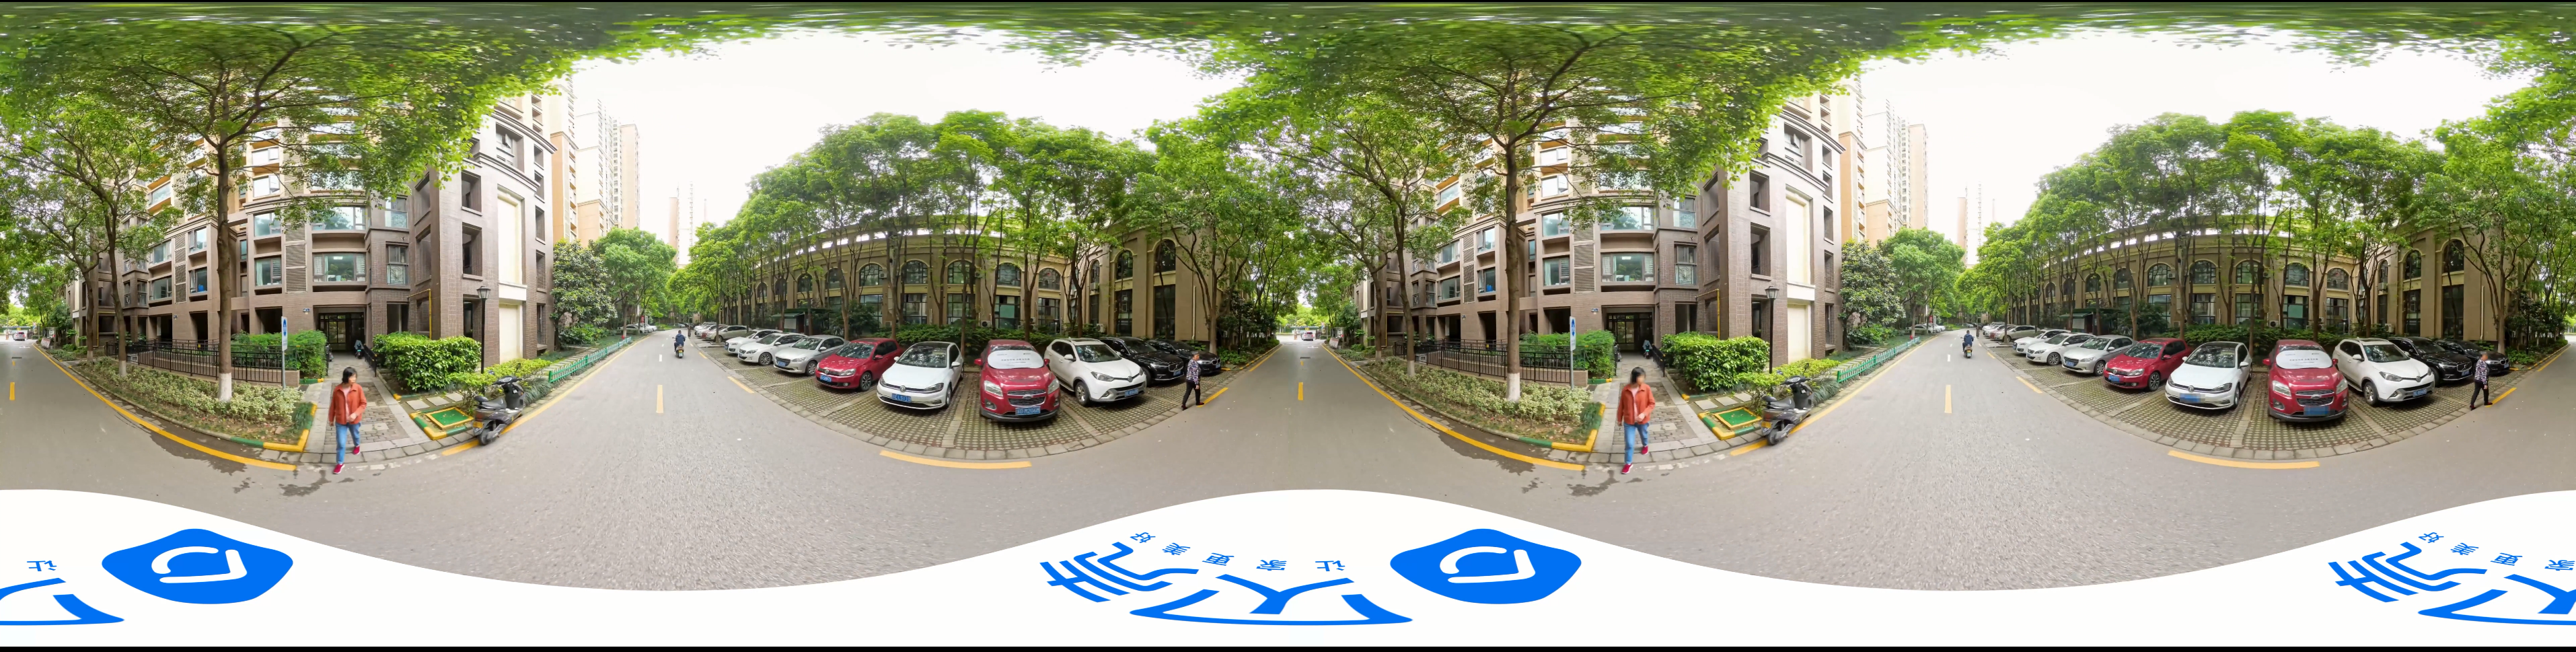
The left figure: Raw video image. The right figure: Face blurring.
"OutputDir":"/mps_test/output/",//Output folder path. Replace it.
"AiAnalysisTask":{
"Definition":25,//Preset template ID for smart erasing. Enter 25.
"ExtendedParameter":"{\"delogo\":{\"CustomerAppId\":\"facial_blur\"}"//Additional parameters. Replace them when selecting a different erasing capability.
"OutputDir":"/mps_test/output/",//Output folder path. Replace it.
"AiAnalysisTask":{
"Definition":25,//Preset template ID for smart erasing. Enter 25.
"ExtendedParameter":"{\"delogo\":{\"CustomerAppId\":\"facial_mosaic\"}}"//Additional parameters. Replace them when selecting a different erasing capability.
"OutputDir":"/mps_test/output/",//Output folder path. Replace it.
"AiAnalysisTask":{
"Definition":25,//Preset template ID for smart erasing. Enter 25.
"ExtendedParameter":"{\"delogo\":{\"CustomerAppId\":\"facial_and_numberplate_mosaic_v2\"}}"//Additional parameters. Replace them when selecting a different erasing capability.
All fields supported by ExtendedParameter and their descriptions are as follows:
"delogo":{
"CustomerAppId":"subtitle_extract", # String, preset scenario parameter. Different scenarios may only use some parameters below. Generally, internal confirmation is required for parameter modifications.
"cluster_id":"", # String, reserved field, used for cluster scheduling by policies. A specific task needs to be run on a specific cluster, so it cannot be modified casually.
"output_patten":"{task_type}-{session_id}", # String, output filename, with no special character. The length should be less than 200, the identifier is {}, and the placeholder can be task_type and session_id.
"als_filter":{ # JSON object, target check and analysis filter.
"min_ocr_height":10, # Float, valid if equal to or greater than 0. For character recognition: Minimum text size. Note: The value less than or equal to 1 represents the video height ratio, and the value greater than 1 represents pixels.
"max_ocr_height":0.06, # Float, valid if equal to or greater than 0. For character recognition: Maximum text size.
"active_areas":[ # JSON array. The recognition result is only adopted when its center point is within this area through area filtering.
{
"lt_x":0.1, # Float, valid if equal to or greater than 0. X-coordinate of the upper left corner of the area. Note: The value less than or equal to 1 represents the ratio, and the value greater than 1 represents pixels.
"lt_y":0.6, # Float, valid if equal to or greater than 0. Y-coordinate of the upper left corner of the area.
"rb_x":0.9, # Float, valid if equal to or greater than 0. X-coordinate of the lower right corner of the area.
"rb_y":0.95 # Float, valid if equal to or greater than 0. Y-coordinate of the lower right corner of the area.
}
]
},
"custom_objs":{ # JSON object, custom area.
"type":0, # Int, enter 0. Specified type.
"time_objs":[# JSON array, time area information.
{
"begin_ms":0, # Int, the start time in milliseconds. Same as video start if left blank.
"end_ms":100, # Int, the end time in milliseconds. Same as video end if left blank.
"objs":[ # JSON array, area information.
{
"rect":{ # JSON object, target area.
"lt_x":55, # Float, valid if equal to or greater than 0. X-coordinate of the upper left corner of the area. Note: The value less than 1 represents the ratio, and the value greater than or equal to 1 represents pixels.
"lt_y":143, # Float, valid if equal to or greater than 0. Y-coordinate of the upper left corner of the area.
"rb_x":327, # Float, valid if equal to or greater than 0. X-coordinate of the lower right corner of the area.
"rb_y":192 # Float, valid if equal to or greater than 0. Y-coordinate of the lower right corner of the area.
},
"score":100, # Int, enter 100 here. Target reference score.
"type":2, # Int, target type. 1 represents targets such as logos, and 2 represents text.
"value":"LUSN" # String, target value. For example, enter the corresponding text for character recognition.
}
]
}
]
}
"subtitle_param":{ # JSON object, parameters related to subtitles.
"margin_bottom":0.2, # Float, valid if equal to or greater than 0. Used for subtitle file rendering. Subtitle distance from the bottom: Less than or equal to 1 represents video height ratio, and greater than 1 represents pixels.
"font_size":50, # Float, valid if equal to or greater than 0. Used for subtitle file rendering. Subtitle rendering font size: Less than or equal to 1 represents video height ratio, and greater than 1 represents pixels.
"font_type":"simkai", # String. Subtitle rendering font: simkai represents KaiTi, hei represents SimHei, and song represents SimSun.
"translate_dst_language":"en" # String, used for subtitle translation. If it is set to empty, no translation will be performed, and only the original subtitles will be output. The corresponding relationships for other values are: en-English, zh-Chinese, ja-Japanese, ko-Korean, de-German, pt-Portuguese, id-Indonesian, th-Thai, and ms-Malay. The above is just a list of commonly used languages. We support translation of hundreds of languages. Contact us to get the complete list.
In the erasing scenario, the original video usually comes with original subtitles. Using OCR for subtitle extraction delivers better and more accurate results. Therefore, the smart erase feature only integrates OCR capabilities.
Can Subtitle Embedding and External Subtitle Features Be Used Separately?
Embedding subtitles or using external subtitles without erasing can be implemented via the audio/video transcoding feature. For details, see Subtitle Embedding and External Subtitles in Audio/Video Transcoding Integration.
How to Compose an Existing Audio File with a Video File to Generate a New Video?
Business Scenario:
The AI voice dubbing file has been generated via other methods. It is hoped to separate the voice and background sound in the video, then compose the AI voice dubbing with the background sound and replace the audio of the original video.
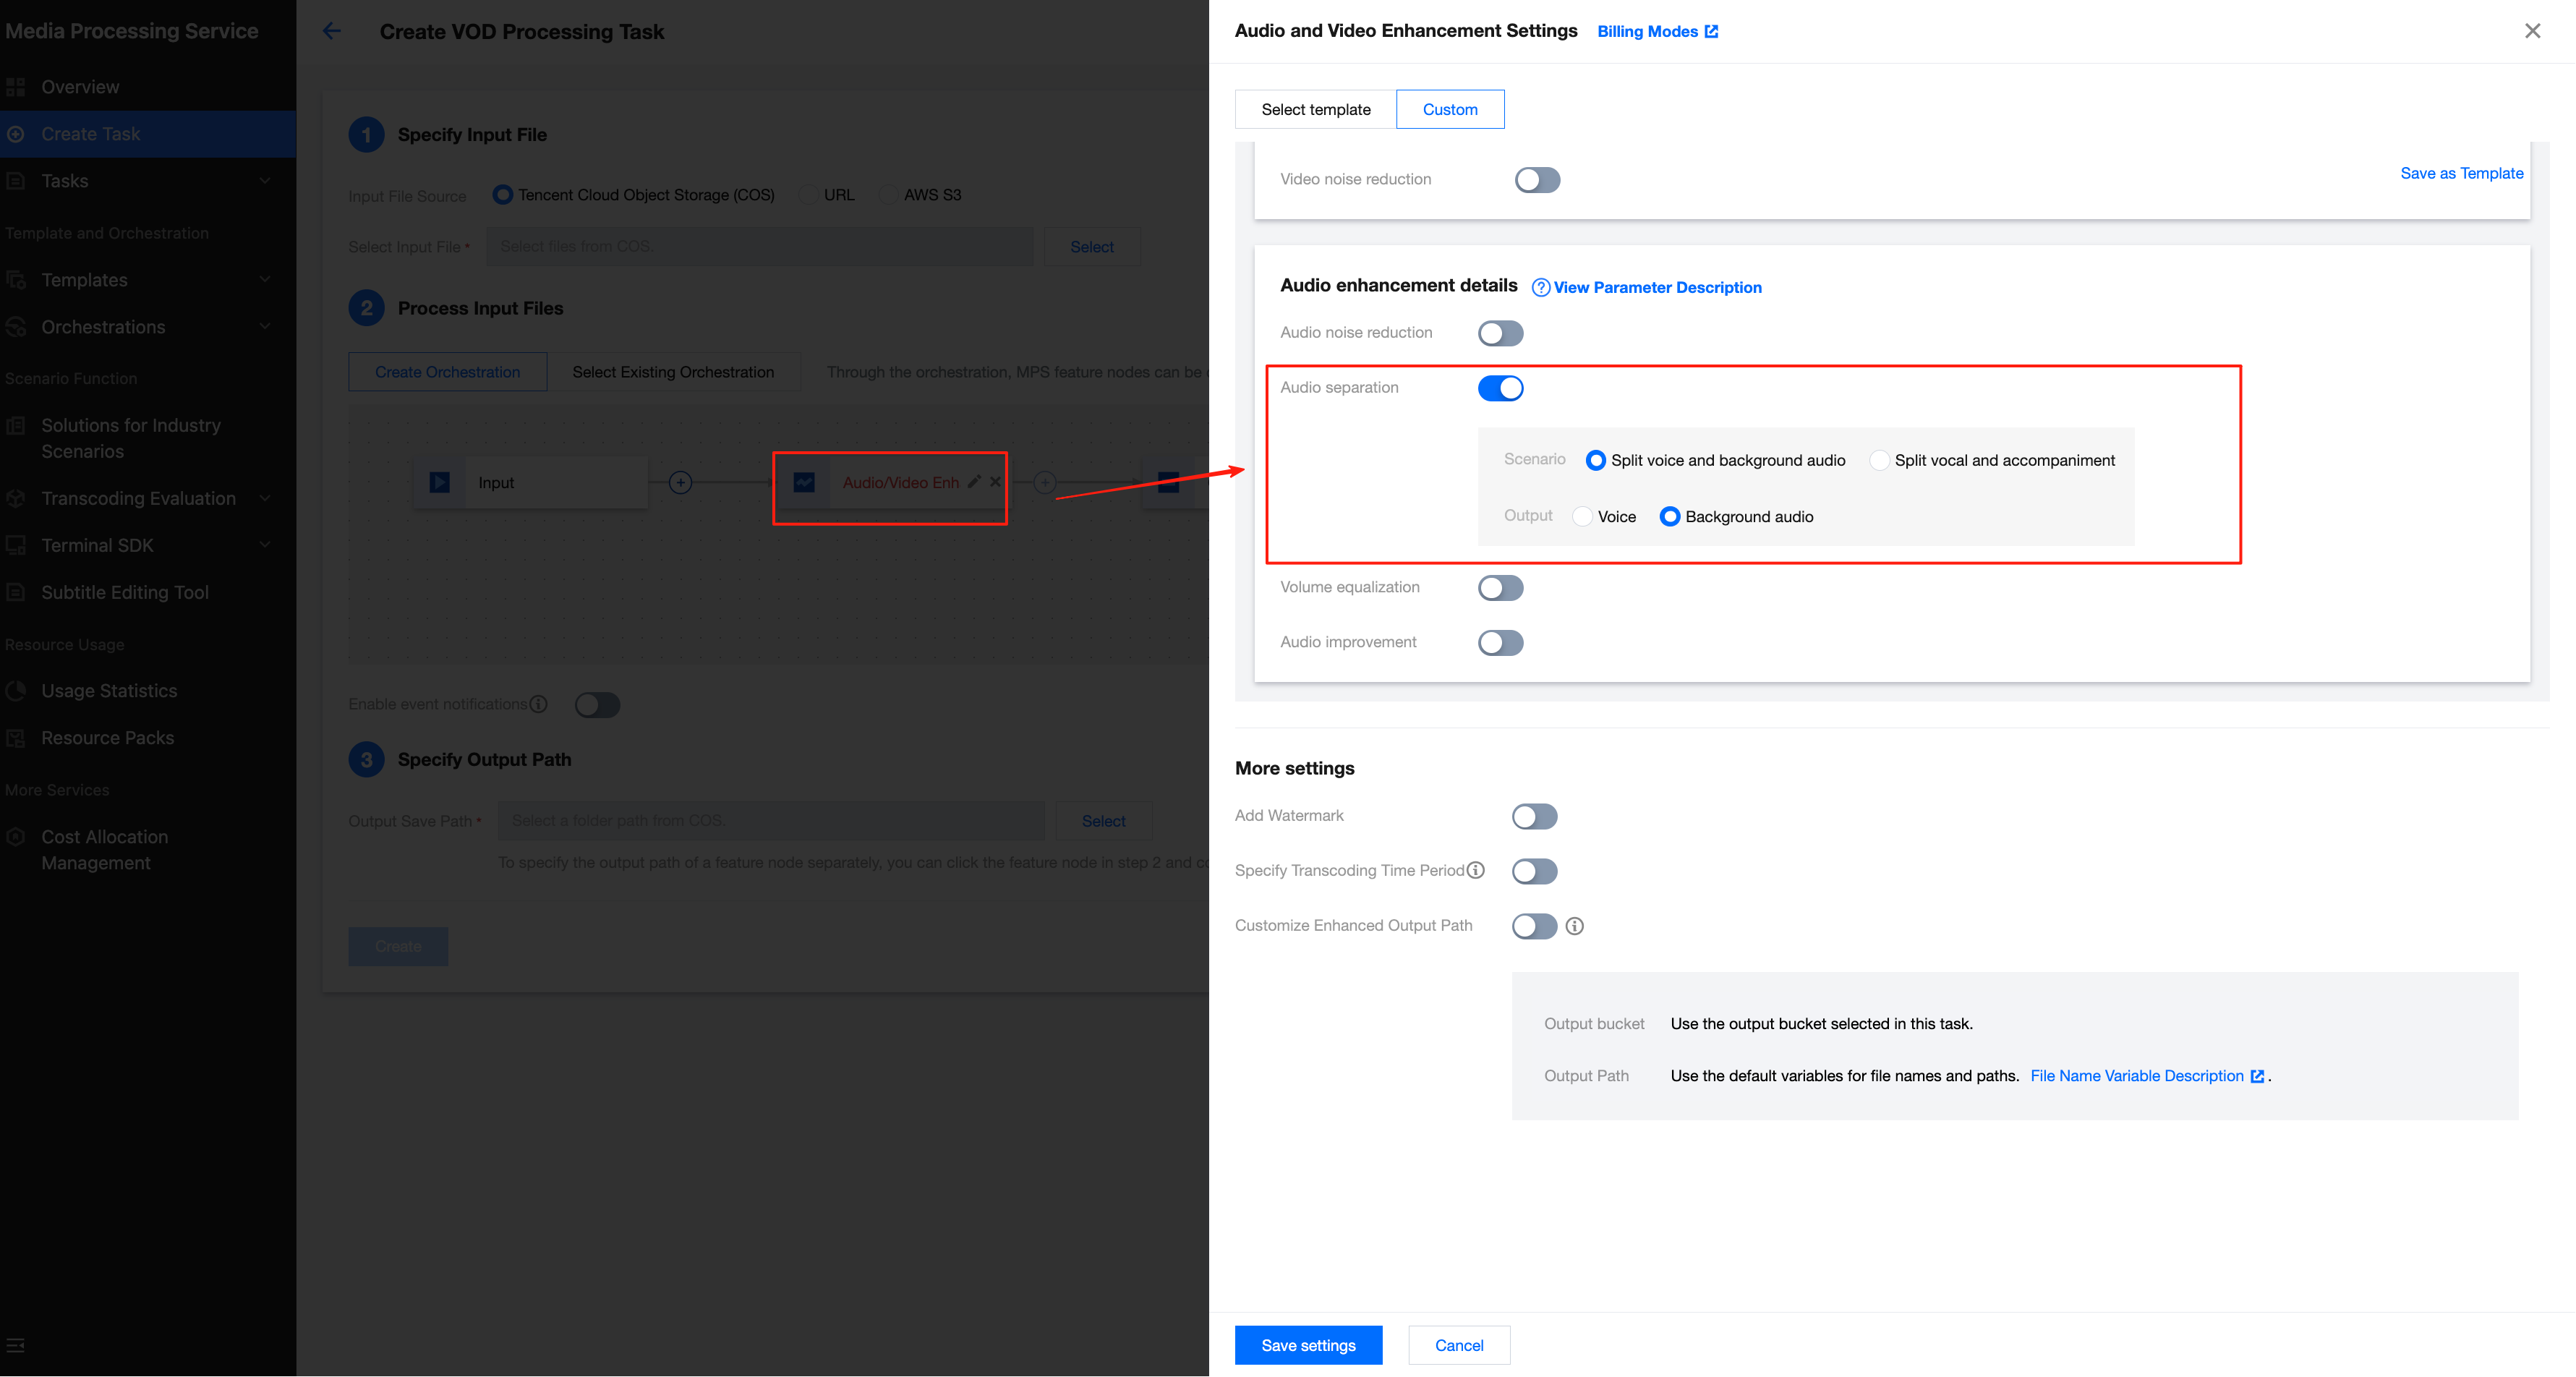
Solution:
To separate the voice and background sound, you can create an audio/video enhancement task in the console and enable the audio separation feature. After initiating the task, you will get the background sound file.
Then, call the Video Editing API and select the synthesis task to compose the AI voice dubbing and background sound with the video and generate a new video. The JSON example is as follows:
POST / HTTP/1.1
Host: mps.tencentcloudapi.com
Content-Type: application/json
X-TC-Action: EditMedia
<Common request parameters>
{
"FileInfos":[//Input the information of the file that requires synthesis.
"OutputObjectPath":"/editmedia/compose/final_video.{format}",//Output folder path and filename definition.
"ComposeConfig":{
"TargetInfo":{//Output video parameters.
"Container":"mp4",
"RemoveVideo":0,
"RemoveAudio":0,
"VideoStream":{
"Codec":"H.264",
"Fps":18
},
"AudioStream":{
"Codec":"AAC",
"SampleRate":32000,
"AudioChannel":1
}
},
"Tracks":[//Track information.
{
"Type":"Video",//Track 1, video.
"Items":[
{
"Type":"Video",
"Video":{
"SourceMedia":{
"FileId":"SOURCE_VIDEO"
},
"AudioOperations":[
{
"Type":"Volume",
"Volume":0//Mute the original audio in the video.
}
]
}
}
]
},
{
"Type":"Audio",//Track 2, voice.
"Items":[
{
"Type":"Audio",
"Audio":{
"SourceMedia":{
"FileId":"AUDIO_VOICES"
},
"TrackTime":{
"Duration":"10s"//Track duration, same as the SourceMedia duration if left blank.
},
"AudioOperations":[
{
"Type":"Volume",
"Volume":5//Volume configuration.
}
]
}
}
]
},
{
"Type":"Audio",//Track 3, background sound.
"Items":[
{
"Type":"Audio",
"Audio":{
"SourceMedia":{
"FileId":"AUDIO_BACKGROUND"
},
"TrackTime":{
"Duration":"10s"//Track duration, same as the SourceMedia duration if left blank.
},
"AudioOperations":[
{
"Type":"Volume",
"Volume":5//Volume configuration.
}
]
}
}
]
}
]
}
}
Which Logos Are Supported for the Logo Removal Feature?
Currently, we support automatic recognition and erasing of more than ten logos. For logos not in the supported range, we also offer customized training services, which will be charged separately as a model training fee.
If the logo position is fixed, you can also process it by specifying the erasing area with no additional charge for the model training fee.
Are Fees Charged for Videos Without a Logo?
Yes. The service still performs recognition even if the video has no logo, which also consumes computing resources.
Is Live Streaming Supported?
Currently, external APIs only support VOD files. If there is a need for live streaming processing, contact the developers.
How to Specify the Naming of Output Erasing Files?
You can specify the output filename with the output_patten parameter in the additional parameters.
The placeholder identifier is {}, and the placeholder can be task_type and session_id. The default output is {task_type}-{session_id}.
Usage example:
Example code before translation, only suitable for use in API Explorer:
{
"delogo":{
"CustomerAppId":"subtitle_extract",
"subtitle_param":{
"translate_dst_language":""
},
"output_patten":"custom-{task_type}-{session_id}"
}
}
// If you use the API directly, escape the above code as a string to pass in: {\"delogo\":{\"CustomerAppId\":\"subtitle_extract\",\"subtitle_param\":{\"translate_dst_language\":\"\"},\"output_patten\": \"custom-{task_type}-{session_id}\"}}.
// The output filename for the above parameters will be: custom-delogo-02EF93096ADCC84F4ACF156F3A0D1120DD_1721359047292.vtt.
Does Smart Erase Support COS Automatic Triggering?
The smart erase template is under development and expected to be launched in the console by July 2025. At that time, you can configure orchestration and enable automatic triggering through the console.
Currently, if you have an automatic triggering requirement, contact us for offline configuration. Thank you for your understanding.