The smart subtitle feature supports processing offline audio files, video files, and live streams. It can extract subtitles in the source language from videos through automatic speech recognition (ASR) or optical character recognition (OCR) and implement multilingual translation. It supports LLM-based text translation of subtitle files. The feature also allows configuration of hotword and term lexicons to improve the accuracy of speech recognition and LLM-based translation.
Smart Subtitle Feature
Description
Supported Input Type
ASR-based subtitle generation
Enables ASR-based conversion of dialogs to subtitle files for LLM-based translation.
Supports configuration of hotword and term lexicons to improve the accuracy of speech recognition and LLM-based translation.
Supports embedding and rendering subtitles into video images.
Audio file, video file, live stream, and real-time audio stream
OCR-based subtitle generation
Enables OCR-based extraction of characters from images as subtitles for LLM-based translation.
Video file (with hard subtitles on images)
Subtitle file translation
Supports LLM-based translation of input subtitles into different languages and generation of new subtitles.
Subtitle file (in WebVTT or SRT format)
These features can be enabled by creating different types of smart subtitle templates. For details, see Smart Subtitle Template.
Key features
Comprehensive Platform Support: Offers processing capabilities for on-demand files, live streams, and RTC streams. Live broadcast real-time simultaneous captioning supports steady and gradient modes, with a low barrier to integration and no need for modifications on the playback end.
High Accuracy: Utilizes large-scale models, and supports hotwords and glossary databases, achieving industry-leading accuracy.
Rich Language Variety: Supports hundreds of languages, including various dialects. Capable of recognizing mixed-language speech, such as combinations of Chinese and English.
Customizable Styles: Enables embedding open subtitles into videos, with customizable subtitle styles (font, size, color, background, position, etc.).
Demo
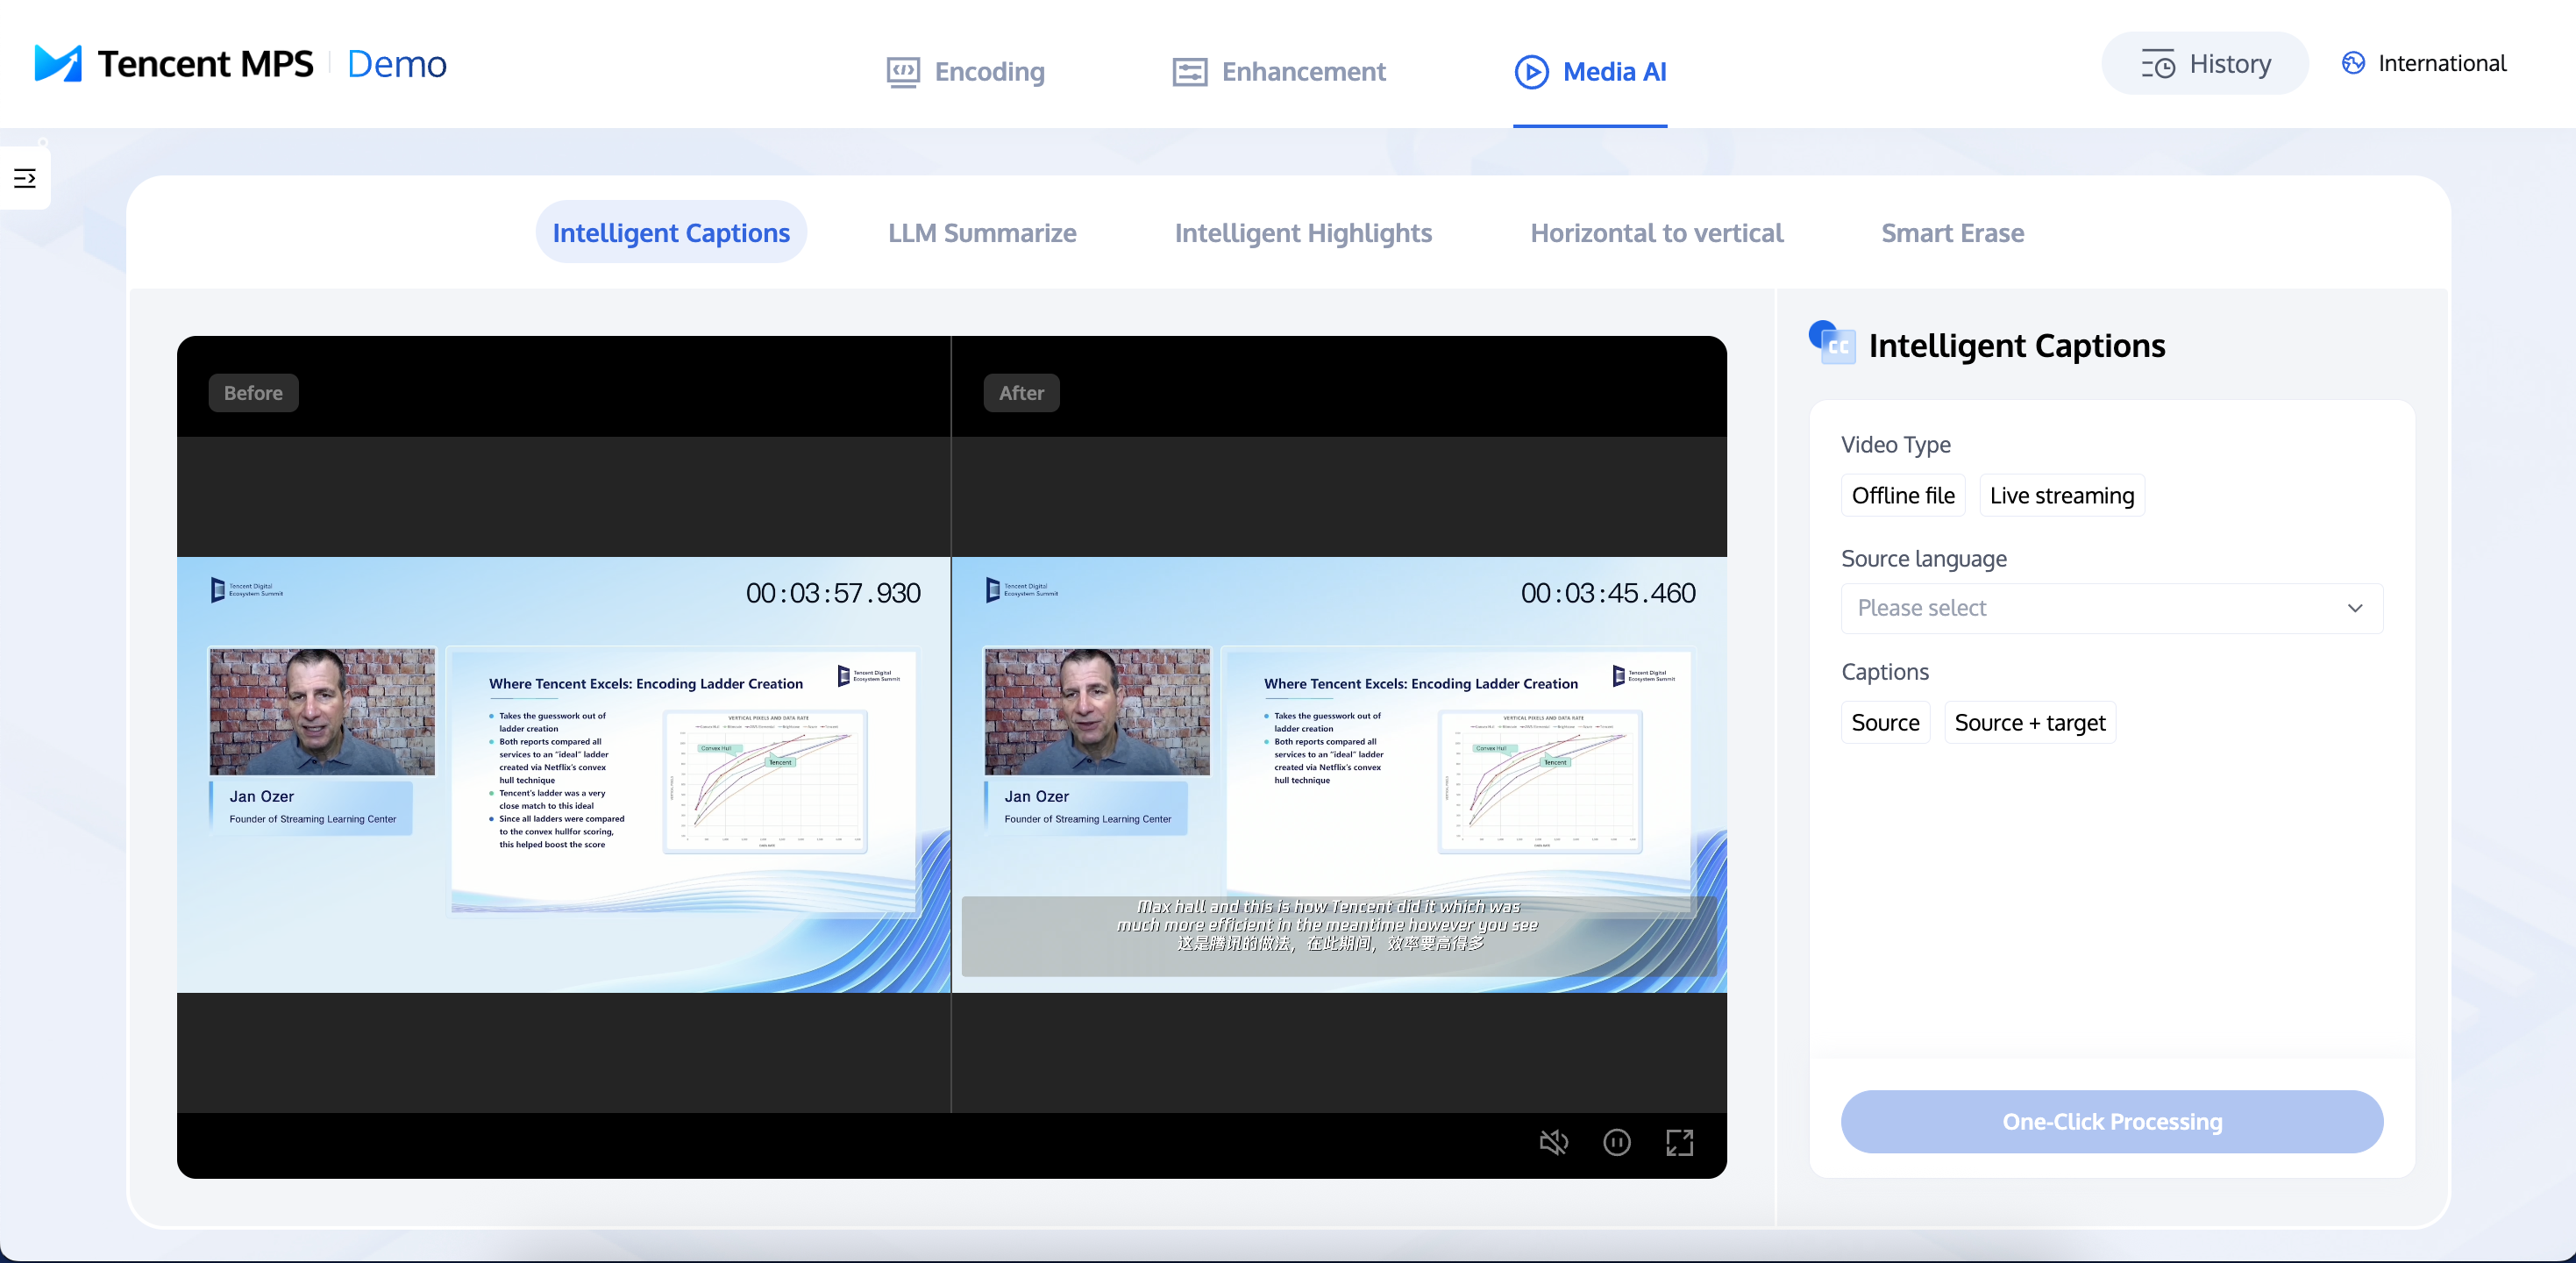
1. Access the Experience Center to navigate to the Intelligent Captions experience page. On the right-hand side, select either an offline video file or a live stream, specify the source language and caption type, and then click One-Click Processing.
2. Once the processing is complete, you can view the results.
Note:
The function of the MPS Demo is relatively simple, only for experiencing the basic effect, please use the API access to test the complete effect.
Scenario 1: Processing Offline Files
Method 1: Initiating a Zero-Code Task from the Console
Initiating a Task Manually
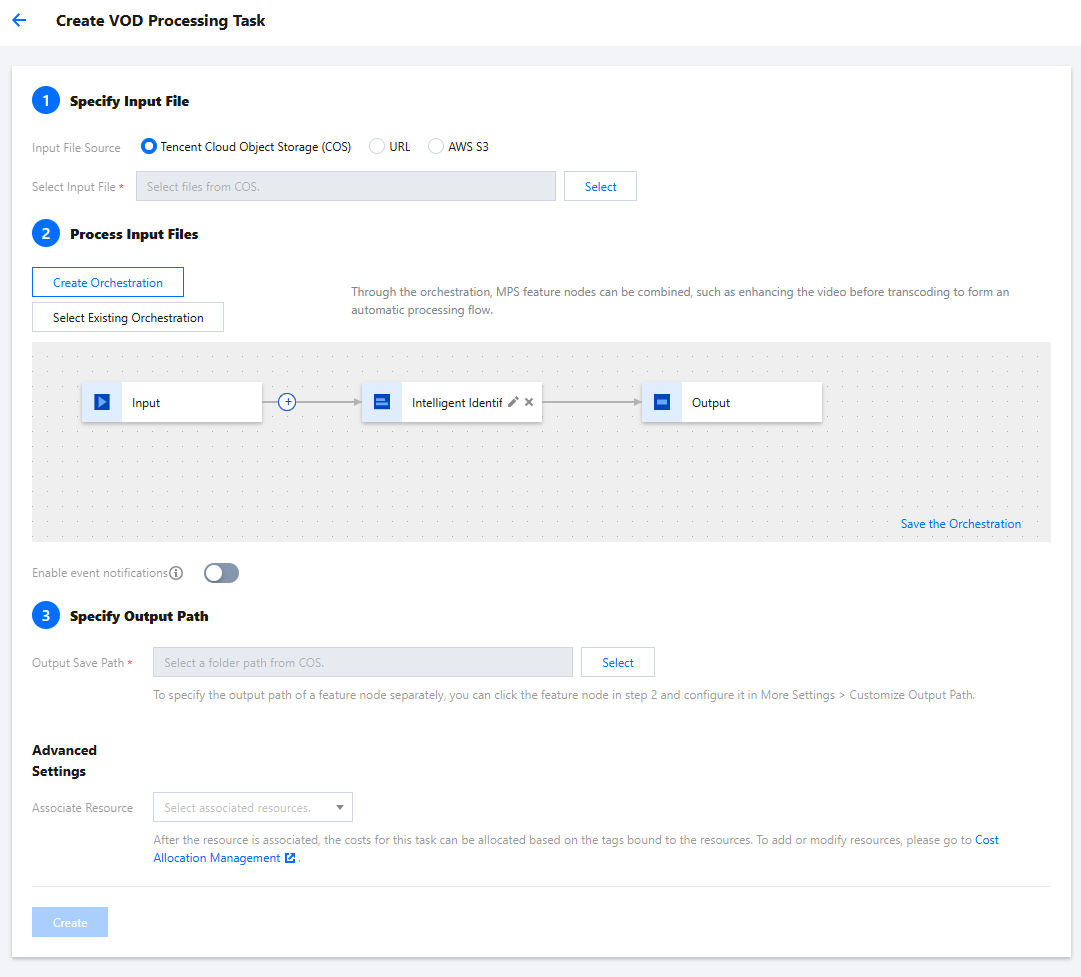
Log in to the Media Processing Service (MPS) console and click Create Task > Create VOD Processing Task.
1. Specify an input file.
You can choose a video file from a Tencent Cloud Object Storage (COS) bucket or provide a video download URL. The current subtitle generation and translation feature does not support using AWS S3 as an input file source.
2. Process the input file.
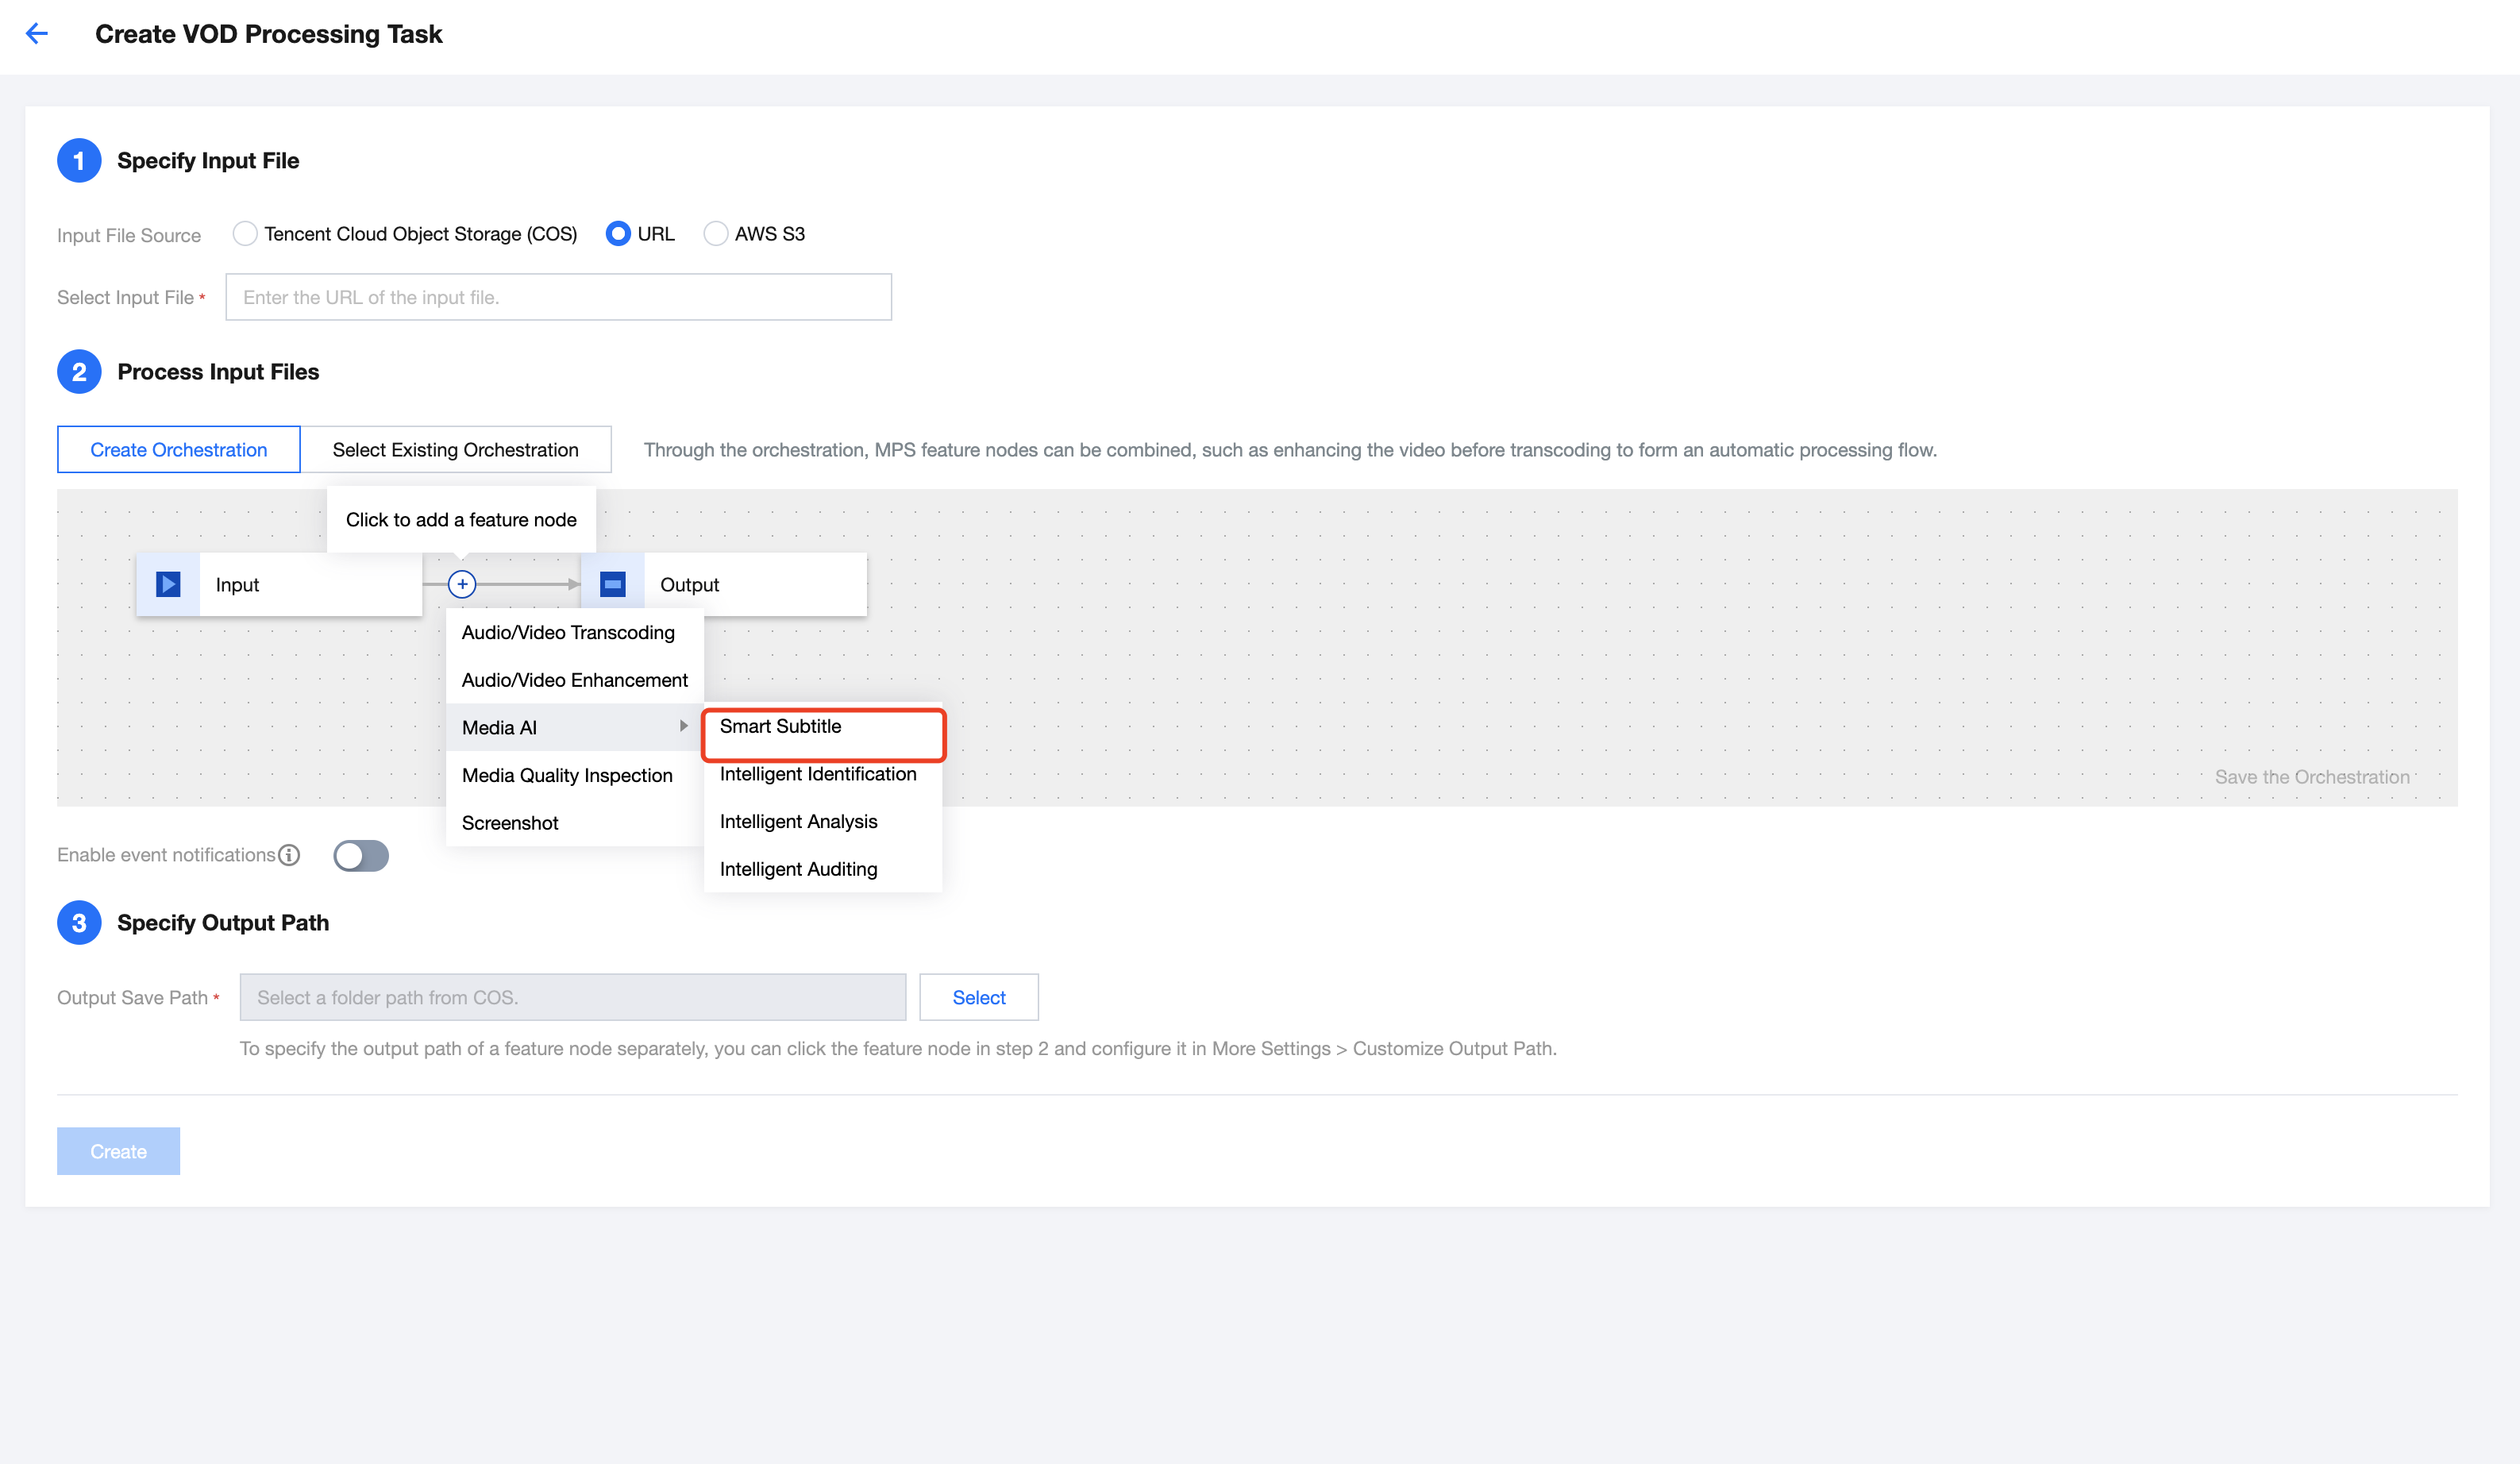
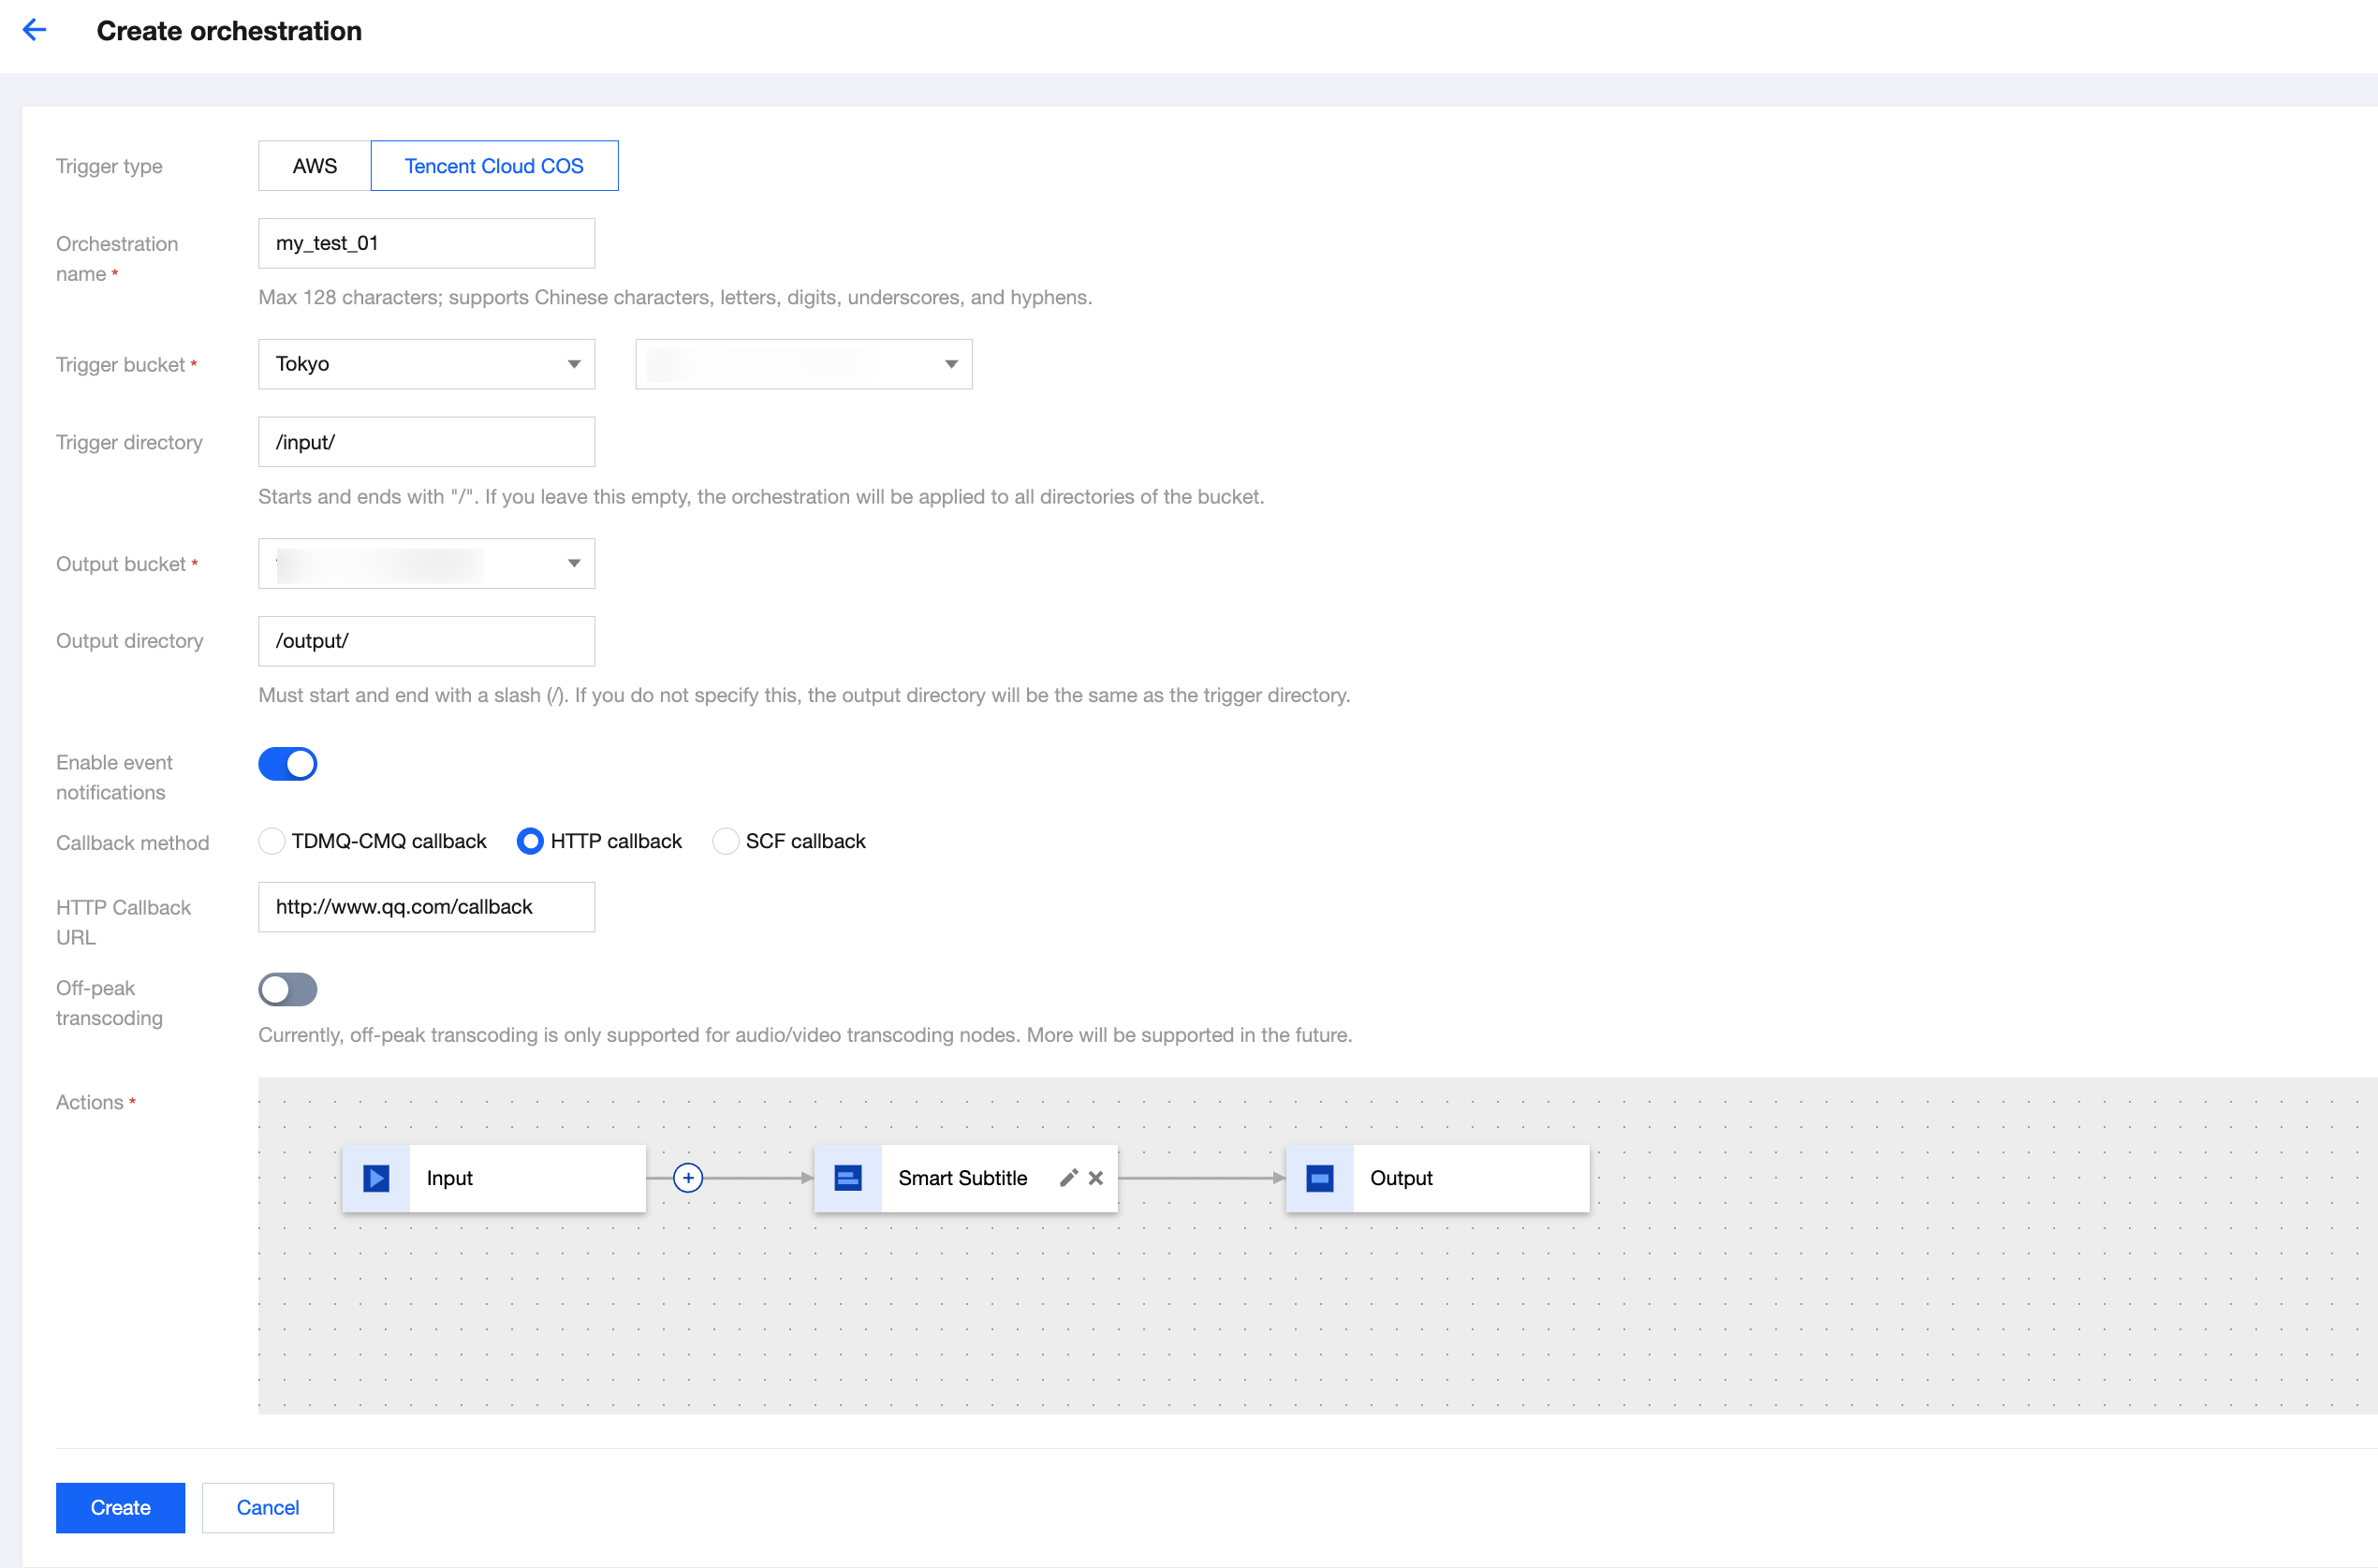
Select Create Orchestration and insert the "Smart Subtitle" node.
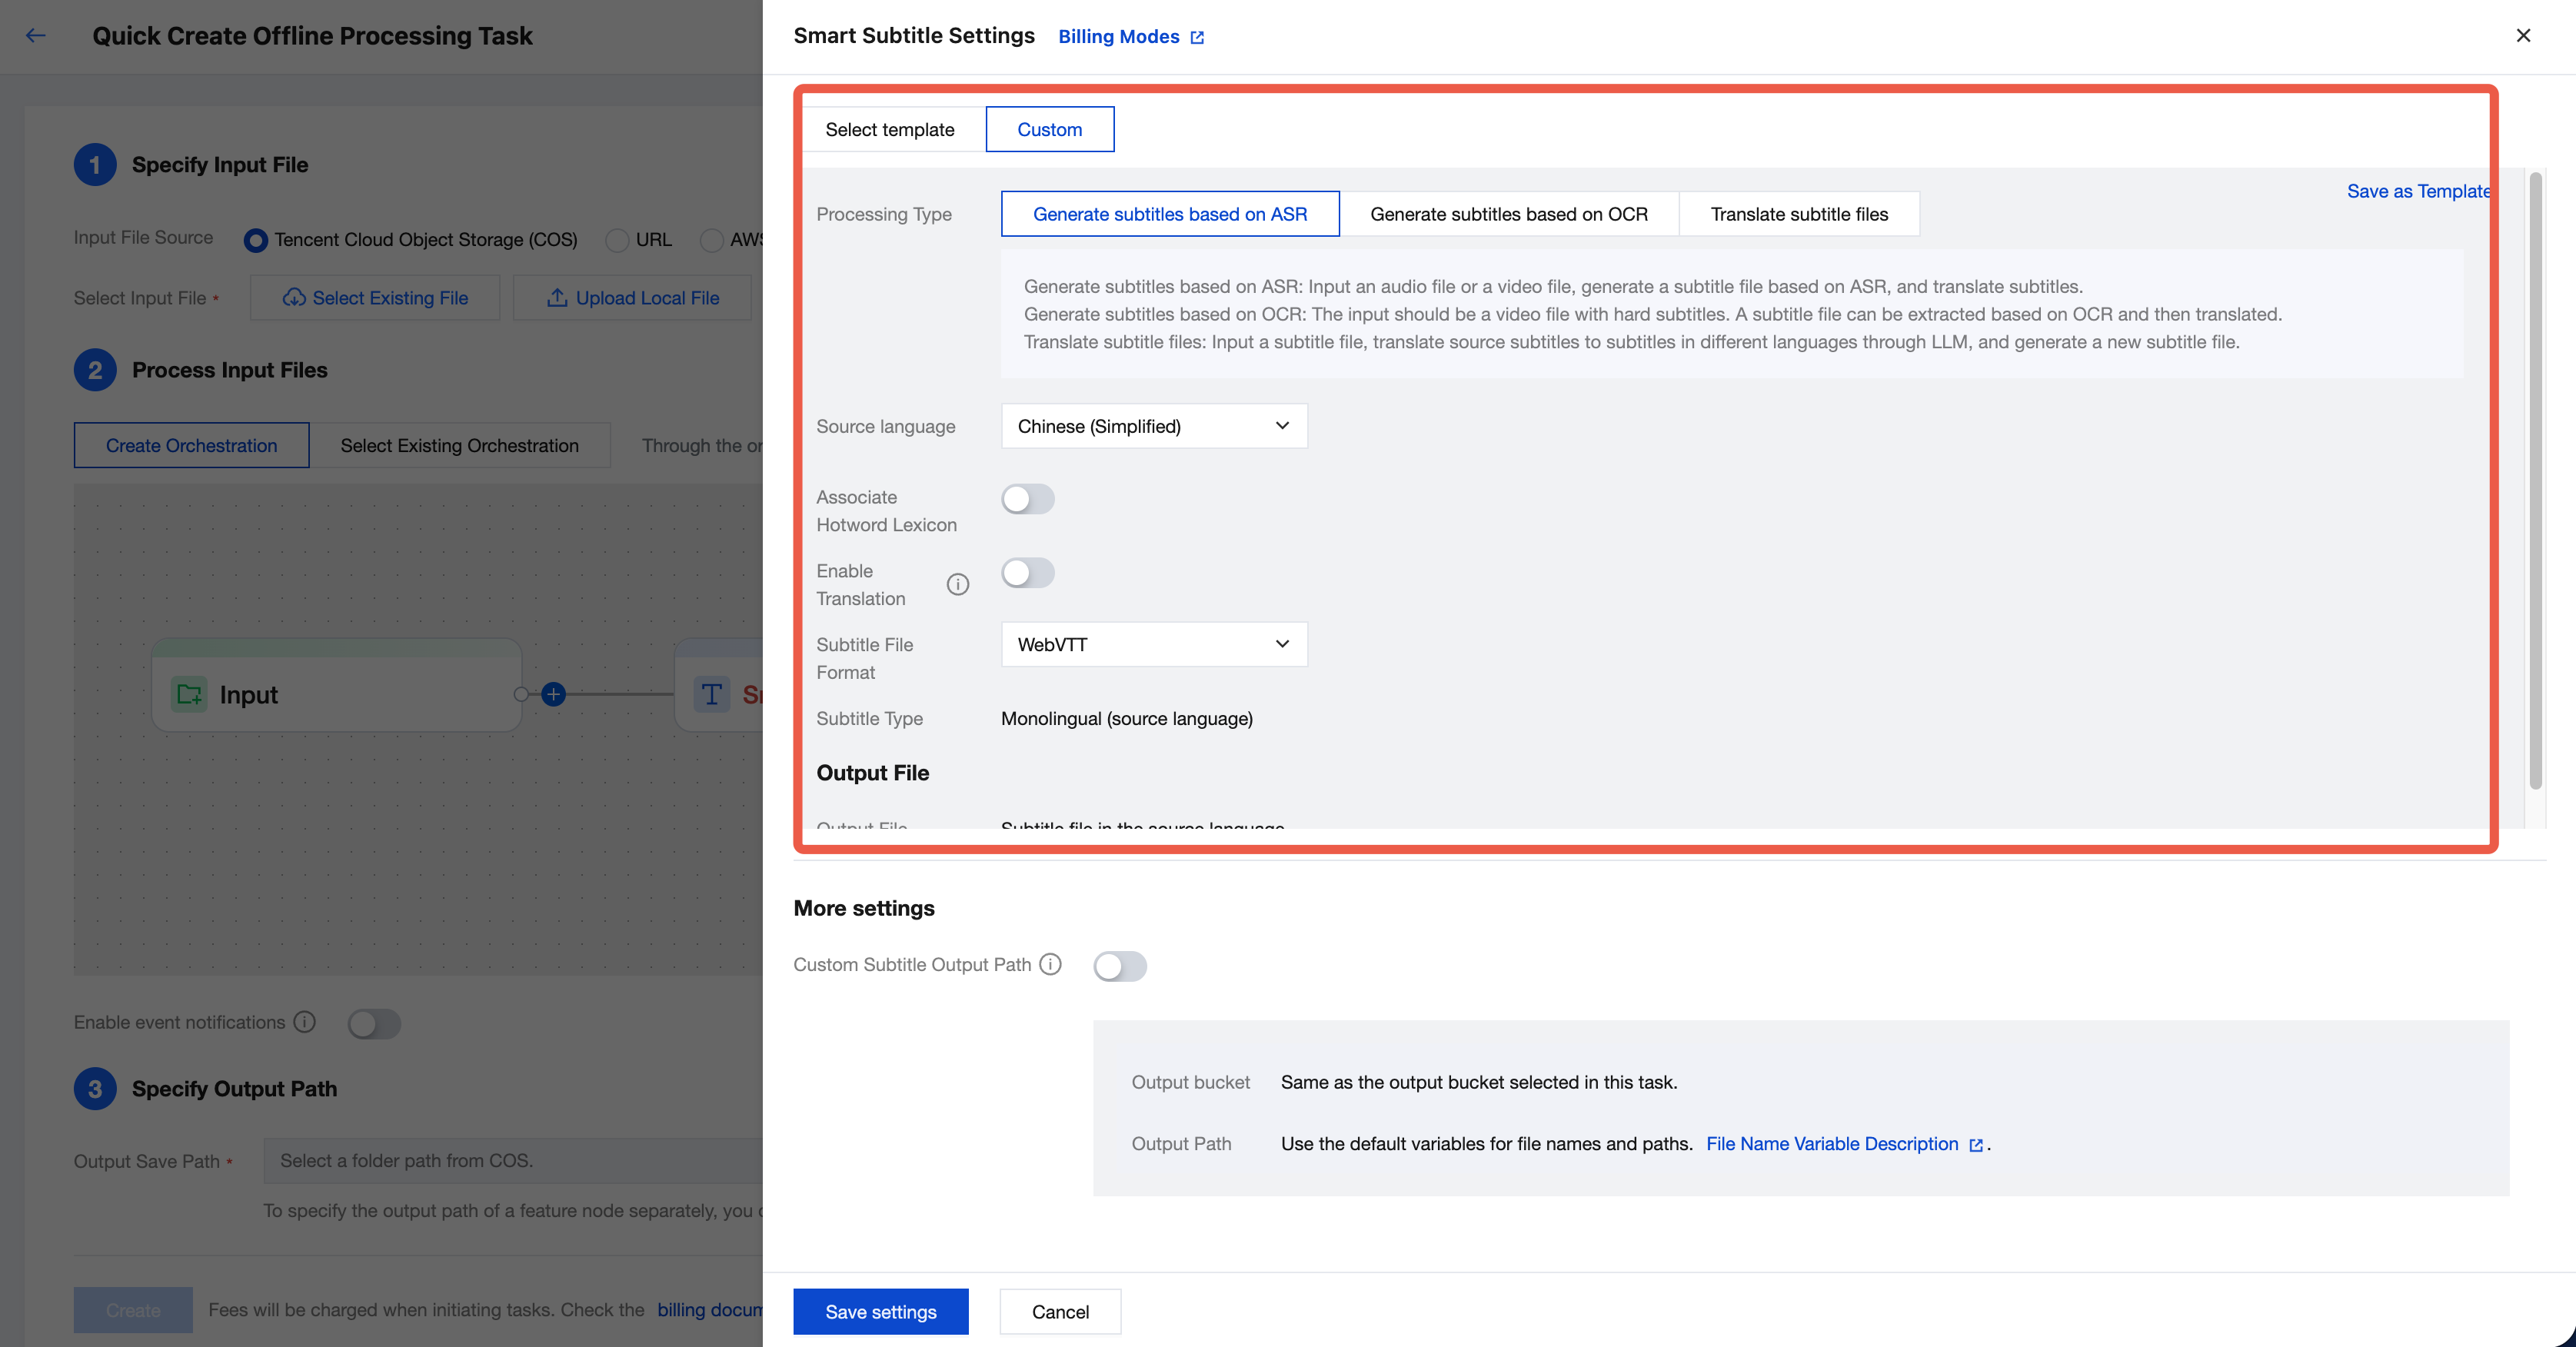
You can choose a preset template or use custom parameters. For a detailed template configuration guide, see Smart Subtitle Template.
3. Specify an output path.
Specify the storage path of the output file.
4. Initiate a task.
Click Create to initiate a task.
Automatically Triggering a Task Through the Orchestration (Optional)
If you want to upload a video file to the COS bucket and achieve automatic smart subtitles according to preset parameters, you can:
1. Enter On-demand Orchestration in the menu, click Create VDD Orchestration, select the smart subtitle node in task configuration, and configure parameters such as the bucket and directory to be triggered.
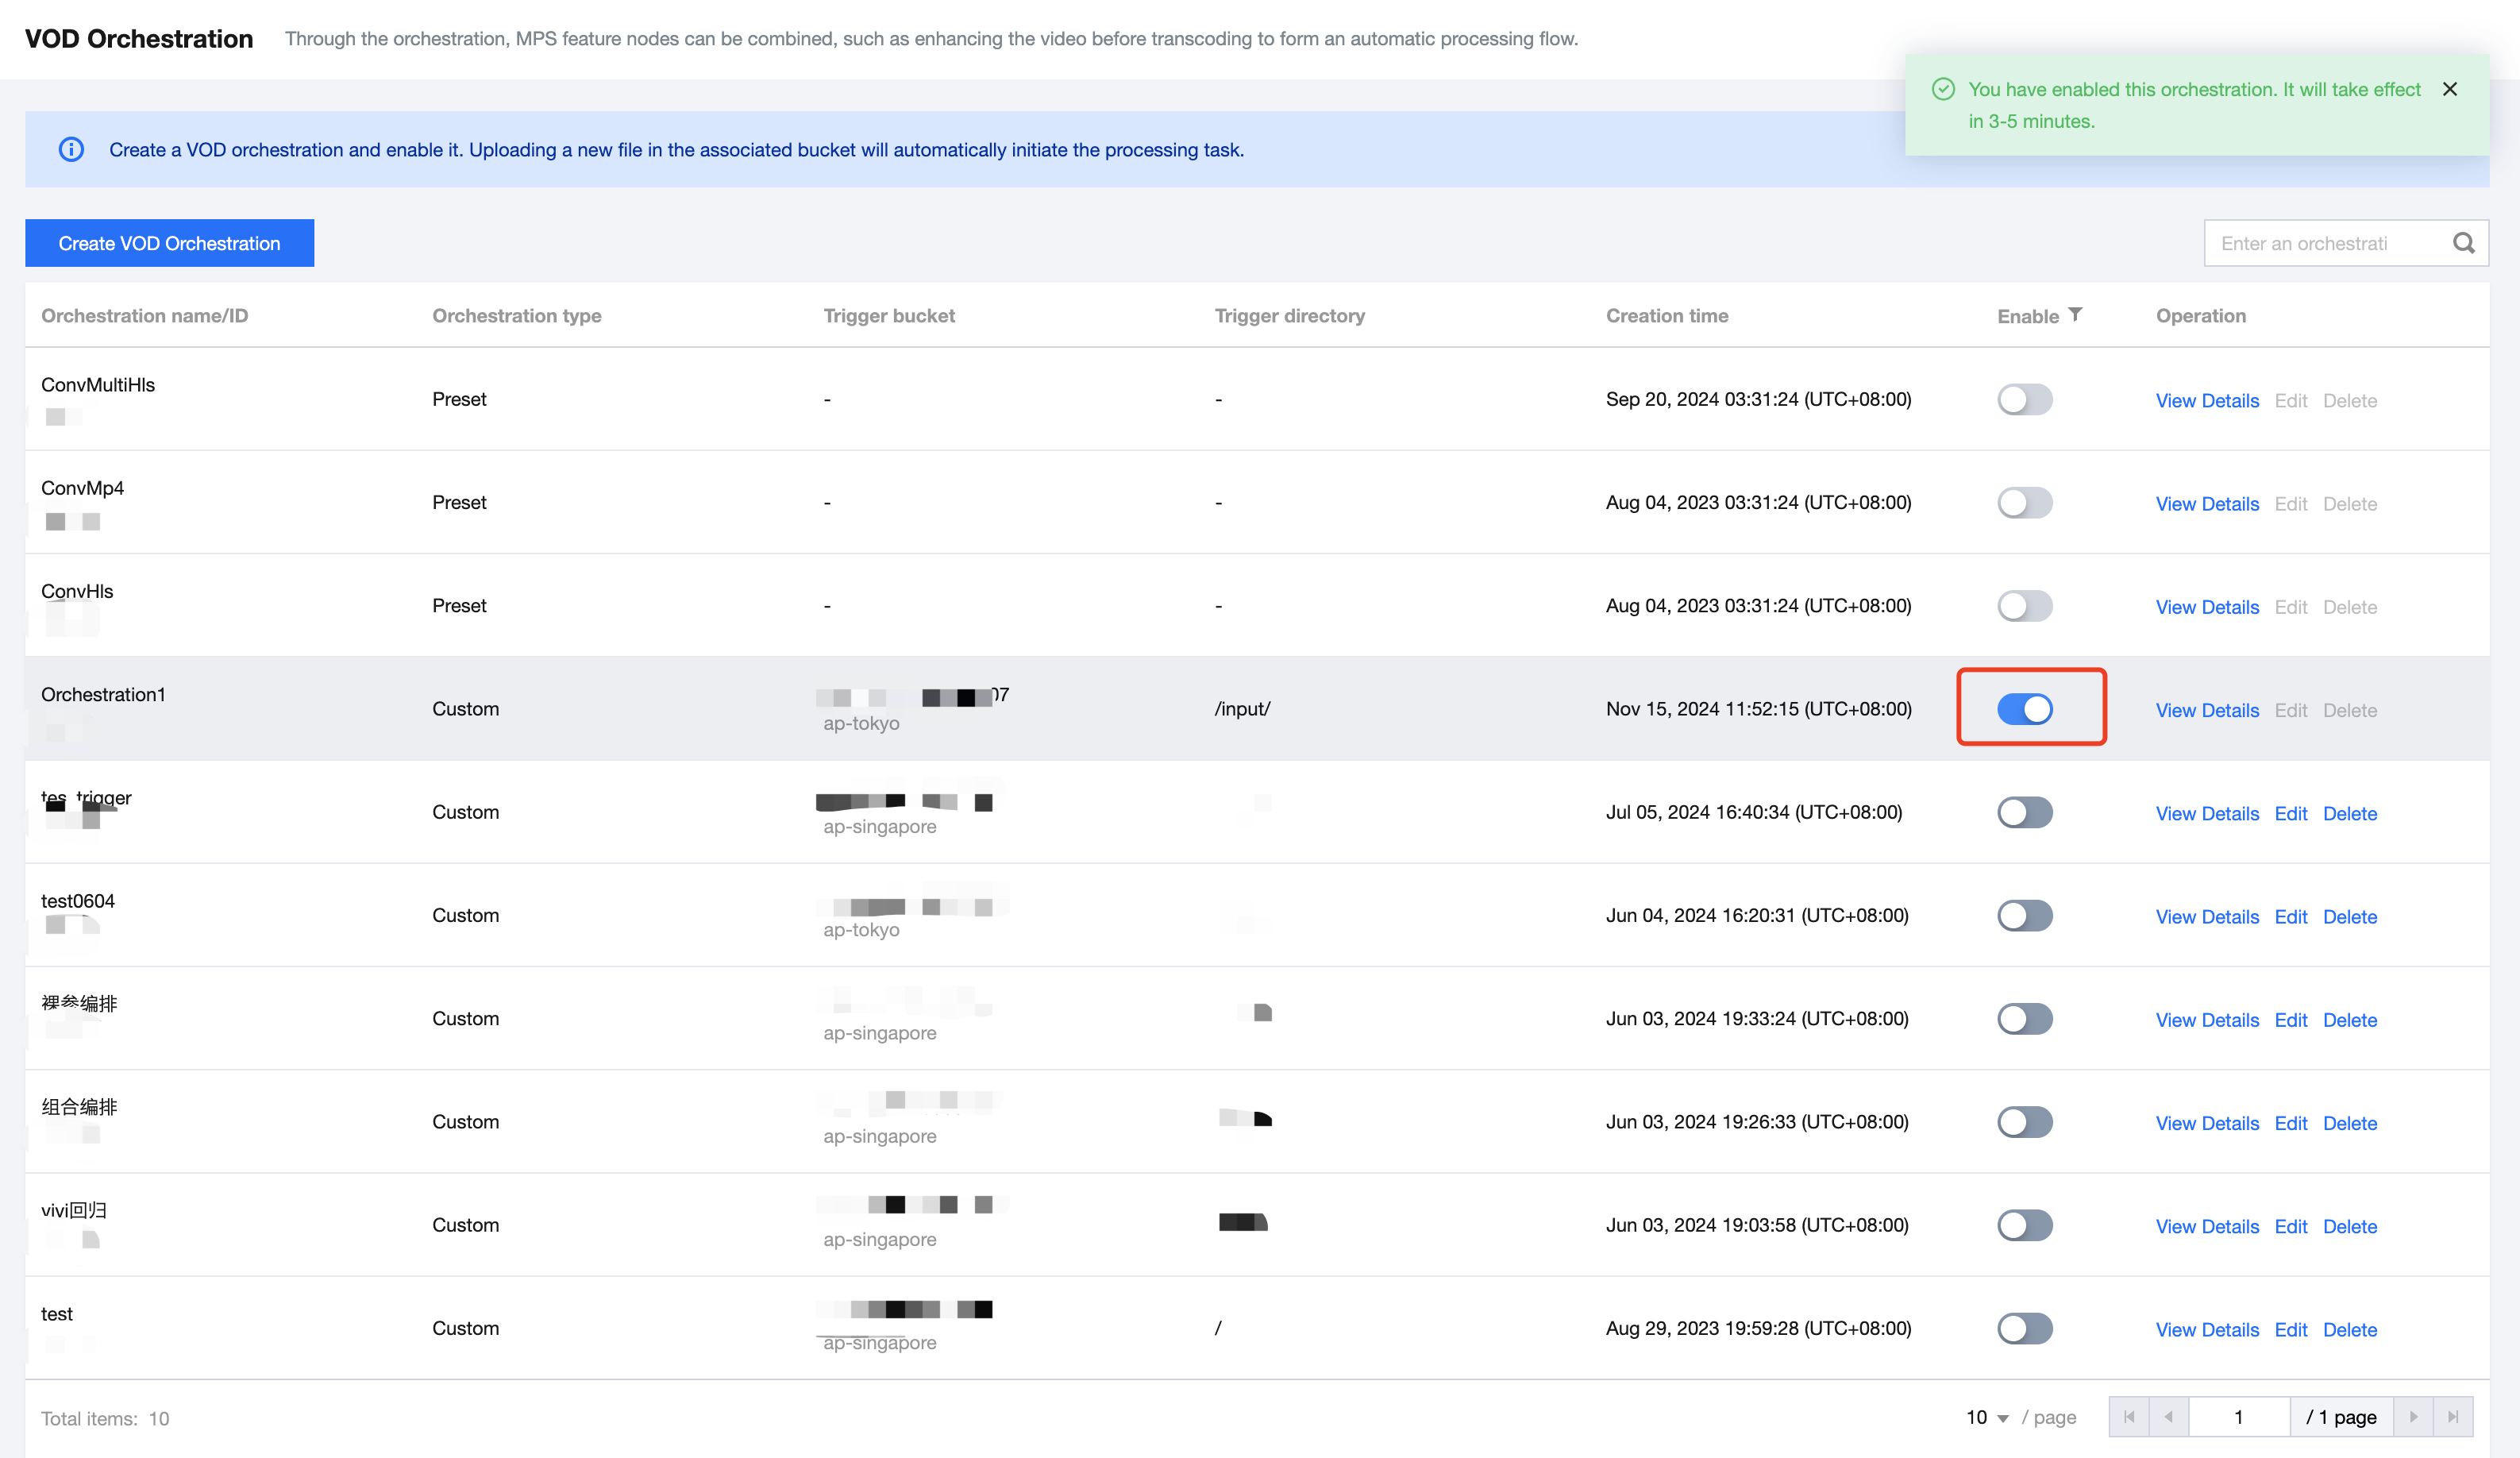
2. Go to the VOD Orchestration list, find the new orchestration, and enable the switch at Enable. Subsequently, any new video files added to the triggered directory will automatically initiate tasks according to the preset process and parameters of the orchestration, and the processed video files will be saved to the output path configured in the orchestration.
Note:
It takes 3-5 minutes for the orchestration to take effect after being enabled.
Method 2: API Call
Call the ProcessMedia API and initiate a task by specifying the Template ID. Example:
{
"InputInfo":{
"Type":"URL",
"UrlInputInfo":{
"Url":"https://test-1234567.cos.ap-guangzhou.myqcloud.com/video/test.mp4"// Replace it with the video URL to be processed.
}
},
"SmartSubtitlesTask":{
"Definition":122,//122 is the ID of the preset Chinese source video—generate Chinese and English subtitles template, which can be replaced with the ID of a custom smart subtitle template.
"UserExtPara":""//Extended parameter.
},
"OutputStorage":{
"CosOutputStorage":{
"Region":"ap-guangzhou"
},
"Type":"COS"
},
"OutputDir":"/output/",
"Action":"ProcessMedia",
"Version":"2019-06-12"
}
If you create an orchestration in the console, you can also call the ProcessMedia API to initiate a task by specifying the Orchestration ID. Example:
{
"InputInfo":{
"Type":"COS",
"CosInputInfo":{
"Bucket":"facedetectioncos-125*****11",
"Region":"ap-guangzhou",
"Object":"/video/123.mp4"
}
},
"ScheduleId":12345,//Replace it with a custom orchestration ID. 12345 is a sample code and has no practical significance.
"Action":"ProcessMedia",
"Version":"2019-06-12"
}
Note:
If there is a callback address set, see the ParseNotification document for response packets.
Using Extended Parameters to Customize Features
Smart Subtitle offers various custom features that can be enabled via the extended parameter UserExtPara. The extended parameter is a serialized JSON string. Below is the list of supported extended parameters:
Parameter Name
Parameter Type
Description
Reference Value
need_wordlist
int
Whether to return word timestamps (not supported by some templates). Default: not return.
1: Return word timestamps.
1
accurate_mode
int
Whether to enable precision mode. Precision mode is an optional feature that provides more accurate timestamps. Default: disable.
1: Enable precision mode.
1
adapt_words
string
Hotword text. For the specific format, see Custom Hotword Lexicon. This is suitable for scenarios with uncertain hotwords. You can customize hotwords per request, up to 128 entries.
Tencent Cloud|10, Media Processing Service|10
The above capabilities can be enabled simultaneously unless otherwise specified.
Subtitle Application to Videos (Optional Capability)
Call the ProcessMedia API, initiate a transcoding task, specify the vtt file path for the subtitle, and specify subtitle application styles through the SubtitleTemplate field. Below is an example of the input parameters. For details on how to initiate tasks in the console, configure subtitle styles, and more, see the description of burn-in subtitles in Audio/Video Transcoding Integration:
{
"MediaProcessTask":{
"TranscodeTaskSet":[
{
"Definition":100040,//Transcoding template ID. It should be replaced with the transcoding template you need.
"OverrideParameter":{//Overwriting parameters that are used for flexibly overwriting some parameters in the transcoding template.
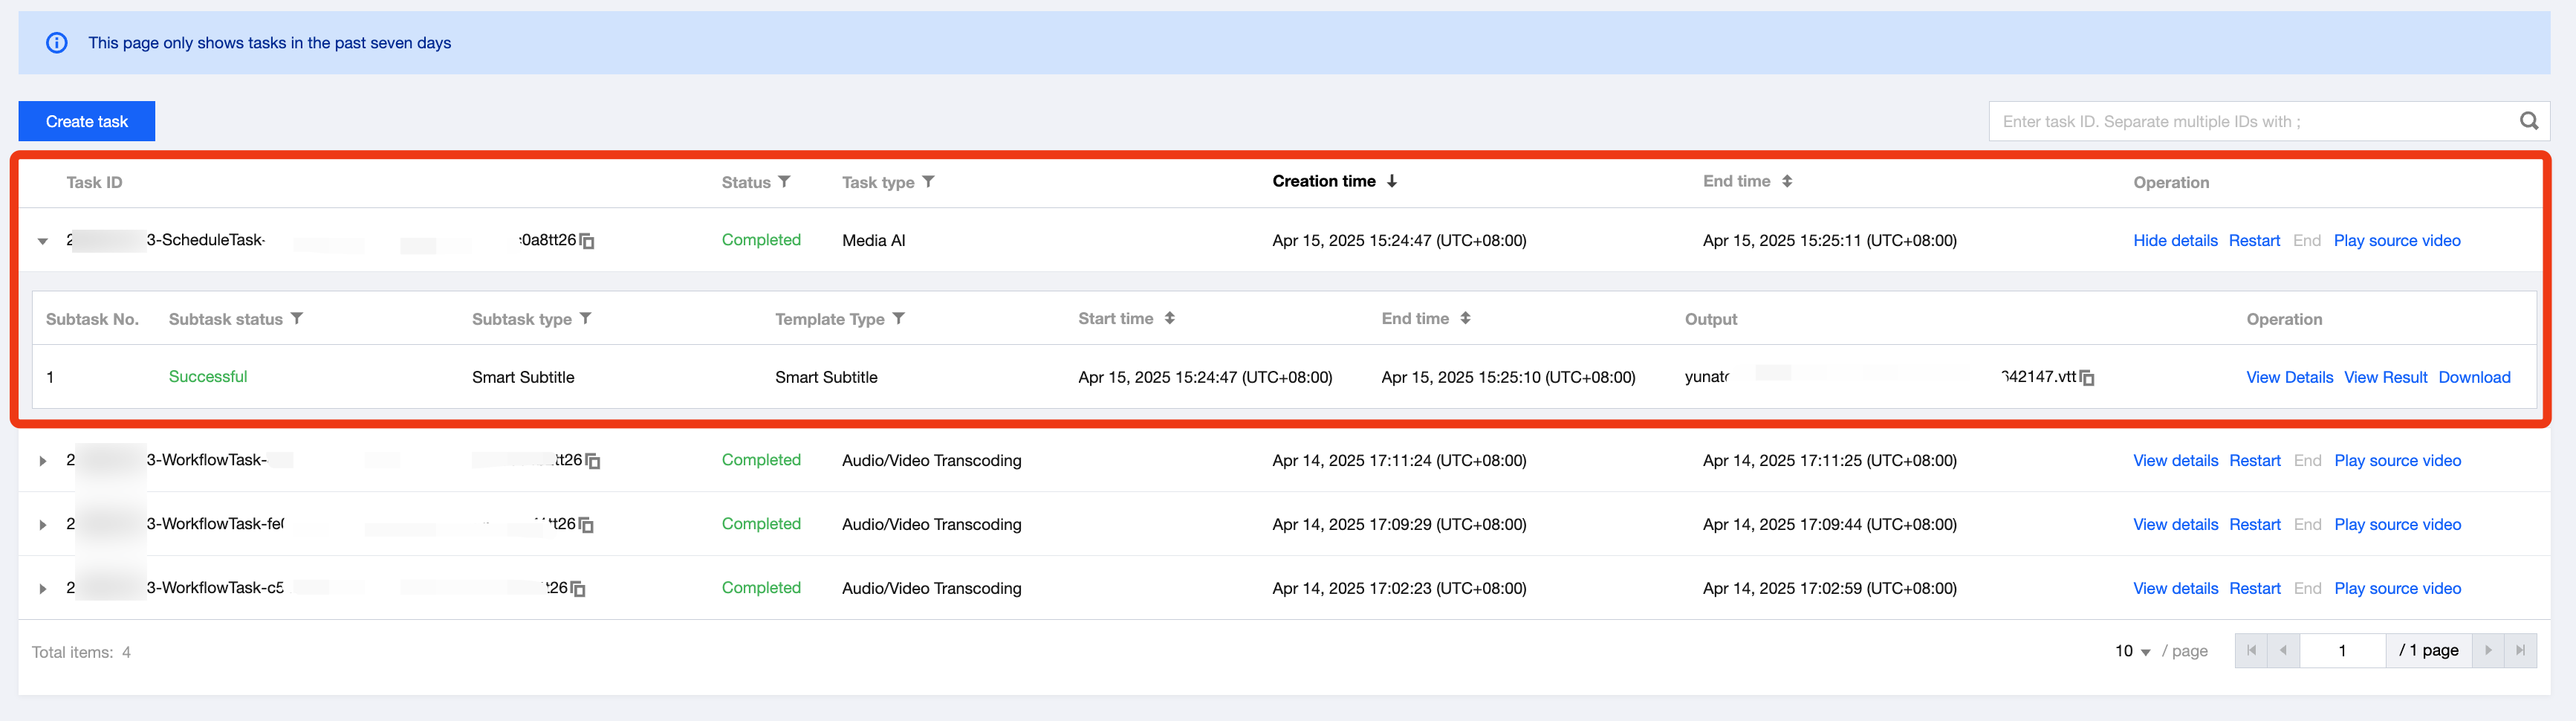
1. Navigate to the Offline Task Management in the console, where the list will display the tasks that have just been initiated.
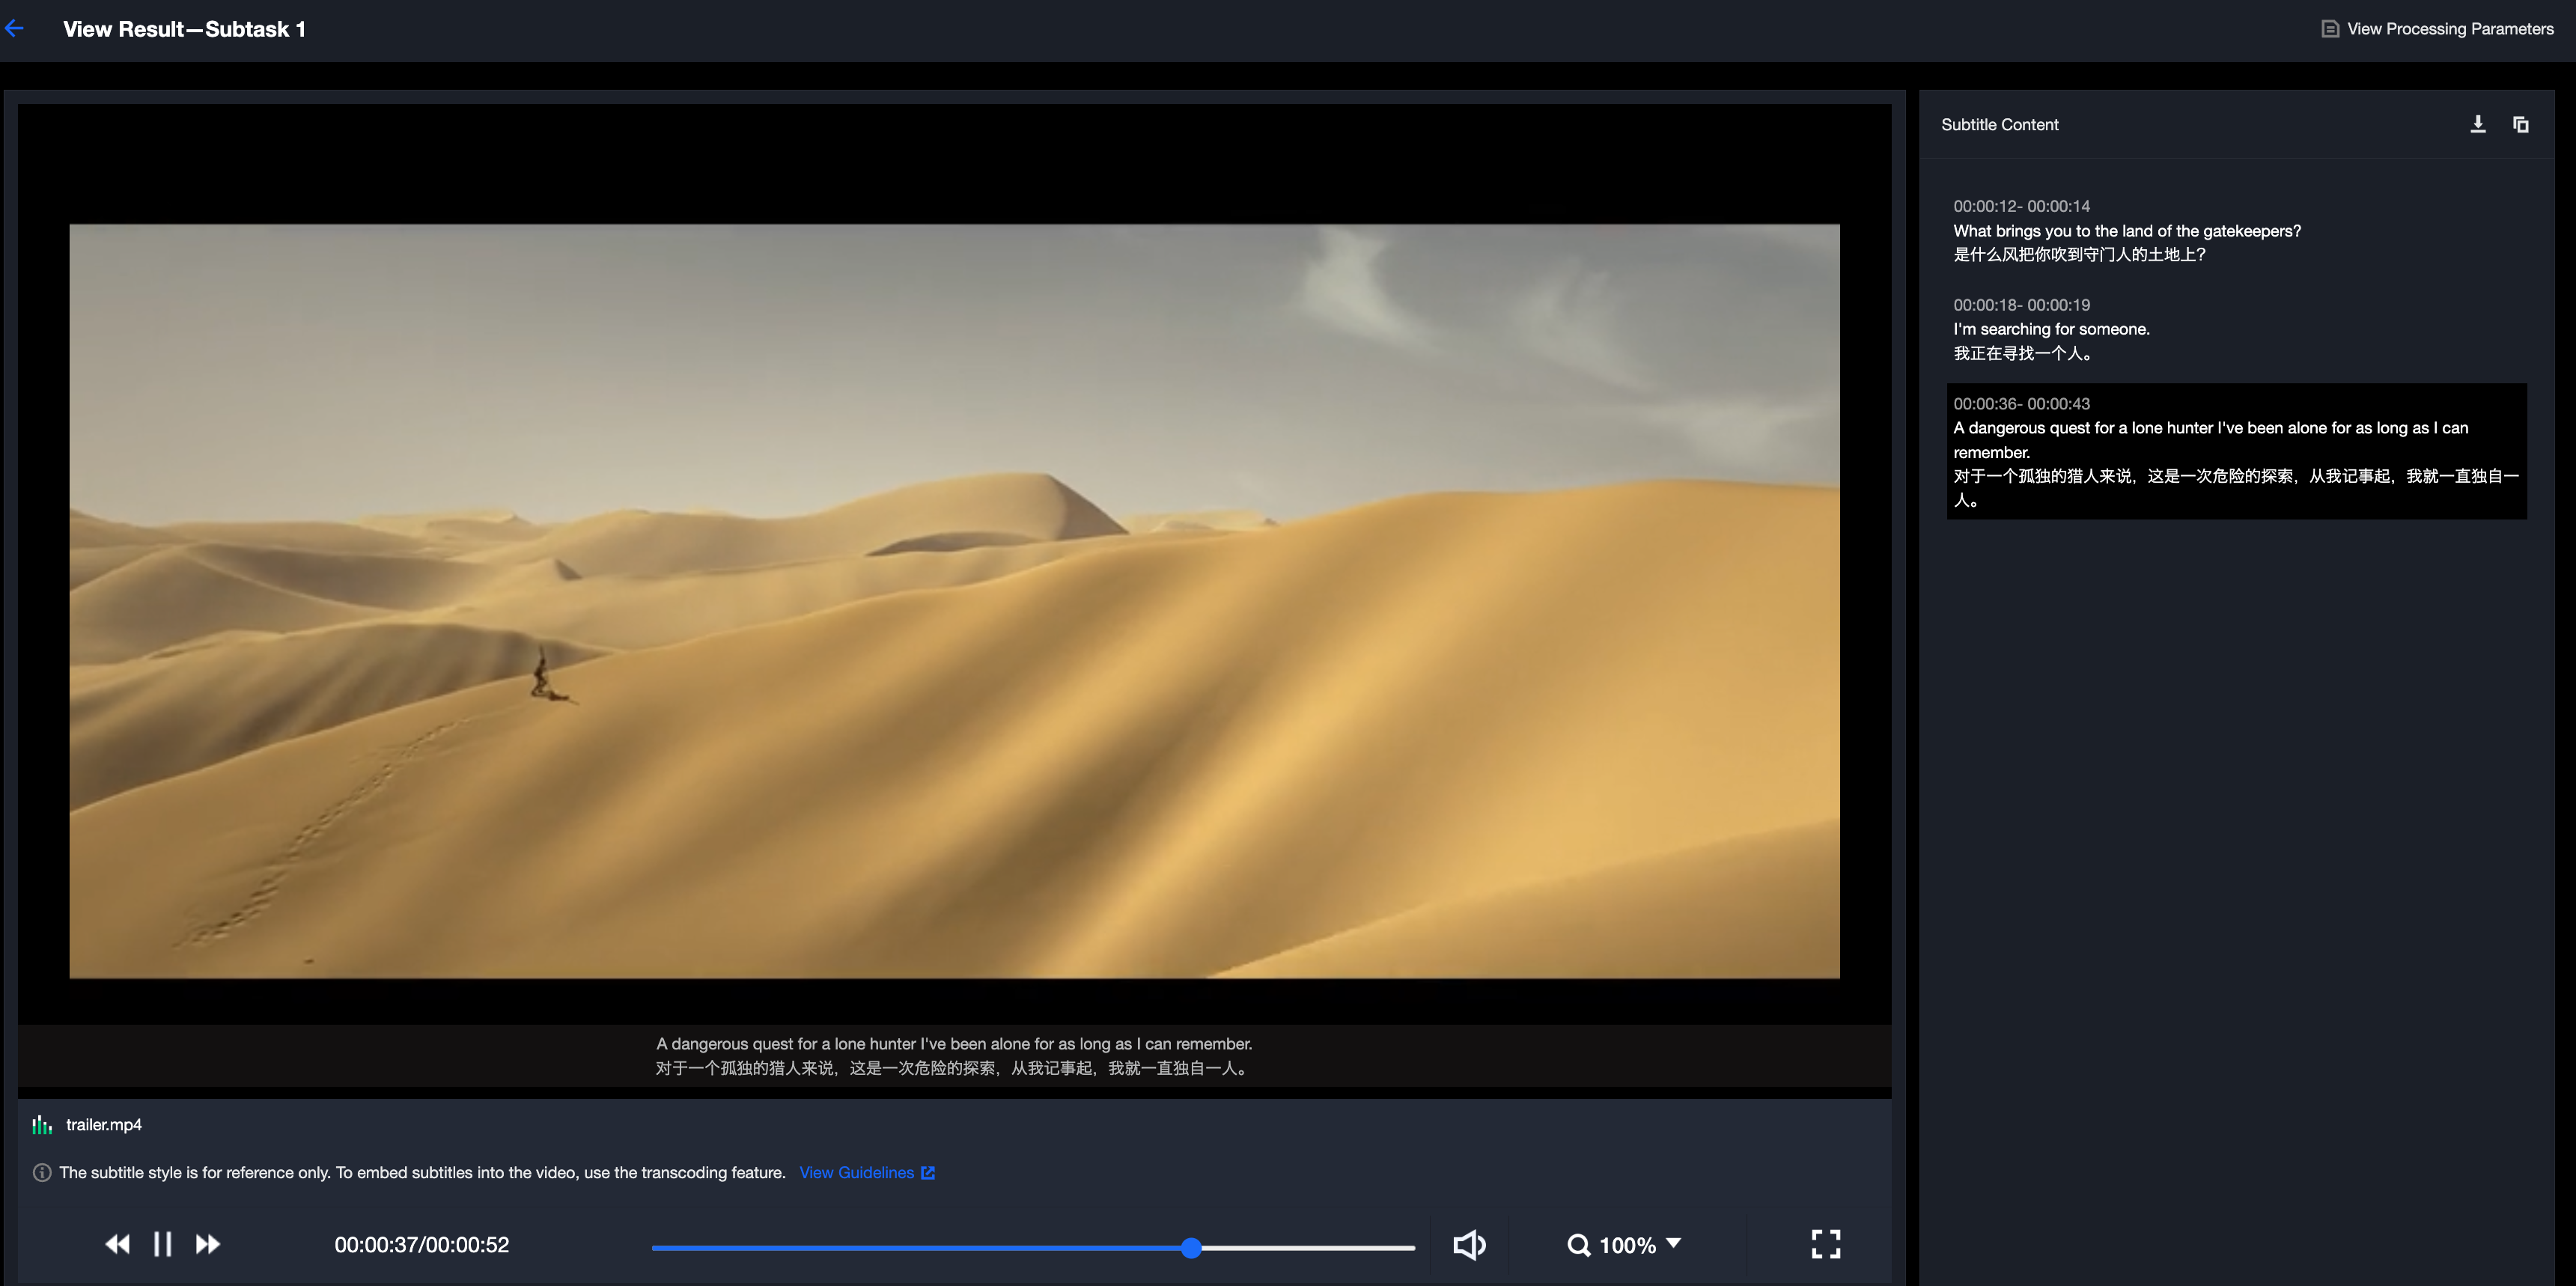
2. When the subtask status is "Successful", clicking on View Result allows for a preview of the subtitle.
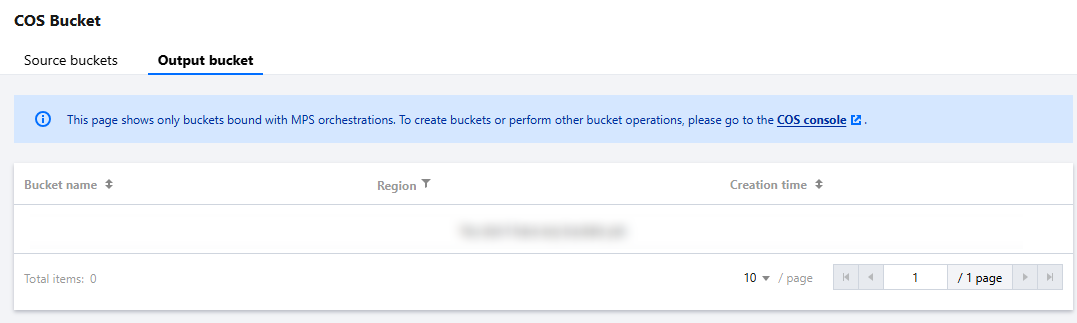
3. The generated VTT subtitle file can be found in Orchestration > COS Bucket > Output Bucket.
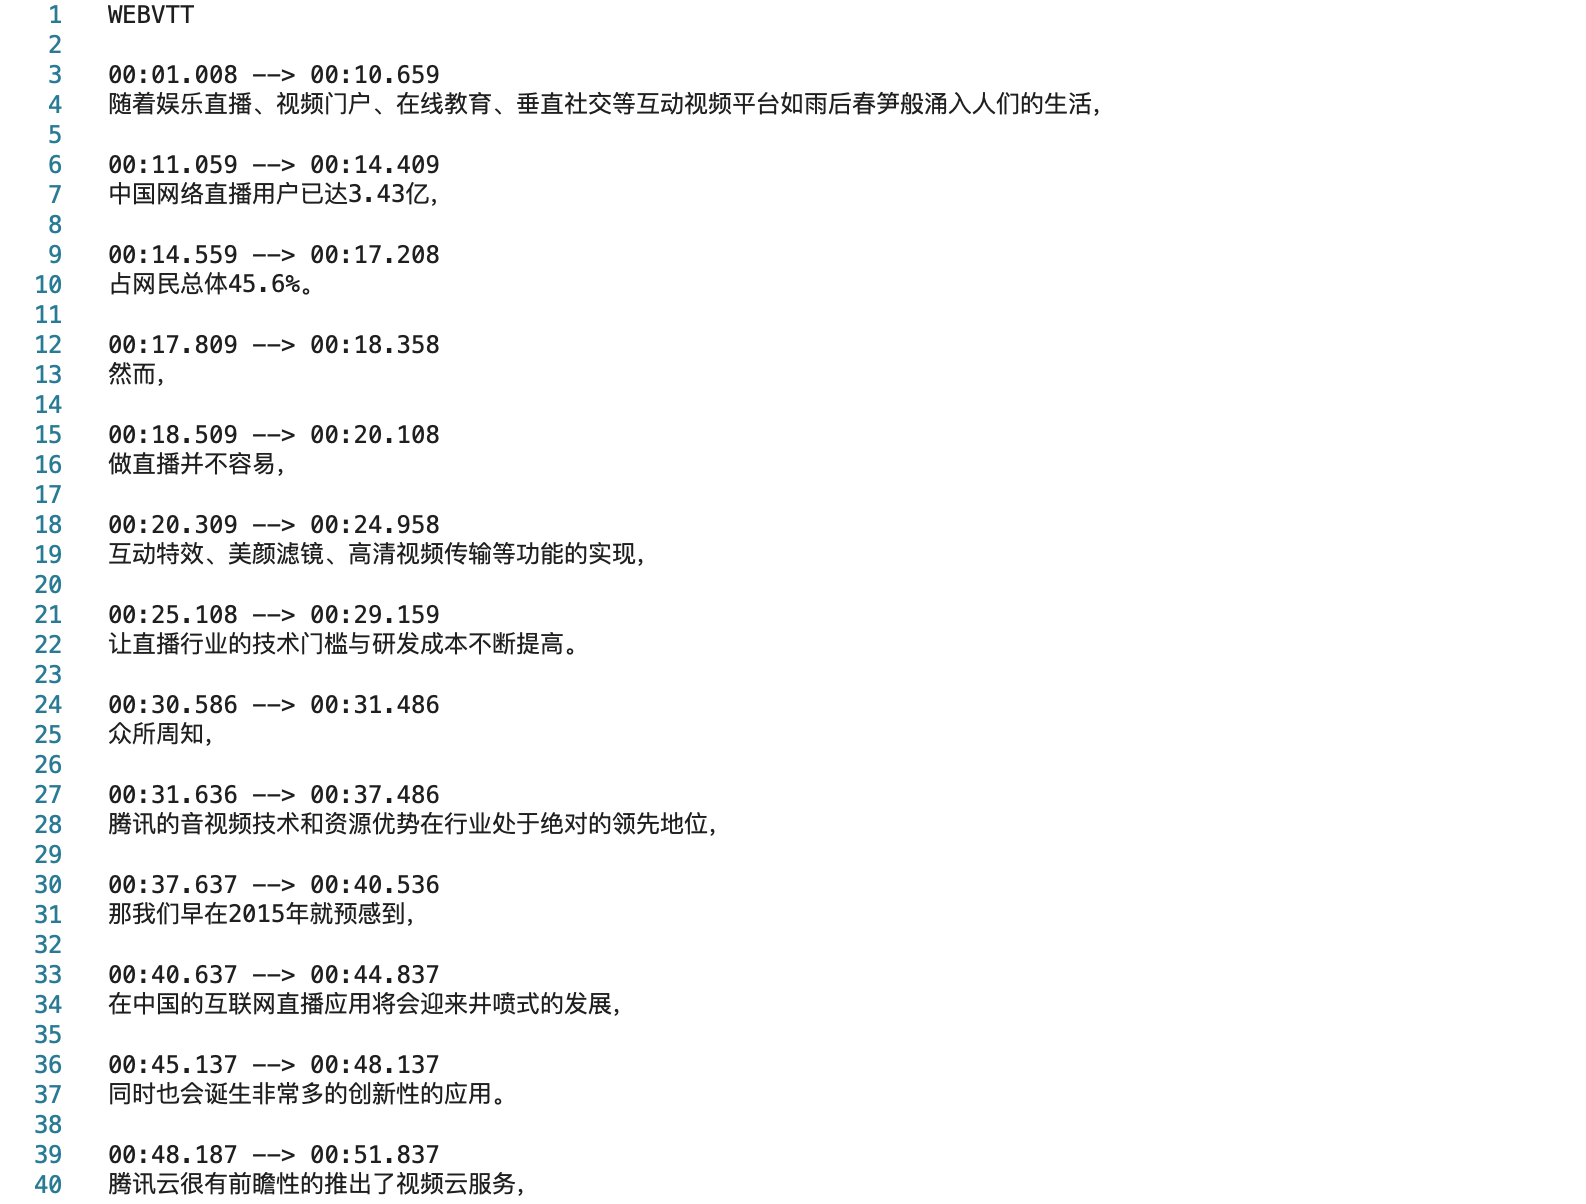
Sample Chinese subtitles:
Sample Chinese-English subtitles:
Event Notification Callbacks
When initiating a media processing task with ProcessMedia, you can configure event callbacks through the TaskNotifyConfig parameter. Upon the completion of the task, the results will be communicated back to you via the configured callback information, which you can decipher using ParseNotification.
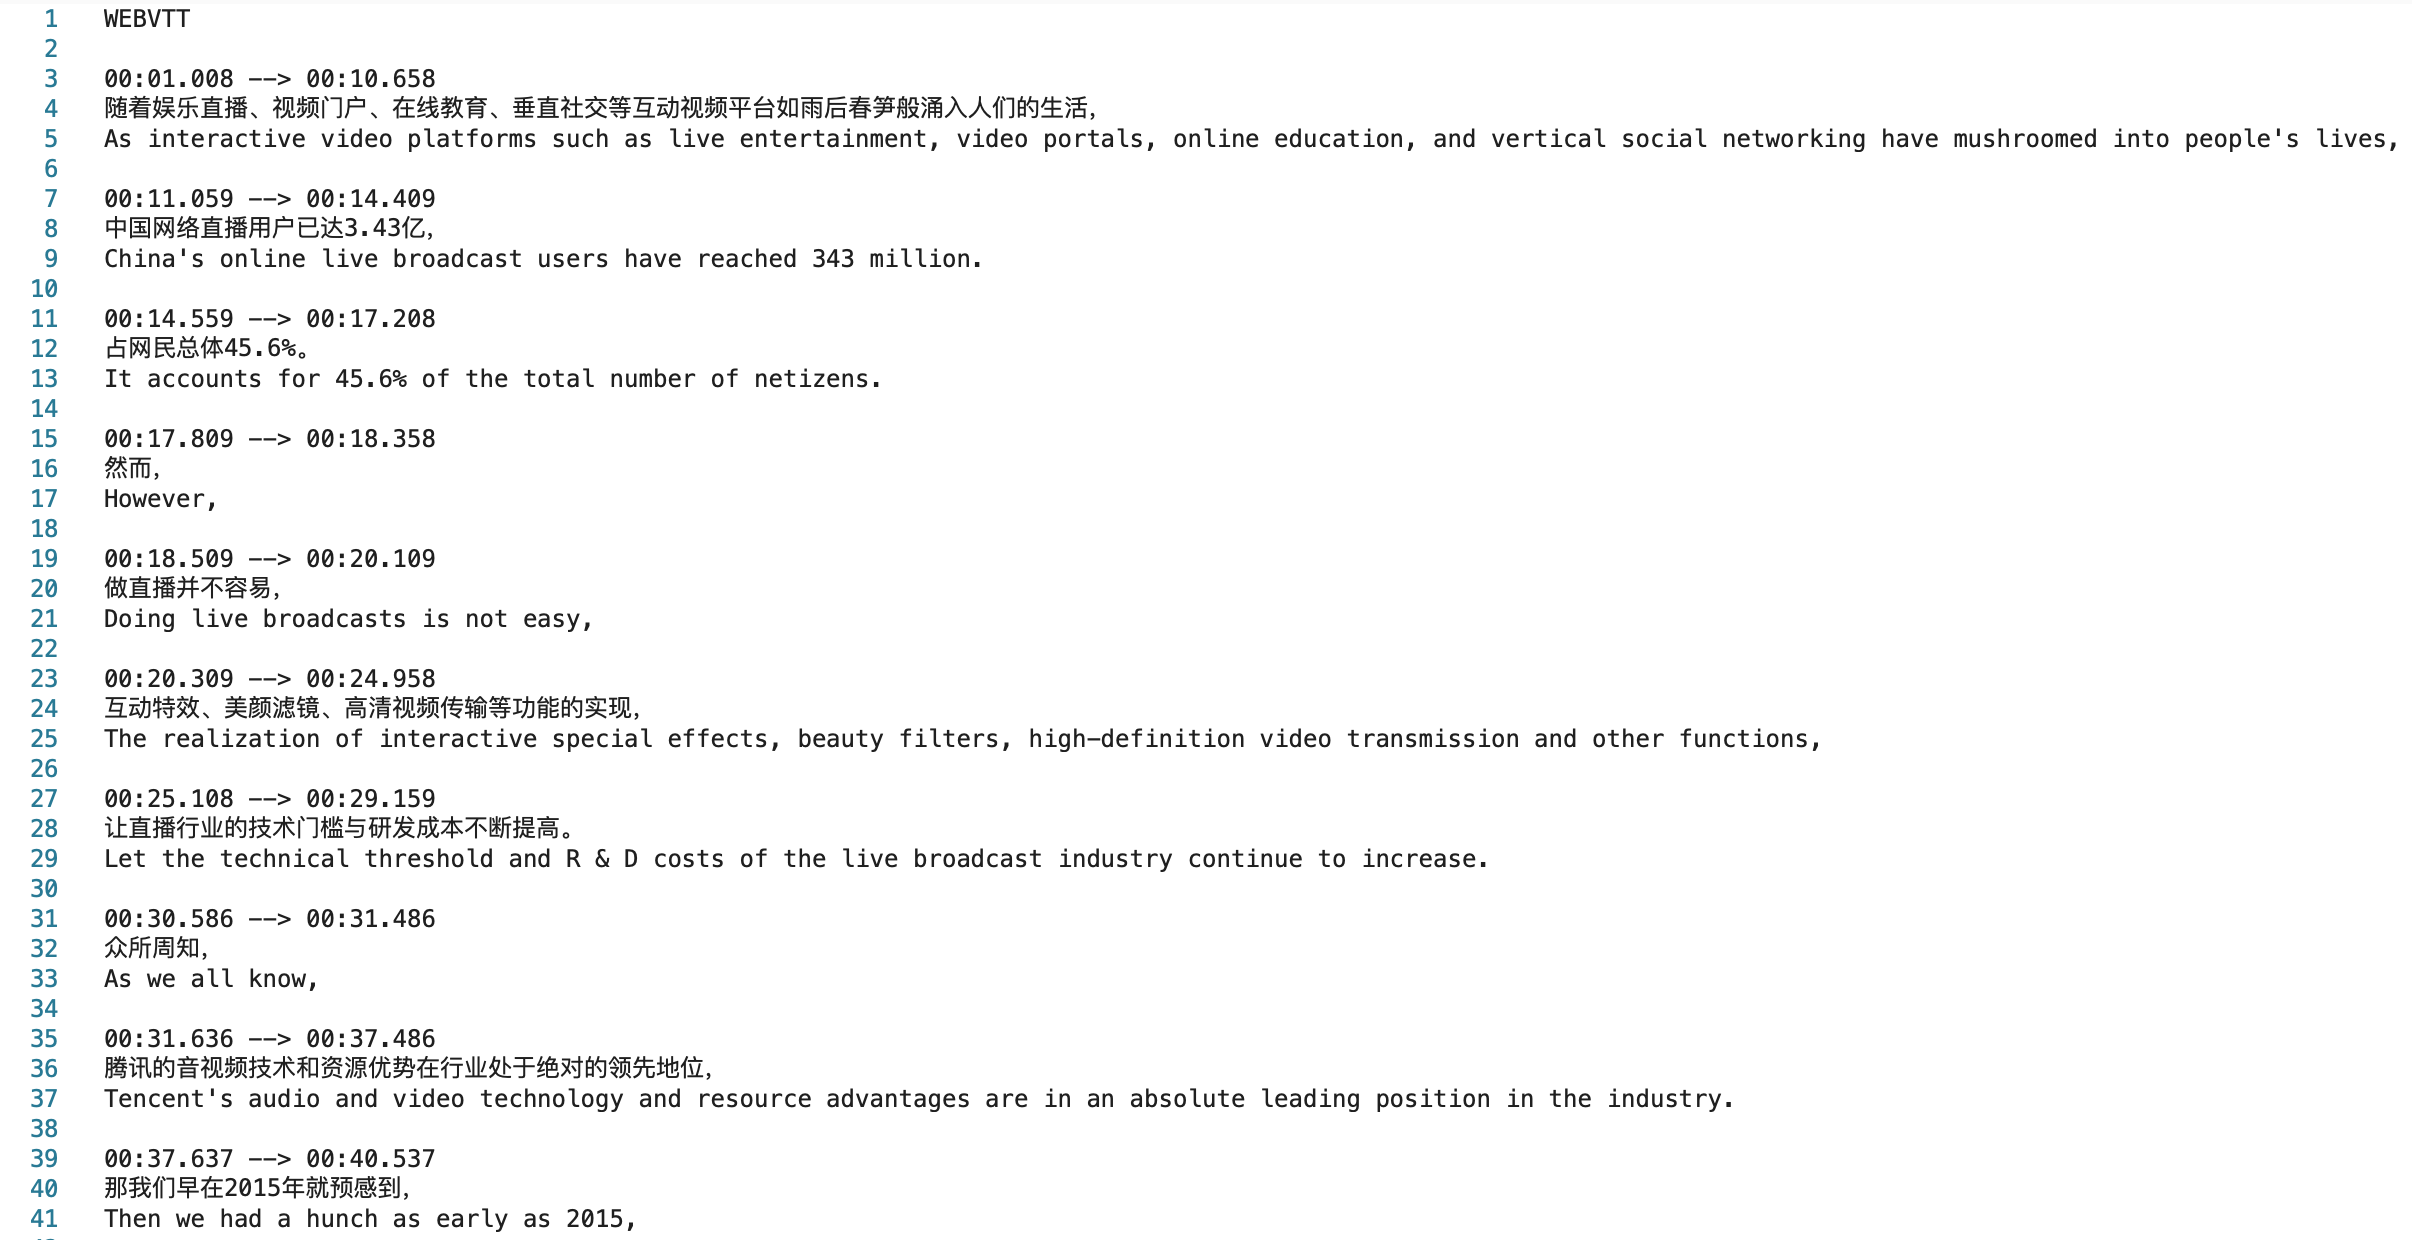
Querying Task Results by Calling an API
Call the DescribeTaskDetail API and fill in the task ID (for example, 24000022-WorkflowTask-b20a8exxxxxxx1tt110253 or 24000022-ScheduleTask 774f101xxxxxxx1tt110253) to query task results. Example:
Scenario 2: Live Streams
There are currently 2 solutions for using subtitles and translations in live streams: Enable the subtitle feature through the Cloud Streaming Services (CSS) console, or use MPS to call back text and embed it into live streams. It is recommended to enable the subtitle feature through the CSS console. The solution is introduced as follows:
Method 1: Enabling the Subtitle Feature in the CSS Console
When the transcoding stream (append the transcoding template name _transcoding template name bound with the subtitle template to the corresponding live stream's StreamName to generate a transcoding stream address) is obtained, subtitles will be displayed. For detailed rules of splicing addresses for obtaining streams, see Splicing Playback URLs.
Note:
Currently, there are 2 forms of subtitle display: real-time dynamic subtitles and delayed steady-state subtitles. For real-time dynamic subtitles, the subtitles in live broadcast will dynamically correct the content word by word based on the speech content, and the output subtitles change in real time. For delayed steady-state subtitles, the system will display the live broadcast with a delay according to the set time, but the viewing experience of the complete sentence subtitle mode is better.
Method 2: Calling Back Text through MPS
Currently, it is not supported to use the MPS console to initiate live stream smart subtitle tasks. You can initiate them through the API.
Currently, using MPS to process live streams requires the use of the Intelligent Identification template. This is achieved using Automatic Speech Recognition or speech translation.
"Definition":10101//10101 is the preset Chinese subtitle template ID, which can be replaced with the ID of a custom intelligent identification template.
Scenario 3: Processing Private Audio Streams via WebSocket
In scenarios such as video conferencing and duplex voice, audios can be transmitted to the recognition and translation services via WebSocket, and the results can be returned over the same protocol. Recognition, recognition and translation, and simultaneous recognition and translation of multiple real-time audio streams are supported. Real-time subtitles can be output in the steady-state or gradient mode. For details about the protocol, see WebSocket Protocol for Recognition.
Sample code:
#!/usr/bin/env python3
# -*- coding: utf-8 -*-
import argparse
import struct
import time
import os
import signal
import sys
import hashlib
import hmac
import random
from urllib.parse import urlencode, urlunsplit, quote